Showing posts with label blockette. Show all posts

Wednesday, November 12, 2014

Blockette's Necklace

Blockette designed this necklace over the summer.
 I put the whole thing together for her because working with tiny jump rings can be tricky for an almost 9 year old (at the time).
She fell in love with this giant bag of key charms.  
I love how the whole thing looks antique-y, but the charms are made of plastic!

Looking at the necklace now, the keys are just the right size for fairy houses. 
 No wonder she likes them so much!

Monday, November 3, 2014

Halloween 2014

This year Blockette wanted to be Athena.  I think this was the first year I said, "Yeah, I can do that!"
without hesitation.

 Everything just sort of fell together.  AND I spent less than $10 on supplies.  Over half that cost was because I bought 3 different shades of gold paint in order to get the color I wanted.

The owl was borrowed from my mom.  The tunic was from last year's Medusa costume.  I already had the purple fabric.

                         
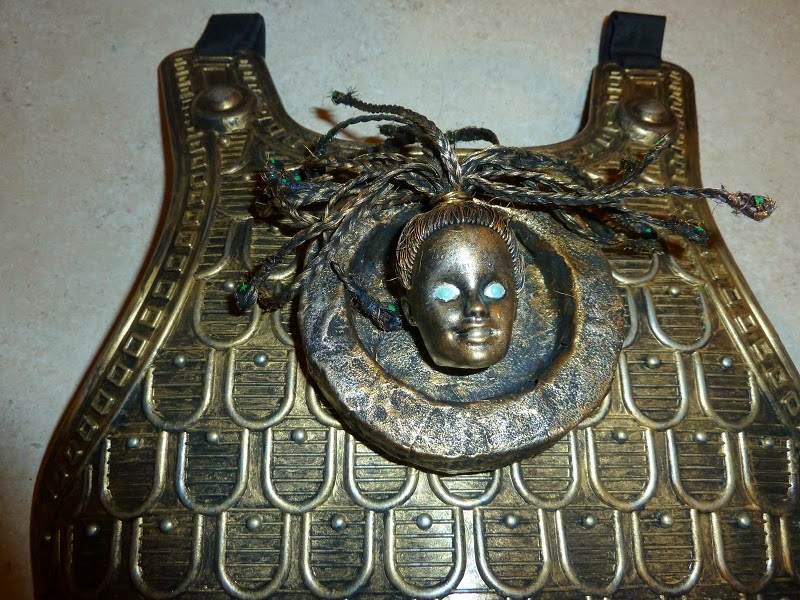
 Blockette's armor was a plastic black and silver colored breast plate armor I found at the dollar store.  Medusa's head is also a dollar store find.  I made the medallion out of paper mache.  Barbie and the medallion both got a base coat of matte black spray paint before being dry brushed with several different coats of gold acrylic paint.  Since the breast plate was already black, it saved me the spray paint step.  I gave everything a coat of clear matte spray paint too.
 If you look closely at Medusa, you can see that each of her hair braid snakes have green eyes.  Also, her eyes glow in the dark, courtesy of some blue glow in the dark nail polish.

Then, there is THE HELMET....


I'm so proud of this thing.  It's made of cardboard, paper mache, brown paper bags and paper towels.  oh yeah...and the bristles of a broom.  The pictures do NOT do it justice.  It looks WAY cooler in person.  I followed these tutorials from Constructables and Instructables, for the construction of the helmet.  Then, because I hadn't done papermache for nearly 30 years, I followed these instructions from DLTK.

The helmet took about 3 weeks, including researching and planning.  It was a lot of hurry up and wait because I'd cut something out and then have to wait because my model was in school, or because I was waiting for the layers of paper mache or coats of paint to dry.

A fun side note: the circular medallion like objects on the helmet are cut from paper towels!  They gave the perfect amount of texture when dry brushed with gold paint.

The bristles on top of the helmet are from a broom.  I thought about painting them red, but was afraid it might not turn out right, so I left them black.  I think the contrast looks very striking.

Finally, I used the handle from the broom for the spear.  The tip of the spear is cut from a sheet of glittery craft foam that had a sticker backing.

Blockette wanted to wear sandals trick or treating.  I told her that her toes would freeze and fall off.  Instead we decided that it would be ok for her to wear her tennis shoes.  After all, they were Nike. Nike was the goddess of victory, and Blockette thought the pun was really cool!


Friday, February 21, 2014

Jalapeno Bagels

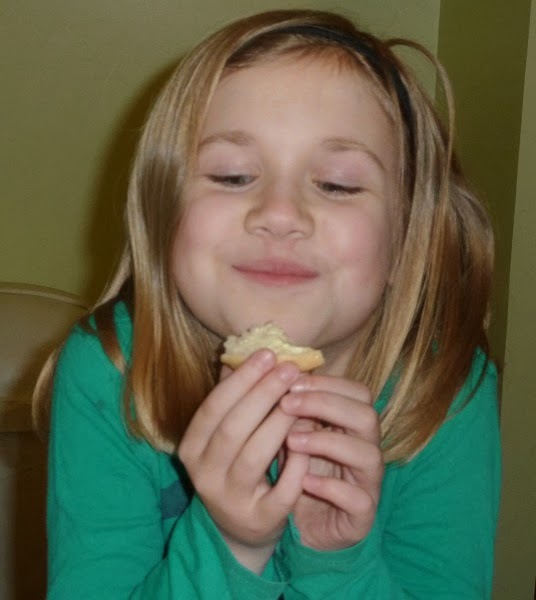
Last year Blockette's class read a book called Jalapeno Bagels.  At the end of the discussion period, the teacher brought in jalapeno bagels and cream cheese.  Blockette could not stop talking about how great those bagels were, and "when would I make them?"

I found a great recipe over at Veggie Mama, but the timing was never right.  It was too hot, I didn't have the ingredients, we had too many other bread products in the house, I was lazy, etc.  Over one of the many cancelled school days we had this winter, the universe aligned, and Blockette and I made Jalapeno Bagels.

As neither one of us is all that keen on heat, I erred on the side of caution and used only 1 jalapeno.  I think they would have tasted better with a bit more of a kick to them.  Next time I will use 2 jalapenos.

While I was mixing up the dough, Blockette exclaimed, "Where are the red bits?!  The ones we had at school had red bits."  As luck would have it I had some roasted red peppers in the freezer.  I used 1/4 of a pepper, but I think 1/2 a pepper would have been better.


Jalapeno Bagels adapted from Veggie Mama
1 3/4 c lukewarm water
1 t dried yeast
2 t salt
1 1/2 T sugar
5 c flour
1-2 jalapenos, minced
1/4-1/2 roasted red pepper, diced
:
Mix water, yeast, salt and sugar and let proof for 5 min. Add flour.  When all the flour is combined, add jalapenos and red peppers. Knead for 10 min on low speed, adding more flour if needed until dough is stiff. Let dough rest 10 min, then divide into 12 pieces.  Roll dough pieces into balls and make into "O" shape by sticking your thumb through the middle and gently stretching out the circle.  Alternately you can roll into a snake and overlap the ends to make a ring.  Cover with plastic wrap and let rise 1-1 1/2 hrs. Fill large pot with water and bring to a boil. Place bagels in boiling water until they float to the top – about 20-40 seconds.  Remove bagels to drain on parchment.  Transfer to baking sheet.  Bake at preheated oven at 375 for 30-50 min, or until outside is golden brown.  Let cool before slicing. 

Monday, July 15, 2013

Five Cross Stitch Bookmarks

I made these five bookmarks for various teachers at the end of the school year. 


They were a big hit with the recipients.  Now all I have to do is figure out what to make for an end of the year gift next year as Blockette will have some of the same teachers she had last year.  Luckily I have LOTS of time to solve that dilemma.

Tuesday, June 25, 2013

More Artwork from Blockette

Earlier this month my family and I participated in Relay for Life.  Our team had some kid's games at the event as a fundraiser.  One of the games was a fishing game.  Blockette designed the screen for the kids to fish over. 

She was a bit overwhelmed with the huge scale she needed to draw in, so I told her that she should just draw it on regular sized paper and I would enlarge it.  If there's any art that I'm good at, it's putting something on a grid and enlarging it...original ideas...not so much.  That's Blockette's department!

I wound up having to paint the cardboard because the paint was quite uncooperative.  No matter how hard I tried, the paint only wanted to stick on in a single coat.  Every time I attempted a second layer, I only managed to remove the paint in the first layer.  I am not ashamed to say that I yelled at that cardboard on more than one occasion.

It all turned out in the end.

I think it's adorable...especially the expression on the mermaid who sees the fishing pole with bait!  Not in a million years would I have thought to do that.  That's why we pay the big bucks for Blockette to do these sort of creative endeavors.

Tuesday, May 28, 2013

Robe for Blockette

We are trying to teach Blockette to be modest.  This has involved her wearing a robe when she comes out of the shower instead of making a nakid dash from the bathroom to her bedroom. 

Wouldn't you know it but the kid outgrew the durn thing?  The nerve of the child.

Do you have any idea how hard it is to find a robe this time of year?

IMPOSSIBLE!!!!

Because apparently kids only wear robes when it's cold out.  Sigh.

So I tried to find some free instructions for making a robe online.  I came up with this and this.  Except it wasn't exactly what I wanted.  Then I realized what I wanted was a smaller version of a rob I had bought back in the late 80's.  It's so old that I got it from Pier One Imports back when they sold clothing.  Anyone else but me remember that?

So I traced the robe and scaled it down a bit, but not too much because I didn't want to have to make another robe next year. 

My bestie was even nice enough to let me go shopping in her fabric stash.  I found this nice purple lightweight paisley stuff.  It worked perfectly.


Please excuse the weird photo.  Apparently we must twirl when I'm photographing clothing.

Blockette says she feels like she is wearing a kimono, in a good way.  She's actually not too far off.  It's really a lot like a summer kimono called a yukata

Friday, May 17, 2013

We're So Picky!

I hate my bathroom.  It's sooo UGLY.  Although, it is an improvement from when we moved in 7 years ago.  It had fake plastic tile sheeting on all the walls.  Like the stuff you might line a shower with.  Over all the walls. 

And when we took that down...Pepto Bismal pink walls.

Did I mention the cabinet and floor were green?

Yeah.

We repainted the walls but the cabinets and floors were a project that got moved to the bottom of the list.  They are still at the bottom of the list.  And I still hate them.

Blockette didn't quite understand how I could not like the bathroom when my favorite color is green.  I like green, just not that shade of green, and not in my bathroom.

Now when I say the cabinets are green, I mean they are mostly green.  Whoever painted them, just took the cabinets that were there for God knows how long and painted them.  They did not sand them first.  How do I know this?  The paint is peeling off the cabinets.

I got sick of looking at the peeling paint and in 15 min Blockette and I did this:

Here's a close up:

And of the other side:

We did this with our fingers.  The paint came off in great big sheets.  There is something so satisfying about peeling off great big sheets of ugly paint.  Sort of like peeling a sunburn, without the pain of getting burned in the sun!

Blockette is hooked on paint peeling.  Every time we are in there at the same time she asks when we can do it again.  I think a few more steamy showers and we'll have another go at a peel-o-rama.  I figure by the end of the summer we'll have the entire cabinet stripped of all it's paint!

Tuesday, May 14, 2013

Kiln Fired Bird

Lookie what Blockette made for me for Mother's Day!


She made it in art class in school. 

I love how the wing is textured, and the multicolored tail, and it's black hair.  What?  You've never seen a bird with hair before?  You must live a very sheltered life cause I have one hanging in my kitchen now!

Blockette was soooo proud when she gave it to me.  Her face was practically glowing!  She was so happy I thought she was going to cry!  Somehow that makes the gift all the more special, knowing she felt she worked hard and did her best on it.

Monday, May 6, 2013

Easy Circle Skirt for Blockette

When my best friend was clearing out her fabric stash she had this fabric with a stamped pattern for a circle skirt.  The only thing is that it called for a zipper. 

Only I don't do zippers.
Or windows.

Then I realized that the waist opening would be the right size for Blockette without a zipper.  So a hem and some elastic were all I needed to do.  Awesome! 


This was one of those things I made for Blockette without asking her if she'd like it.  I took a risk and it paid off.  

At first she was a bit leery of the skirt.  She'd never had a long skirt like this before.  Of course she was sold once she took it for a twirl.

My favorite part is that it can be worn with nearly every short sleeve shirt she has in her drawer. 


Monday, April 29, 2013

Nature Weaving


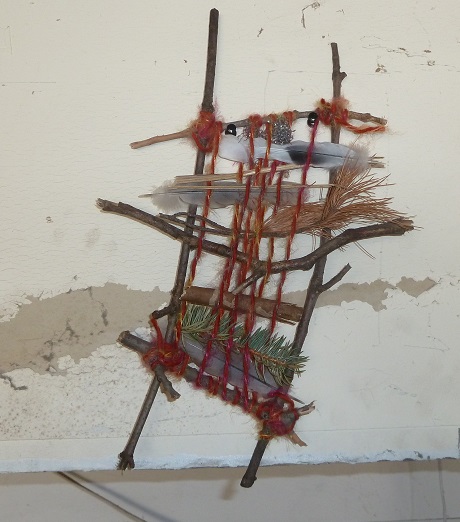
We made these nature weavings way back at the end of March, over Spring Break.  
I got the idea from the Blog: In These Hills.


We assembled the looms from sticks in our back yard, and scrap yarn.


Then we went for a walk around the block and wove them into our loom on the spot.
This was harder than it might seem because it was quite cold and we were weaving the items in with our gloves on.  Some of the things, particularly the pine branches, wanted to stick to our gloves instead of staying inside the weaving.

Blockette and I hung them up in the garage over a particularly ugly spot over the door into the basement.
I love that I get to see them everyday.

Wednesday, April 17, 2013

Blockette's Bike Basket

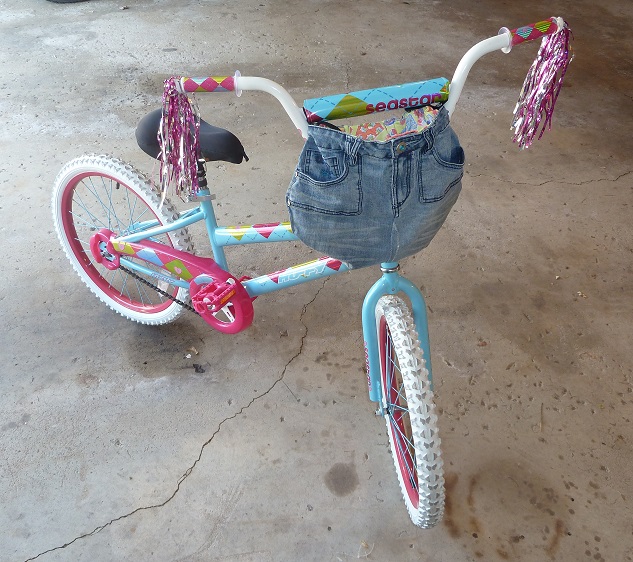
Blockette outgrew her last bike over the winter.  Mrblocko and Blockette went out and found this bike themselves.  On Clearance.  And it's girly!

This is her first girly bike.

We've been buying her boys bikes in the past because they felt so much sturdier.  What's the deal?  Girls can't be all rough and tumble with their bikes like boys?

Anyhow, Blockette has been wanting some way to carry her own water on Bike rides.  I thought about making her a super fancy basket but that seemed really complicated and beyond my sewing skills.

So I made this instead:

A jeans bike basket!

Over the winter my best friend gave me a bag of old holey jeans.  This pair happens to have belonged to her daughter.  Normally I'd hack off the legs and make cut offs for Blockette, however, there was also a hole in the crotch.  With all those seams meeting up it was just a bit too tricky for me to patch.  So into the crafting pile they went.

This pair of jeans just seemed perfect for this project.

Guess how it's attached to the bike frame?


The button elastic that was already inside the jeans! 

I can't stop patting myself on the back for that idea.  I'm not sure if it's ever been done before, but it was one of the few crafting creations I got from my own brain, not Pinterest or some random blog.

As I mentioned earlier, there was a hole and worn spot on the seam of the crotch.  I was worried about the stability of the bottom of the bag.  So I decided to line it.  The fabric is also from my bestie who was down sizing her fabric stash.  It's got little skirts all over it.  I thought that was a fun fabric to put on the inside of a bag that used to be a pair of pants.

Once I had the lining made I ran into a little issue.  Since I was using the elastic as a strap this meant I couldn't attach the lining where I wanted to.  Then I realized just about anywhere I wanted to attach the lining would require me to stitch through the belt loops.  I didn't want to do that either.  Then I realized I was going to have to stitch over the fly.  I wasn't sure how my sewing machine would handle that.

It must have been fate, because earlier in the week I had purchased some fabric glue for a different craft project.  This is the kind of fabric glue that once it drys is a permanent bond.  Whatever you glue can go in the washer and dryer, once the glue has dried.

This was the first time I've used this fabric glue.  So far it's held up great.

I was unsure if Blockette would like the jean basket/bag for her bike.  I wasn't sure I'd be able to make it successfully, so I didn't tell her until it was finished.  I almost gave up at least three times. I'm glad I kept problem solving and finally finished it because Blockette thinks it's awesome!  She even told me that she now has the coolest bike EVER. 

Tuesday, April 16, 2013

Kite Flying Weather

I love that we have this park so close to our house.  It's perfect for kite flying. 

You can't really tell in the photo, but Blockette's kite is a butterfly!

Here's a close up:
It was so windy on Sunday that it almost looked like the wings were flapping.  I think if it had been just a bit windier the kite might have broken.

Friday, March 22, 2013

Art Supply Organization

Blockette LOVES to draw.  Consequently, she has a nice stash of art supplies.  Previously we were containing them in these stackable bins.


They worked well for a while.  Then she had so many pencils and markers that every time you tried to find a particular marker, twelve would fall out.  The bins were over full, so they never ever got stacked.  So much for a space saving storage unit.

Then I saw this post from Curbly where they took an old shoe box and filled it with empty toilet paper tubes.  I mentioned this idea to Blockette and she thought it was awesome.

It took us a long time to collect up enough tubes.  Luckily, I discovered that for the shoe box I was using, I could get three sections out of one paper towel card board tube.  Every Wed when I helped out in the kitchen at church, I'd snag the empty paper towel rolls.

Finally, this weekend we had enough rolls to fill the box.

Here's what our new storage unit looks like:
 Blockette and I decided that the box would work best if the supplies were arranged in color groupings.  I love how you can find what you are looking for right away.

This box now holds all her pens, mechanical pencils, smencils, regular pencils, the gem topped fancy pencils she got from my uncle, colored pencils, twisty crayons, markers, paint brushes, popsicle sticks and scissors.

 And look:

Empty spaces!  That means she has room to grow and we won't be scrambling to find a new storage solution in 6 months.  Hooray!

She still has her crayons and art supplies of similar height in one bin.  They were too short for the cardboard rolls.  Blockette uses her crayons much less than she does her colored pencils.  Besides, as you can see by the first picture, even with all the random coloring utensils, the bin isn't too full to rummage through.

I did find this link for a different kind of art caddy using rolls of varying heights over at Instructables.  It reminds me a lot of the Advent Calendar I made for Blockette over the winter. I may make a version like that for her if she gets too many short supplies; for now the cardboard box is working great for us.

The funny thing is that I can't tell if Blockette likes the organization better than the shoe box itself.  She has taken it upon herself to decorate the outside of the box.  Even our organization has to be fancy I guess.  Such is the life of a superstar artist.

Friday, March 1, 2013

Snowman Snow

Tuesday we got out biggest snow of the year so far...4 inches.  Four inches of the wettest snow ever.  While it was back breaking to shovel, it was perfect for making a snowman.


Blockette made this snowman all by herself.  Well, I helped her stack the layers. The snow was so heavy I had to struggle to lift the middle ball.  Of course I had noodle arms from driveway snow removal duty.  That's my excuse, and not because I'm a wimpy girly girl.

I think it's the cutest snowman in the history of snowbeings. 

Last year my mom gave Blockette a snowman kit, but we didn't get enough of the right kind of snow to use it.  It was so awesome to have everything handy.  There was no arguing over how Blockette needs to wear her scarf more than the snowman does.  I think the scarf in the kit was the perfect size.  And don't you just dig the heart?  Uber cuteness!  Thanks mom!!!

Wednesday, February 13, 2013

Anthropology Hack Jeans - Superstar Edition

I saw this tutorial for heart print jeans tutorial over at My Little Secrets.  
It was a hack on some dark blue jeans with white hearts you could purchase at Anthropology for a whopping $188. 

They were super cute, but ugh...not at that price.

Plus most of my jeans have embroidery patches on them, and I'd like to keep at least one pair as plain unaltered denim.

So that means I raid Blockette's closet for my crafting experiment!

She had a pair of gray jeans that I had dyed fushia earlier in the school year.  
They were hand me downs and Blockette hated the faded black look.  
After nearly staining the tub, I had some pinkish jeans that were pretty neat.  
When I discovered them in her room the other day, I knew they would be perfect for this project.

I told Blockette what I wanted to do, and showed her the picture.  
I told her that I would make the hearts silver instead of white.  
She was totally on board.  Blockette even lent me her stencils to do the job.  

Her stencils had two different sized hearts and as I was in the process of deciding between the two, I noticed that there were stars on the same stencil.  

Then it hit me....stars would be WAY cooler.  

I asked Blockette which she would rather have, stars or hearts. 
Without missing a beat she exclaimed "Stars!"


 I think they take the jeans to a whole 'nother level of coolness. 
 Unlike the hack at My Little Secrets, I stenciled stars on the front and the back.  
I left the rear pockets plain for contrast.

And here is proof of how cool the "new" jeans are.  
Apparently, this is how you "lounge" when you are super cool.
No one ever told me. 
Guess that's how come I'm not super cool.
When you are super cool, you don't need to be told how to act cool.

Wednesday, February 6, 2013

Blockette's Soap Savers

Yes, more crochet!

 I've been sort of a crochet nut as of late.  I feel like I'm being more productive crocheting than I am cross stitching.  I guess it's cause I'm making something I can actually use with the crochet, and the cross stitch just sits there, most of the time not even finished into something suitable for framing.  Now that I think about it, if you figure in the cost of framing, crocheting is a lot cheaper hobby than cross stitching.

Anyhow, onto the latest crochet project.  I actually made these while I was up at my mom's over Christmas.  I saw the pattern for  soap savers when I stumbled across the blog Moogly.  I thought they would be a good solution to a problem we were having.

soap saver with full bar of soap, nubby scrubby side
Maybe those of you with kids have this problem too.  You see when Blockette was bathing herself, she was either putting too much soap on her bath poof, or not enough.  We tried going the bar of soap and wash cloth route, but she wasn't getting enough soap on the wash cloth to get a lather on her body.  Also, whenever Mrblocko or I took a shower, her bar of soap was getting wet and washing down the drain.

This little crochet pouch solves that problem!  There is no pouring the soap on anything.  The soap is right there!  The in between step of putting the soap on the washcloth is eliminated as well.  Essentially, the soap is inside the washcloth.  The pouch also keeps the soap from washing down the drain, or half the bar getting stuck to the shelf in the shower.

soap saver with used bar of soap, non nubby scrubby side
 See, that "gummy" wet soap is contained inside the soap saver!  No more soap gunk sticking to the shower shelf! 

Also, you can use the bar of soap down to nothing.  No waste.  If Blockette breaks the bar once it's tiny, no big deal, the pieces will stay inside the soap saver.

I made two in case one needed to be washed.  That way Blockette couldn't use the excuse that she couldn't take a shower because her scrubby was in the hamper.

Because I'm still a crochet newbie, I had to work each of them up more than once.  It wasn't until my mom suggested using a stitch marker when I completed each row, that I finally got the hang of things.  My stitch marker was super fancy.  I just used the tail from the beginning of the stitching and moved it up each row.  Then when I finished, I just wove the rest of the tail in as normal.  That worked out better than having to keep track of some separate piece of yarn, or one of those plastic yarn markers you can purchase.

The multi colored scrubby was stitched in Lily Sugar'n Cream Psychedelic and the blueish one in Swimming Pool.  This yarn is 100% cotton, medium or 4.  I used the recommended I hook.

One word of warning.  If you use Sugar n Cream yarn, in a dark color (particularly the blues), it will bleed.  Unless you like blue dye in your shower, I highly suggest you wash the soap saver at least once with a color catcher. This will save you from any panic that you've permanently stained your tub blue. 

Wednesday, January 30, 2013

Princess Crown Braid

I was feeling experimental with Blockette's hair so I tried out a new braid.  I call it the crown braid, but the tutorial from Princess Hair Styles called it a "never ending French braid bun." 


I won't get into the hows and whatnot of how to make the braid because Princess Hair Styles has a great video tutorial, which explains the technique much better than I could.


 This is what I call the wonky side, where the braid ends.  I think I could have tucked it into the other part of the French braid a little better.  Over all, I think it's not too shabby for the first attempt.


 ...and the "nice" side.

The hairstyle took a bit longer than regular French braids. This is most likely due to the fact that it is awkward to braid the part by her neck and then up the "nice" side of the braid.  I had to have Blockette sit with her head down on her lap which she was not happy about.
 Blockette wore this hairstyle when we went out to visit her Grandparents.  We went out to dinner and a couple people stopped us and told us how cute her hair was, just like a princess.  I asked Blockette if it was worth the extra trouble to have her hair styled like this and she said she loved it as a sometimes fancy hair do.

By the end of the day her hair did sag a bit but held together through a few hours of vigorous playtime crawling on the floor playing with Grandma's spunky kitten. I don't think many hairstyles would survive those sort of crazy activities.

Oh and as for the short sleeves in the middle of winter?  It was nearly 60 the day this photo was taken. Crazy Chicago winters.


Friday, January 25, 2013

Chalkboard Journal Fail

This Christmas I decided to make something crafty for Blockette.  She loves journals and notebooks to write and draw in.  I thought that this Chalkboard journal from No.2 Pencil would be perfect.

Except that it wasn't.

I don't know what happened.

This time I followed the directions exactly.  Not even taking a single short cut.

I even used 6 coats of Martha Stewart chalkboard paint compared to the 4 in the tutorial.  Just in case.

I rubbed the surface with chalk and then wiped it off with a damp cloth.   Just like the directions say.

Then I wrote on the journal cover.  Seemed fine.  I erased it with a dry cloth.

So I wrapped it and it sat around for a week.

Blockette was so excited when she opened it along with a brand new box of colored crayola brand chalk.

So of course she grabbed a piece of chalk and went to town on the cover to see if it worked.

This is what happened:


If you look in the upper right hand corner you can see 2 games of tic tac toe she played with her father.

How sweet!

Only...

They will NOT come off.

I tried wiping it off with a dry cloth and paper towel.

Then I made it damp.

Neither thing got the chalk off.

I even tried rubbing more chalk on the cover with the side of the piece of chalk.  All that did was scratch the cover and change the hue to a slightly different shade of blue.

I don't know why it scratched the cover.  I wasn't using my super Hulk like strength super powers or anything.  Just a light gentle hand.  Maybe I AM the Hulk?

Any tips or suggestions about what I might have done wrong?  Or what I can do to fix this craft disaster?

Friday, December 7, 2012

Blockette's Advent Calendar

Last year Mrblocko pointed out how Christ is absent from a lot of our Christmas celebrations/traditions.  So, I've been trying to find ways to change that focus.  One of the things we are doing this year is having an Advent calendar.

I wanted the calendar to be a little more personal than something store bought, but I didn't want to spend hours and hours on something that may or may not get used again.  I also was not feeling particularly crafty with the sewing machine.  It seems to be temperamental this time of year.

So what's a crafty gal to do?  Make one out of recycled toilet paper and paper towel tubes.

You can't really tell from this photo, but all the tubes are of varying heights.  And Blockette just discovered that the insides of the tubes are painted with different colors.  I had thought she would like that little touch, and am quite pleased that I was right!

The tubes are hot glued onto a piece of cardboard that came inside a calendar to keep it from getting bent.  I knew I was saving that thing for a good reason!

At the beginning of November, I had read somewhere about how a mom held back 25 pieces of Halloween candy to put in their Advent calendars.  I thought that was a great idea.  Sneaky too.  And I'm all about being sneaky.

Originally, I had planned on covering the tubes with some tissue paper.  That was a massive fail.  The tissue stuck to everything except the tubes.  I read where one mom, who did a fancier version of this type of Advent calendar,  used small muffin tin liners.  I didn't have any of those, but I did have foil. 

I really didn't expect the foil to work.  I was so surprised when it did. And, I only used regular old elmers gel glue.  I'm sure the white glue would work, but we only had the gel stuff in the house.  The foil peels off and reminds me of a yogurt cup.  I bet using yogurt cup lids would work equally well.

 You're probably saying, "OK so it's an Advent calendar, but how is that bringing the focus back on Jesus for Christmas?  Isn't it just a way to give your child candy?" 

I guess it is, but inside each tube, along with the candy, is a Bible verse.  I found a great print out from Happy Home Fairy that contained 24 verses specifically made for a child's Advent calendar. 

However, if you look carefully at our calendar, you'll see that I made it to include Christmas Day.  I went hunting for another verse and decided on, "God’s gift is eternal life given by Jesus Christ our Lord."  Romans 6:23.  I thought it fit in nicely with the progression of all the other verses.

So far, the calendar is going great.  Blockette is as excited about the verses as she is about the candy.  She even wants to look up the verses on the Bible App she has on her Nook.  Hopefully, this is a tradition we will continue every year.  I think in the future I'll just write down the passages and have her look them up to read to us as she seems to be interested in the expanded versions of the verses.