no one else wanted to try this, but i liked it on apples.
Healthy Chocolate Hummus via super healthy kids
2 c cooked, unsalted chickpeas (or 1 can)
3-4 T unsweetened cocoa powder
2 T almond butter
1/4 c maple syrup
1 t vanilla
Add all ingredients into the cup of a large food processor, and puree until smooth.

Showing posts with label fruit. Show all posts
Showing posts with label fruit. Show all posts
Tuesday, February 27, 2018


Tuesday, February 24, 2015
Sugared Cranberries
These were also made for Thanksgiving 2014. I absolutely love them and could not stop eating them!
Sugared Cranberries from Our Best Bites
12-ounce bag fresh cranberries
1 c sugar
1 c water
*additional sugar for rolling
Wash cranberries and discard damaged ones. Place in a bowl. Combine sugar and water in a pot and heat until simmering. Stir until sugar is dissolved and let cool for a few minutes until warm (not hot). Pour over cranberries and let sit in fridge, covered, overnight. Use a slotted spoon to remove berries from syrup. Set berries on a cooling rack that is placed over foil to collect drips. Spread berries out so they are not touching each other. Let dry for 1 hour. Roll berries a handful at a time in sugar. Place sugared berries on a baking sheet, or foil, etc. and let dry for an hour or two.I prefer to store in the fridge in an airtight container.. Try not to stack them too deep, the more they rub against each other long term, the greater chance of sugar rubbing off.
Sugared Cranberries from Our Best Bites
12-ounce bag fresh cranberries
1 c sugar
1 c water
*additional sugar for rolling
Wash cranberries and discard damaged ones. Place in a bowl. Combine sugar and water in a pot and heat until simmering. Stir until sugar is dissolved and let cool for a few minutes until warm (not hot). Pour over cranberries and let sit in fridge, covered, overnight. Use a slotted spoon to remove berries from syrup. Set berries on a cooling rack that is placed over foil to collect drips. Spread berries out so they are not touching each other. Let dry for 1 hour. Roll berries a handful at a time in sugar. Place sugared berries on a baking sheet, or foil, etc. and let dry for an hour or two.I prefer to store in the fridge in an airtight container.. Try not to stack them too deep, the more they rub against each other long term, the greater chance of sugar rubbing off.
Thursday, February 12, 2015
Chipotle Peach Chicken Tacos
Chipotle Peach Chicken Tacos via Sugar Dish Me
Chicken:
1 lb boneless skinless chicken breast
1 c peach preserves
2 chipotle peppers in adobo sauce, chopped (be sure to scrape the seeds out to avoid TOO much heat)
½ c orange juice
1½ T chili powder
½ t cumin
½ t paprika
salt to taste
½ c chicken broth or water, as needed
Rice (optional):
1 c jasmine rice
½ c chopped cilantro
juice of ½ a lime
Peach Salsa:
1 c ripe but still slightly firm peaches, coarsely chopped (I used chopped frozen peaches)
¼ c red onion, finely diced
2 T sweet red bell peppers
1 jalapeno pepper, finely chopped
2 T chopped fresh cilantro
1 T rice wine vinegar (optional)
Tacos:
8-10 flour tortillas (taco-size)
1 c shredded white cheddar or mex blend cheese
Place chicken breasts in bottom of med saucepan and cover them plus 1" water. Bring to boil and reduce heat to simmer at med high for 10 min (longer if you have thicker pieces of meat). Turn off burner and let chicken sit in water 5 min. Cut to be sure no pink remains in the middle, drain water, and shred chicken with forks. Place it back in the saucepan.Add peach preserves, chipotle peppers, orange juice, chili powder, cumin, paprika, and salt (if needed). Stir to coat chicken. Bring it to a simmer and cook, stirring occasionally, while prepare rice and salsa. Add broth or water as needed. Cook rice according to package instructions. Stir cilantro and lime juice into cooked rice
To make salsa toss peaches, onion, red bell peppers, jalapeno, and rice wine vinegar.To serve tacos add rice to each tortilla, Top with chicken, salsa, and a little shredded cheese. I like to add more chopped cilantro.
Chicken:
1 lb boneless skinless chicken breast
1 c peach preserves
2 chipotle peppers in adobo sauce, chopped (be sure to scrape the seeds out to avoid TOO much heat)
½ c orange juice
1½ T chili powder
½ t cumin
½ t paprika
salt to taste
½ c chicken broth or water, as needed
Rice (optional):
1 c jasmine rice
½ c chopped cilantro
juice of ½ a lime
Peach Salsa:
1 c ripe but still slightly firm peaches, coarsely chopped (I used chopped frozen peaches)
¼ c red onion, finely diced
2 T sweet red bell peppers
1 jalapeno pepper, finely chopped
2 T chopped fresh cilantro
1 T rice wine vinegar (optional)
Tacos:
8-10 flour tortillas (taco-size)
1 c shredded white cheddar or mex blend cheese
Place chicken breasts in bottom of med saucepan and cover them plus 1" water. Bring to boil and reduce heat to simmer at med high for 10 min (longer if you have thicker pieces of meat). Turn off burner and let chicken sit in water 5 min. Cut to be sure no pink remains in the middle, drain water, and shred chicken with forks. Place it back in the saucepan.Add peach preserves, chipotle peppers, orange juice, chili powder, cumin, paprika, and salt (if needed). Stir to coat chicken. Bring it to a simmer and cook, stirring occasionally, while prepare rice and salsa. Add broth or water as needed. Cook rice according to package instructions. Stir cilantro and lime juice into cooked rice
To make salsa toss peaches, onion, red bell peppers, jalapeno, and rice wine vinegar.To serve tacos add rice to each tortilla, Top with chicken, salsa, and a little shredded cheese. I like to add more chopped cilantro.
Thursday, November 27, 2014
Strawberry Shortcake Bars
I made this for when my husband's family came to visit for my mother in law's birthday. My sister in law told me her favorite desserts were strawberry shortcake and Key lime pie. Since I thought strawberry shortcake for a crowd might be too fussy I thought this would be a good alternative. It was a big hit!
Strawberry Shortcake Bars via Kraft
2 pkg. (3.4 oz. each) JELL-O Vanilla Flavor Instant Pudding
2-1/2 cu cold milk
1 tub (8 oz.) COOL WHIP Whipped Topping, thawed
3 cups sliced fresh strawberries plus extra for decorating top
22-1/2 graham cracker sheets
Beat pudding mixes and milk in large bowl with whisk 2 min. Stir in Cool Whip. Gently stir in strawberries. Break whole graham sheets crosswise in half. Arrange 15 squares on bottom of 13x9 pan; cover with 1/3 pudding mix. Repeat layers twice. top with extra halved strawberries. Chill at least 4 hrs before serving.
Strawberry Shortcake Bars via Kraft
2 pkg. (3.4 oz. each) JELL-O Vanilla Flavor Instant Pudding
2-1/2 cu cold milk
1 tub (8 oz.) COOL WHIP Whipped Topping, thawed
3 cups sliced fresh strawberries plus extra for decorating top
22-1/2 graham cracker sheets
Beat pudding mixes and milk in large bowl with whisk 2 min. Stir in Cool Whip. Gently stir in strawberries. Break whole graham sheets crosswise in half. Arrange 15 squares on bottom of 13x9 pan; cover with 1/3 pudding mix. Repeat layers twice. top with extra halved strawberries. Chill at least 4 hrs before serving.
Friday, November 29, 2013
Cherry Coffee Cake
This Cherry Coffee Cake from Controlling my Chaos was amazing. Yes. It IS ugly as sin. But don't let that fool you.

I made this for Mrblocko to take as a dish to pass for breakfast with the 8th graders who are going through Confirmation at church. There was a LOT of food so I thought it was a great testament to the goodness that he only came home with half the pan as leftovers.
Poor us. Forced to eat half a pan of Cherry Coffee Cake! The horror!
Actually, Blockette didn't want to try any at first. She "hates" cherries. I convinced her to take a taste test and I think her eyes rolled back in her head with delicious delight.
Truth be told, I don't like cherries either. I didn't think I was going to like it, especially since it looked so hideous. The cake mix is so sweet that it balances out any tart from the cherries. Also, the crumble on the top tastes like cake batter. I love cake batter.
I made one minor change to this recipe. I used about half the glaze as a drizzled topping. The cake was already so sweet with the cake mix and canned cherries. I felt too much glaze would have made the cake overly sweet. I say this and I have the biggest sweet tooth of anyone I know. Half the glaze was just enough to help moisten the crumble topping and keep it in place for transport.
Cherry Coffee Cake from Controlling my Chaos
1 box yellow cake mix, divided
1c flour
2 1/4 t yeast (or one package)
2/3 c warm water
2 eggs, beaten
1-21 oz can cherry pie filling
1/3 c cold butter cut into cubes
Glaze (use sparingly)
1c powdered sugar
1T corn syrup
1 t vanilla
1-2 T water
Mix 1 1/2 c cake mix, flour, yeast and water til smooth. Add eggs. Pour in greased 9x13 pan. Top w cherries. In small bowl mix remaining cake mix and butter with hands til crumbly. Sprinkle over cherries. Bake at 350F for 35-40 min. (at 35 min the contents of the pan giggled a bit, after another 5 min they had firmed up) Once cake is cool, combine glaze ingredients and drizzle liberally over the top of the cake.

I made this for Mrblocko to take as a dish to pass for breakfast with the 8th graders who are going through Confirmation at church. There was a LOT of food so I thought it was a great testament to the goodness that he only came home with half the pan as leftovers.
Poor us. Forced to eat half a pan of Cherry Coffee Cake! The horror!
Actually, Blockette didn't want to try any at first. She "hates" cherries. I convinced her to take a taste test and I think her eyes rolled back in her head with delicious delight.
Truth be told, I don't like cherries either. I didn't think I was going to like it, especially since it looked so hideous. The cake mix is so sweet that it balances out any tart from the cherries. Also, the crumble on the top tastes like cake batter. I love cake batter.
I made one minor change to this recipe. I used about half the glaze as a drizzled topping. The cake was already so sweet with the cake mix and canned cherries. I felt too much glaze would have made the cake overly sweet. I say this and I have the biggest sweet tooth of anyone I know. Half the glaze was just enough to help moisten the crumble topping and keep it in place for transport.
Cherry Coffee Cake from Controlling my Chaos
1 box yellow cake mix, divided
1c flour
2 1/4 t yeast (or one package)
2/3 c warm water
2 eggs, beaten
1-21 oz can cherry pie filling
1/3 c cold butter cut into cubes
Glaze (use sparingly)
1c powdered sugar
1T corn syrup
1 t vanilla
1-2 T water
Mix 1 1/2 c cake mix, flour, yeast and water til smooth. Add eggs. Pour in greased 9x13 pan. Top w cherries. In small bowl mix remaining cake mix and butter with hands til crumbly. Sprinkle over cherries. Bake at 350F for 35-40 min. (at 35 min the contents of the pan giggled a bit, after another 5 min they had firmed up) Once cake is cool, combine glaze ingredients and drizzle liberally over the top of the cake.
Friday, November 8, 2013
Cheater Pull Apart Apple Bread
I think I've said on this blog once or maybe a trillion times that I love bread. Carbs=love. Even Blockette has been known to choose bread over dessert at times. Particularly if its fresh bread. I can't really blame her. Bread is just so tasty.
So bread in dessert form? uh...no brainer.
This recipe is super simple. All you need is a can of biscuits, an apple, and cinnamon sugar.

Bread?
Dessert?
Easy?
Where have you been all my life?
Apple Pie Pull Apart Bread from Heather's French Press
1 can Biscuits (I used Grands)
1 medium apple, peeled,cored and thinly sliced
cinnamon - sugar {1/3 c sugar mixed w 1 t cinn and 1/4 t nutmeg}
Line a bread pan w parchment. Pre-heat oven to 350F. Toss apples in cinn-sugar. Set aside.
Slice each biscuit in half to get 16 rounds and coat in cinn sugar too. Place in pan starting with bread and alternating with apple and bread, ending with bread. Bake for 20 min or until brown, then cover with foil and bake for 20-30 more min until the bread is fully cooked. Top with a glaze made from milk and powdered sugar, or caramel sauce, or ice cream if desired!
So bread in dessert form? uh...no brainer.
This recipe is super simple. All you need is a can of biscuits, an apple, and cinnamon sugar.

Bread?
Dessert?
Easy?
Where have you been all my life?
Apple Pie Pull Apart Bread from Heather's French Press
1 can Biscuits (I used Grands)
1 medium apple, peeled,cored and thinly sliced
cinnamon - sugar {1/3 c sugar mixed w 1 t cinn and 1/4 t nutmeg}
Line a bread pan w parchment. Pre-heat oven to 350F. Toss apples in cinn-sugar. Set aside.
Slice each biscuit in half to get 16 rounds and coat in cinn sugar too. Place in pan starting with bread and alternating with apple and bread, ending with bread. Bake for 20 min or until brown, then cover with foil and bake for 20-30 more min until the bread is fully cooked. Top with a glaze made from milk and powdered sugar, or caramel sauce, or ice cream if desired!
Monday, October 7, 2013
Watermelon Slushy Fail
A few weeks ago I bought this massive watermelon. The large ones were cheaper than the personal ones for some reason. A large watermelon is way too much for the three of us to eat before it spoils. I looked to see if there was some other way we could consume the melon aside from just eating it normally in cut up cubes.
I came across this recipe for Watermelon Lime Frosties over at My Life in Food. So I froze the remaining watermelon, which just happened to be exactly 3 cups-exactly what the recipe called for. It must be kismet, right?
Hmmm.
Not so much.
First off my wimpy blender did not like the frozen watermelon. I thought I was going to burn out the motor on the poor guy. As luck would have it, I did not and I managed to puree the mixture after adding an additional cup of water. That and pulsing and poking at the concoction for a good 20 min.
Then I thought to myself, "Man, this better be worth it."
Sadly, not so much. Although, it wasn't nearly as bad as the Cucumber Drink of Slime.
The drink was a beautiful pinkish red though. I think that was the biggest improvement over the Failed cucumber drink. It actually looked like it was going to taste good.
So what was the problem with the drink? It tasted bitter. I even added additional maple syrup - 3 additional Tablespoons for a total of 5 Tablespoons.
I'm pretty sure the culprit was the seeds. Huh? Well, you ask, why didn't I pick out the seeds? It was a seedless watermelon. What? I thought you said the seeds were the problem. Gee you should get your story straight.
Yes. The seeds WERE most likely the problem. Even seedless watermelon has seeds. They are usually those tiny puny little seeds that are impossible to pick out. Normally, they just get eaten and you can't taste them at all. But in pureeing the melon...they get pulverized and their bitter qualities overwhelm the entire drink. This is the only thing that I can think of that would make the drink bitter as the lime juice was sour, and the banana and maple syrup were sweet.
To be fair, this drink wasn't a total Fail. Blockette loved it. I'm not sure why. I gave her a big old glass and she slurped and gulped that bad boy down. I poured some of the leftovers into Popsicle molds, but tossed the rest. Mrblocko didn't even want to try it. I think he was still reeling from the cucumber drink debacle.
This slushy concoction could have been salvaged by adding some booze. Something like Malibu would have added sweetness and I believe the coconut flavor would have overwhelmed the bitterness. However, it was a school night and Alcohol and I are not friends. I didn't think the experiment was worth the pain I'd have to suffer the next morning.
Watermelon Lime Frosty from My Life in Food
3 c watermelon, cubed and frozen
1 ripe banana, peeled and frozen
2-5 T maple syrup
Zest from 2 limes
Juice from 2 limes (about 4 tablespoons)
1/2 -1 c water
Blend all ingredients until smooth, adding more water as needed to keep the mixture moving. Add booze as needed.
I came across this recipe for Watermelon Lime Frosties over at My Life in Food. So I froze the remaining watermelon, which just happened to be exactly 3 cups-exactly what the recipe called for. It must be kismet, right?
Hmmm.
Not so much.
First off my wimpy blender did not like the frozen watermelon. I thought I was going to burn out the motor on the poor guy. As luck would have it, I did not and I managed to puree the mixture after adding an additional cup of water. That and pulsing and poking at the concoction for a good 20 min.
Then I thought to myself, "Man, this better be worth it."
 |
| via |

The drink was a beautiful pinkish red though. I think that was the biggest improvement over the Failed cucumber drink. It actually looked like it was going to taste good.
So what was the problem with the drink? It tasted bitter. I even added additional maple syrup - 3 additional Tablespoons for a total of 5 Tablespoons.
I'm pretty sure the culprit was the seeds. Huh? Well, you ask, why didn't I pick out the seeds? It was a seedless watermelon. What? I thought you said the seeds were the problem. Gee you should get your story straight.
Yes. The seeds WERE most likely the problem. Even seedless watermelon has seeds. They are usually those tiny puny little seeds that are impossible to pick out. Normally, they just get eaten and you can't taste them at all. But in pureeing the melon...they get pulverized and their bitter qualities overwhelm the entire drink. This is the only thing that I can think of that would make the drink bitter as the lime juice was sour, and the banana and maple syrup were sweet.
To be fair, this drink wasn't a total Fail. Blockette loved it. I'm not sure why. I gave her a big old glass and she slurped and gulped that bad boy down. I poured some of the leftovers into Popsicle molds, but tossed the rest. Mrblocko didn't even want to try it. I think he was still reeling from the cucumber drink debacle.
This slushy concoction could have been salvaged by adding some booze. Something like Malibu would have added sweetness and I believe the coconut flavor would have overwhelmed the bitterness. However, it was a school night and Alcohol and I are not friends. I didn't think the experiment was worth the pain I'd have to suffer the next morning.
Hangover + walking into traffic = Pancake Mrsblocko
 |
| via |
Watermelon Lime Frosty from My Life in Food
3 c watermelon, cubed and frozen
1 ripe banana, peeled and frozen
2-5 T maple syrup
Zest from 2 limes
Juice from 2 limes (about 4 tablespoons)
1/2 -1 c water
Blend all ingredients until smooth, adding more water as needed to keep the mixture moving. Add booze as needed.
Friday, April 5, 2013
Apple Snickerdoodle Cobbler
Yet again, I forgot to take a picture of the food I made before we shoved it in our faces and made it disappear.
The Snickerdoodle version of the Apple Cobbler was the brain child of Rachael at Baked by Rachael.
It was good, but I guess I'm not as big of a fan of snickerdoodles as I thought I was. Maybe it was to different from the classic cobbler to win me over completely. I found myself missing the oats!
For not LOVING snickerdoodles, I thought this was a pretty labor intensive dessert. You have to prepare the dough, let it sit, then prepare the apples and then wait for it to bake. It's nearly an hour, of prep time, with chilling the dough, and then 45 min in the oven. It seemed like a long time for what should be a simple dessert. I think I could have made an apple pie in the same amount of time.
While we all enjoyed the dessert, I think I'll stick with the super speedy microwave version of the apple crisp my mom always made. Apple-y goodness in about 15 min. However, if you've got patience and an affinity for snickerdoodles, give this cobbler a try!
Apple Snickerdoodle Cobbler from Baked by Rachael
Cookies:
1/2 t cream of tartar
1/8 t salt
1/2 t baking powder
2/3C flour
1/4C butter, softened
1/3C sugar, plus 1/2C
1 egg
3/4 t cinnamon
Apples:
8C apples (roughly 6-8 apples depending on their size)
1/4C brown sugar
1/2 t cinnamon
Preheat oven to 350 F. In sm bowl mix first 4 dry ingred for the cookies. In separate bowl cream butter and 1/3 c sugar. Add egg and then dry ingred. Wrap dough in plastic wrap and chill for a minimum of 30 min (an hour is best) so the dough is less sticky and easier to work with. In sm bowl combine 3/4 t cinnamon and 1/2 c sugar. Set aside. In large bowl add 1/4 c brown sugar and 1/2 t cinnamon. Peel, core and slice apples. Add to brown sugar and cinnamon mix, toss to coat. Transfer to 8x8 dish. Form 1" balls of dough. Roll in cinnamon-sugar mixture. Place coated dough balls on top of apples, press down to slightly flatten. Bake 45-55 min til apples tender and cookie lightly golden. Cool 15 min before serving. May be stored in fridge several days, if it lasts that long.
 |
| via |

It was good, but I guess I'm not as big of a fan of snickerdoodles as I thought I was. Maybe it was to different from the classic cobbler to win me over completely. I found myself missing the oats!
For not LOVING snickerdoodles, I thought this was a pretty labor intensive dessert. You have to prepare the dough, let it sit, then prepare the apples and then wait for it to bake. It's nearly an hour, of prep time, with chilling the dough, and then 45 min in the oven. It seemed like a long time for what should be a simple dessert. I think I could have made an apple pie in the same amount of time.
While we all enjoyed the dessert, I think I'll stick with the super speedy microwave version of the apple crisp my mom always made. Apple-y goodness in about 15 min. However, if you've got patience and an affinity for snickerdoodles, give this cobbler a try!
Apple Snickerdoodle Cobbler from Baked by Rachael
Cookies:
1/2 t cream of tartar
1/8 t salt
1/2 t baking powder
2/3C flour
1/4C butter, softened
1/3C sugar, plus 1/2C
1 egg
3/4 t cinnamon
Apples:
8C apples (roughly 6-8 apples depending on their size)
1/4C brown sugar
1/2 t cinnamon
Preheat oven to 350 F. In sm bowl mix first 4 dry ingred for the cookies. In separate bowl cream butter and 1/3 c sugar. Add egg and then dry ingred. Wrap dough in plastic wrap and chill for a minimum of 30 min (an hour is best) so the dough is less sticky and easier to work with. In sm bowl combine 3/4 t cinnamon and 1/2 c sugar. Set aside. In large bowl add 1/4 c brown sugar and 1/2 t cinnamon. Peel, core and slice apples. Add to brown sugar and cinnamon mix, toss to coat. Transfer to 8x8 dish. Form 1" balls of dough. Roll in cinnamon-sugar mixture. Place coated dough balls on top of apples, press down to slightly flatten. Bake 45-55 min til apples tender and cookie lightly golden. Cool 15 min before serving. May be stored in fridge several days, if it lasts that long.
Monday, March 11, 2013
Caramelized Apple Grilled Cheese
The other day I was in the mood for something out of the ordinary for lunch. I didn't have a lot of ingredients to work with, so it was a bit of a challenge. I decided to make a Caramelized Apple Grilled Cheese Sandwich. I found the recipe at Our Eating Habits.

Lunch only took 10 min from start to shoving the food in my mouth. That included cutting and cooking the apples, then preparing the grilled cheese.
I used a smallish apple, and there was lots of extra caramely bits left in the pan. The next time I make this I will use two apples and save the leftovers for lunch or a snack the next day. Of course, if you were making this for a crowd, or didn't want to be bothered with peeling and cutting up fruit, you could certainly use apple pie filling!

What really made this sandwich extraordinary was the bread. I was fortunate enough to have leftover French Toast in the freezer. I used that instead of plain bread. It made the sandwich even more cinnamon-y. For someone who can't get enough cinnamon, this was heaven.
The recipe says to use good quality cheddar cheese. I bet that would have been even better. I didn't have that, all I had was processed sliced cheddar and shredded jalapeno Mexican blend cheese. I went for the sliced because I wanted the cinnamon flavor to dominate. I'm sure that the spicy and the sweet would have been a good match as well.
Here's what you need to do if you want to make your very own fancy schmantcy caramelized apple grilled cheese sandwich:
1 T butter
1 T brown sugar
1 dash of cinnamon (I used 1/4 t)
1 apple (peel, core and slice) (You could use 2 apples, and make 2 sandwiches/have leftovers)
2 thick slices of good cheddar cheese (I used one slice of processed cheddar)
2 slices of good bread (I used French toast made on regular sandwich bread)
butter for grilling bread
In small pan melt 1T butter. Add brown sugar and cinnamon. Cook til brown and bubbly. Add apples and cook 5 min. Butter each slice of bread. Place buttered sides down on skillet. Top with cheese then apples. Cook on med, flip when golden brown, continue cooking til second side is golden brown. (Recipe from Our Eating Habits)

Lunch only took 10 min from start to shoving the food in my mouth. That included cutting and cooking the apples, then preparing the grilled cheese.
I used a smallish apple, and there was lots of extra caramely bits left in the pan. The next time I make this I will use two apples and save the leftovers for lunch or a snack the next day. Of course, if you were making this for a crowd, or didn't want to be bothered with peeling and cutting up fruit, you could certainly use apple pie filling!

What really made this sandwich extraordinary was the bread. I was fortunate enough to have leftover French Toast in the freezer. I used that instead of plain bread. It made the sandwich even more cinnamon-y. For someone who can't get enough cinnamon, this was heaven.
The recipe says to use good quality cheddar cheese. I bet that would have been even better. I didn't have that, all I had was processed sliced cheddar and shredded jalapeno Mexican blend cheese. I went for the sliced because I wanted the cinnamon flavor to dominate. I'm sure that the spicy and the sweet would have been a good match as well.
Here's what you need to do if you want to make your very own fancy schmantcy caramelized apple grilled cheese sandwich:
1 T butter
1 T brown sugar
1 dash of cinnamon (I used 1/4 t)
1 apple (peel, core and slice) (You could use 2 apples, and make 2 sandwiches/have leftovers)
2 thick slices of good cheddar cheese (I used one slice of processed cheddar)
2 slices of good bread (I used French toast made on regular sandwich bread)
butter for grilling bread
In small pan melt 1T butter. Add brown sugar and cinnamon. Cook til brown and bubbly. Add apples and cook 5 min. Butter each slice of bread. Place buttered sides down on skillet. Top with cheese then apples. Cook on med, flip when golden brown, continue cooking til second side is golden brown. (Recipe from Our Eating Habits)
Wednesday, January 9, 2013
Vegan Pumpkin Crumble Ice Cream
Ice cream in the winter? Yes. I'm one of those weird people. Growing up ice cream was such a treat that I would eat it when offered, no matter the weather.
This ice cream is healthy to boot! Well, healthier than a poke in the eye. And it's Vegan too.
 I guess this ice cream could be super healthy, but I had to go and ruin that!
The original recipe called for pumpkin, bananas, vanilla and spices. I added 1/4 maple syrup because the banana taste was too strong for me. I think I also over seasoned the ice cream. I added 1 t of cinnamon and 1 t of pumpkin pie spice. Next time I'll reduce the spices to 1/2 t each.
As if adding maple syrup wasn't enough, I had to go and add a crumble crust topping! Do you remember this Dutch Apple Pie with a crumble crust? Well I used that crust recipe for the topping. Yes it was amazing!
OK. Maybe Mrblocko didn't think it was amazing. I think he is all pumpkined out so what does he know. Blockette and I sure enjoyed it!
Vegan Pumpkin Crumble Ice Cream adapted from Vegan Ventures and My Culinary Companion
3 1/2 bananas, frozen and cut into coins
heaping 1/3c pumpkin puree
1/2 t each pumpkin pie spice and cinnamon
1 t vanilla
1/4 c maple or pancake syrup
topping
1c flour
1/2 c br sugar
1/4 c oats
6T margarine
Puree all ingredients in a food processor until smooth. Chill for 2 hours. While the ice cream is hardening, preheat the oven to 350F. Combine the topping ingredients and press on a silpat or parchment lined cookie sheet. Bake for 15-20 minutes until light golden brown. Let cool and break into bite size chunks. The edges will be crispier than the middle. We liked having the mixture of crunch and soft pieces in our ice cream. Serve the ice cream in bowls and sprinkle with crumble pieces! Don't eat it too fast or you'll get a brain freeze!
1
This ice cream is healthy to boot! Well, healthier than a poke in the eye. And it's Vegan too.

The original recipe called for pumpkin, bananas, vanilla and spices. I added 1/4 maple syrup because the banana taste was too strong for me. I think I also over seasoned the ice cream. I added 1 t of cinnamon and 1 t of pumpkin pie spice. Next time I'll reduce the spices to 1/2 t each.
As if adding maple syrup wasn't enough, I had to go and add a crumble crust topping! Do you remember this Dutch Apple Pie with a crumble crust? Well I used that crust recipe for the topping. Yes it was amazing!
OK. Maybe Mrblocko didn't think it was amazing. I think he is all pumpkined out so what does he know. Blockette and I sure enjoyed it!
Vegan Pumpkin Crumble Ice Cream adapted from Vegan Ventures and My Culinary Companion
3 1/2 bananas, frozen and cut into coins
heaping 1/3c pumpkin puree
1/2 t each pumpkin pie spice and cinnamon
1 t vanilla
1/4 c maple or pancake syrup
topping
1c flour
1/2 c br sugar
1/4 c oats
6T margarine
Puree all ingredients in a food processor until smooth. Chill for 2 hours. While the ice cream is hardening, preheat the oven to 350F. Combine the topping ingredients and press on a silpat or parchment lined cookie sheet. Bake for 15-20 minutes until light golden brown. Let cool and break into bite size chunks. The edges will be crispier than the middle. We liked having the mixture of crunch and soft pieces in our ice cream. Serve the ice cream in bowls and sprinkle with crumble pieces! Don't eat it too fast or you'll get a brain freeze!
1
Monday, December 31, 2012
Crumble Crust Dutch Apple Pie
I love pie.
LURVE it.
Making the crust...eh....not so much.
The thing is, I'm the only one in the house who really likes pie crusts. Sometimes I just don't want to go to all that trouble when I'm the only one who will truly appreciate it.
Naturally, when I saw this recipe for dutch apple pie from My Culinary Companion that had a non traditional crust, I was all about making it.
You know how Dutch Apple pies have that crumbly goodness on top? Imagine that as the crust, plus crumbled on top of the apples.
AW YEAH!
 I guarantee no one will leave their crusts on their plates with this pie. Unless they are aliens. Aliens are weird like that.
The only thing I didn't like about this recipe was the amount of apples. 3 cups of apples for a 9" pie pan? That seemed rather stingy to me, especially when you consider that apples shrink when you cook them. So I increased the apples to a whopping 6 cups!
Crumble Crust Apple Pie slightly adapted from My Culinary Companion
2 c flour
1 c packed brown sugar
1/2 cup quick-cooking oats
3/4 c butter, melted
1 t cinnamon
filling
2/3 c sugar
3 T cornstarch
1-1/4 c cold water
6 c diced peeled tart apples (I used
1 t vanilla
1 t apple pie spice
In a large bowl, combine flour, brown sugar, oats, cinnamon and butter; set aside 1 cup for topping. Press remaining crumb mixture into an ungreased 9-in. pie plate; set aside.
For filling, combine sugar, cornstarch and water in a large saucepan until smooth; bring to a boil. Cook and stir for 2 minutes or until thickened. Remove from the heat; stir in apples, spice and vanilla. Pour into crust; top with reserved crumb mixture. Bake at 350° for 40-45 minutes or until crust is golden brown. Cool on a wire rack. Cool completely before cutting and serving.
LURVE it.
Making the crust...eh....not so much.
The thing is, I'm the only one in the house who really likes pie crusts. Sometimes I just don't want to go to all that trouble when I'm the only one who will truly appreciate it.
Naturally, when I saw this recipe for dutch apple pie from My Culinary Companion that had a non traditional crust, I was all about making it.
You know how Dutch Apple pies have that crumbly goodness on top? Imagine that as the crust, plus crumbled on top of the apples.
AW YEAH!

The only thing I didn't like about this recipe was the amount of apples. 3 cups of apples for a 9" pie pan? That seemed rather stingy to me, especially when you consider that apples shrink when you cook them. So I increased the apples to a whopping 6 cups!
Crumble Crust Apple Pie slightly adapted from My Culinary Companion
2 c flour
1 c packed brown sugar
1/2 cup quick-cooking oats
3/4 c butter, melted
1 t cinnamon
filling
2/3 c sugar
3 T cornstarch
1-1/4 c cold water
6 c diced peeled tart apples (I used
1 t vanilla
1 t apple pie spice
In a large bowl, combine flour, brown sugar, oats, cinnamon and butter; set aside 1 cup for topping. Press remaining crumb mixture into an ungreased 9-in. pie plate; set aside.
For filling, combine sugar, cornstarch and water in a large saucepan until smooth; bring to a boil. Cook and stir for 2 minutes or until thickened. Remove from the heat; stir in apples, spice and vanilla. Pour into crust; top with reserved crumb mixture. Bake at 350° for 40-45 minutes or until crust is golden brown. Cool on a wire rack. Cool completely before cutting and serving.
Tuesday, November 20, 2012
Maple Chicken with Onions and Apples

I did a bit of research and found that original recipe is from Kraft. That one seemed the easiest. Of
course if you are opposed to bottled Italian dressing, you could follow this recipe from Cookin a blue streak that uses thyme, sage, cider vinegar and chicken stock. I, however, am most certainly not opposed to bottled dressing!
This recipe was a huge success!
I was a bit leery about the onions. We are used to eating caramelized onions. I suppose I could have caramelized the onions, but I was short on time. They turned out great even though they weren't caramelized. Somehow they combine with the sweet from the apples and maple and the tang from the salad dressing. It sounds weird, but it's a nicely balanced combo.
The leftovers were just as tasty. We ate them cold, over warm rice.
Blockette wanted me to tell you that this dish was so awesome, it's right behind Beefaroni on the delicious scale.
Maple Baked Apple Chicken from Kraft
4 chicken breasts
1/2 c sliced onions ( I used 2 small onions)
3 apples (I used 4 small apples: 2 jonagold and 2 gala) - sliced thin
1/2 c pancake or maple syrup (I used homemade syrup)
1/3 c Italian Dressing
Heat oven to 350°F. Spray large ovenproof nonstick skillet with cooking spray. Heat on medi-high heat. Add chicken; cook 3 min. on each side or until lightly browned on both sides. Remove from heat. Place onions on top of chicken; surround with apple slices. Mix syrup and dressing; pour over chicken. Bake 20-25 min. or until chicken is cooked through (165ºF). Spoon syrup mixture in skillet over chicken just before serving.
Tuesday, September 18, 2012
Maple Cinnamon Banana "Ice Cream"
I liked the Peanut Butter Banana Chocolate chip Ice Cream so much, I had to make another batch the next day! This time I decided to switch things up a bit with maple, pecans and cinnamon flavors.

Which one is better? I can't decide!
If you're a fan of maple or cinnamon, you'll love this version as much as I did. Wanna know what the best part about this dessert was? The maple and cinnamon flavors are so strong, I couldn't taste any banana. Double super bonus!
Maple Cinnamon Banana "Ice Cream"
2 frozen bananas, sliced into coins
2 scoops of peanut butter (I used a tablespoon, not the measuring kind.)
3 regular tablespoons of Maple syrup (I used basic Pancake syrup. In my opinion, it has a stronger maple flavor than the real stuff.)
1 1/2 tsp cinnamon (use less if you are not a total cinnamon junkie like me)
small handful of pecan pieces
small handful of Hershey's cinnamon chips
Pulse the frozen bananas in a food processor. Add the peanut butter, syrup and cinnamon. Blend until smooth and fluffy. Pour into shallow container. Fold in pecans and chips. Eat now if you like soft serve, freeze for 2-4 hours for firmer consistency. Serves 2.

Which one is better? I can't decide!
If you're a fan of maple or cinnamon, you'll love this version as much as I did. Wanna know what the best part about this dessert was? The maple and cinnamon flavors are so strong, I couldn't taste any banana. Double super bonus!
Maple Cinnamon Banana "Ice Cream"
2 frozen bananas, sliced into coins
2 scoops of peanut butter (I used a tablespoon, not the measuring kind.)
3 regular tablespoons of Maple syrup (I used basic Pancake syrup. In my opinion, it has a stronger maple flavor than the real stuff.)
1 1/2 tsp cinnamon (use less if you are not a total cinnamon junkie like me)
small handful of pecan pieces
small handful of Hershey's cinnamon chips
Pulse the frozen bananas in a food processor. Add the peanut butter, syrup and cinnamon. Blend until smooth and fluffy. Pour into shallow container. Fold in pecans and chips. Eat now if you like soft serve, freeze for 2-4 hours for firmer consistency. Serves 2.
Monday, September 10, 2012
PB 'Nana Chocolate Chip "Ice Cream"
This September has been so hot and humid. Hey! Mother Nature! Don't you know school is on and that means it's like Fall now? I mean the tree in the front yard knows it's fall. It's already lost it's leaves. Ok. So it has Emerald Ash Borer and the tree is half dead anyhow, but that is beside the point.
What is the point? It's hot out. And I come home from standing outside for an hour and I'm dripping wet with sweat and grossities. I wanted me something cold to eat for dessert. My tummy had been a bit on the wonky side so the milk based popsicles that were already in the freezer were not appealing in the least.
Then I remembered reading about "ice cream" made from bananas. I had bananas...loads of them in the freezer. Seemed like a match made in heaven.
I thought this recipe for Peanut Butter Banana Chocolate Chip Ice Cream from Got Chocolate sounded particularly yummy.
Because I was all hot and sweaty I got all scientific with precise measurements.
I hacked up 2 frozen bananas into coins and tossed them in the food processor.
(In my opinion, the food processor is the key to the success of this recipe. I've made banana smoothies before and the bananas always get caught in the blade, and don't blend very well unless you add a LOT of milk. The Food processor really mashes them up nicely before they melt too much.)
Then I took a big cereal spoon and scooped out 3 blobs of peanut butter. Then I added 3 regular spoonfuls of honey. I pulsed it all together until it looked like creamy smooth mashed potatoes. Next, I poured the mixture into a shallow container, and folded in a large handful of chocolate chips.
At this point the ice cream was soft serve consistency. I could have eaten it right then and there, but it was only 4pm. So I stuck it in the freezer for after dinner.
By the time homework was done, dinner was prepared and eaten, 2 hours later, the ice cream had hardened enough to be just barely scoop-able.
 This was what was leftover after Blockette and I got a hold of the ice cream.
How did the dessert taste?
Surprisingly, this did not have an over powering banana taste. I think this had something to do with the bananas being frozen. Maybe it masks some of that gross banana flavor. Anyhow, the "ice cream" was super delicious!
After Blockette went to bed, I devoured the leftovers. Because you know, I had not had enough fruit that day. I wasn't a pig, just trying to be healthy!
What is the point? It's hot out. And I come home from standing outside for an hour and I'm dripping wet with sweat and grossities. I wanted me something cold to eat for dessert. My tummy had been a bit on the wonky side so the milk based popsicles that were already in the freezer were not appealing in the least.
Then I remembered reading about "ice cream" made from bananas. I had bananas...loads of them in the freezer. Seemed like a match made in heaven.
I thought this recipe for Peanut Butter Banana Chocolate Chip Ice Cream from Got Chocolate sounded particularly yummy.
Because I was all hot and sweaty I got all scientific with precise measurements.
I hacked up 2 frozen bananas into coins and tossed them in the food processor.
(In my opinion, the food processor is the key to the success of this recipe. I've made banana smoothies before and the bananas always get caught in the blade, and don't blend very well unless you add a LOT of milk. The Food processor really mashes them up nicely before they melt too much.)
Then I took a big cereal spoon and scooped out 3 blobs of peanut butter. Then I added 3 regular spoonfuls of honey. I pulsed it all together until it looked like creamy smooth mashed potatoes. Next, I poured the mixture into a shallow container, and folded in a large handful of chocolate chips.
At this point the ice cream was soft serve consistency. I could have eaten it right then and there, but it was only 4pm. So I stuck it in the freezer for after dinner.
By the time homework was done, dinner was prepared and eaten, 2 hours later, the ice cream had hardened enough to be just barely scoop-able.

How did the dessert taste?
Surprisingly, this did not have an over powering banana taste. I think this had something to do with the bananas being frozen. Maybe it masks some of that gross banana flavor. Anyhow, the "ice cream" was super delicious!
After Blockette went to bed, I devoured the leftovers. Because you know, I had not had enough fruit that day. I wasn't a pig, just trying to be healthy!
Monday, July 30, 2012
Banana Bread Waffles

There are two things I usually make with bananas: banana bread and banana pops. The popsicles would seem like the obvious choice with how hot it has been this summer. However, Blockette has not been into eating popsicles lately so all the popsicle molds are still full. And as for the banana bread, I just don't feel like turning on the oven if I don't have to.
So I went on a quest to find a way to use up my growing store of frozen over ripe bananas. I came across a few different recipes for Banana bread waffles, but settled on the one from Willow Bird Baking simply because it called for three bananas instead of two.
I made a few minor changes to the recipe (not listed below). I had some vanilla Light n fit yogurt so I used that instead of the buttermilk. As there was quite a bit of sugar in the yogurt already, I omitted the 2 T of sugar as well. My batter was super thick, so instead of adding 1/4 c of milk, I added 1/2 c. The batter was still very very thick. I also only used 1/2 c of chopped walnuts. In place of the other 1/4 c walnuts, I swapped in 1/4c chopped cinnamon baking chips.
I don't know if it was the cinnamon chips, but the waffles really wanted to stick to the iron. I found that if I sprayed the top and bottom plates of the iron after every other waffle, that eliminated the problem.
We ate our waffles with homemade syrup and strawberries. I'm not normally one for fruit on my waffles, but this was a really great flavor combination.
Banana bread waffles from Willow Bird Baking (This recipe made 13 waffles in my round standard waffle iron.)
2 cups all-purpose flour
1/2 teaspoon salt
2 tablespoons sugar
1 1/2 teaspoons baking soda
1 teaspoon cinnamon
1 3/4 cups buttermilk* or 1 1/2 cups sour cream or plain yogurt thinned with 1/4 cup milk
2 eggs, separated
4 tablespoons (1/2 stick butter, melted and cooled)
1/2 teaspoon vanilla extract
3 ripe bananas, mashed
3/4 cup walnuts, chopped
Combine the flour, salt, sugar, baking soda, and cinnamon. Mix together the buttermilk (or buttermilk substitute) and the egg yolks. Stir in the butter, mashed banana, and vanilla.
Spray the waffle iron lightly with oil and preheat it. Stir the wet into the dry ingredients. Beat the egg whites in a separate bowl with a whisk or electric mixer (make sure bowl and mixer are spotlessly clean) until they hold soft peaks. Stir them gently into the batter. Stir gently to combine.
Spread a ladleful or so of batter onto the waffle iron and bake until the waffle is done, usually 3 to 5 minutes, depending on your iron.
* The buttermilk can be substituted with 1 1/4 cups of milk at room temperature, mixed with two tablespoons white vinegar, left to clabber for 10 minutes.
Wednesday, July 18, 2012
Morning Glory Muffins
We liked these morning glory muffins, from Eat Your Vegetables, so much that I've made them twice already!
 As you can see in the above photo, I made some in a regular muffin tin, and some in a jumbo muffin tin. I think I prefer the jumbo ones!
These babies are loaded with all kinds of goodies: almonds, pecans, apples, carrots, raisins, craisins, and coconut, just to name a few! I like to pretend they are healthy. Veggies and Fruit = healthy right? At least they are healthier than a bowl of Fruit Loops or a cinnamon roll.
Because they have so many add ins, they are a very dense muffin. They rose hardly at all. They weren't so heavy that you felt like eating a brick though. Just keep in mind that they are not a light fluffy breakfast pastry. These babies are substantial and will fill you up.
Now this could be because I added more things than the recipe suggested. First I used 1/2 c of coconut pulp instead of coconut flakes. I had made some coconut milk for Mrblocko when he couldn't have dairy. Our blender isn't too spiffy, so I had to strain out the chunks. I didn't want to pitch them, so I tossed them into the batter. I thought I'd miss the coconut texture, so I added a handful of shredded coconut as well.
Next, I added 1/2 c pecans. Sure the recipe already had almonds, but I thought it needed pecans too. You couldn't really taste the almonds, but the flavor of the pecans jumps right out at you.
I didn't have enough dried cranberries so I used 1/4 c cranberries and 1/4 c raisins. They were a nice mix of flavors. I'm sure you could use all raisins if you wanted as well. I bet golden raisins would be particularly tasty.
Finally, I added 1/2 c white chocolate chips. Because, well...just because. I had some and thought they would be tasty. As this recipe made 12 jumbo muffins (or 24 regular size muffins) there were only a few chips per muffin. This was just enough to give the muffins that little extra flavor boost. Not that they needed it. But seriously, why not go over the top if you can?!
Morning Glory Muffins adapted from Eat Your Vegetables
1/2 c (3 ounces) dried cranberries, rehydrated in hot water and drained (or any combo of dried fruit to equal 1/2 c)
1/2 c white chips
2 c (8 1/2 ounces) all-purpose flour
1 c (7 ounces) sugar
2 t baking soda
2 t cinnamon
1 t ginger
1/2 t salt
2 c (7 ounces) peeled and grated carrots (Use a food processor if you have one)
1 large tart apple (6-7 ounces), grated
1/2 c coconut pulp and a handful of shredded coconut(or a heaping 1/2 c shredded coconut)
1/2 c (2 ounces) sliced almonds
1/2 c pecans
1/3 c (1 1/2 ounces) wheat germ (I used wheat bran)
4 1/2 t ener-g egg replacer whisked with 6 T water (or 3 eggs)
2/3 c vegetable oil (I have used half veg oil and half olive oil with no olive oil taste. you can also replace half the oil with applesauce)
2 t vanilla
Preheat oven to 375 and lightly grease 12 large muffin cups (or 24 reg muffin cups).
In a large bowl, whisk flour, sugar, baking soda, spices, and salt. Add carrots, apple, coconut, nuts, and wheat germ.
In a separate bowl, whisk eggs or egg replacer/water, oil, and vanilla together. Add to flour mixture and stir until evenly combined. Fold cranberries and chips into batter.
Divide batter among cups and bake 20-25 minutes, until golden brown. Let cool in pans for 5 minutes, then transfer to a rack to finish cooling.
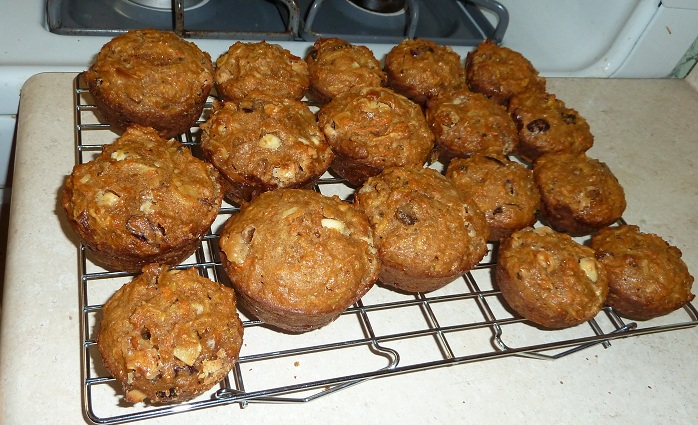
These babies are loaded with all kinds of goodies: almonds, pecans, apples, carrots, raisins, craisins, and coconut, just to name a few! I like to pretend they are healthy. Veggies and Fruit = healthy right? At least they are healthier than a bowl of Fruit Loops or a cinnamon roll.
Because they have so many add ins, they are a very dense muffin. They rose hardly at all. They weren't so heavy that you felt like eating a brick though. Just keep in mind that they are not a light fluffy breakfast pastry. These babies are substantial and will fill you up.
Now this could be because I added more things than the recipe suggested. First I used 1/2 c of coconut pulp instead of coconut flakes. I had made some coconut milk for Mrblocko when he couldn't have dairy. Our blender isn't too spiffy, so I had to strain out the chunks. I didn't want to pitch them, so I tossed them into the batter. I thought I'd miss the coconut texture, so I added a handful of shredded coconut as well.
Next, I added 1/2 c pecans. Sure the recipe already had almonds, but I thought it needed pecans too. You couldn't really taste the almonds, but the flavor of the pecans jumps right out at you.
I didn't have enough dried cranberries so I used 1/4 c cranberries and 1/4 c raisins. They were a nice mix of flavors. I'm sure you could use all raisins if you wanted as well. I bet golden raisins would be particularly tasty.
Finally, I added 1/2 c white chocolate chips. Because, well...just because. I had some and thought they would be tasty. As this recipe made 12 jumbo muffins (or 24 regular size muffins) there were only a few chips per muffin. This was just enough to give the muffins that little extra flavor boost. Not that they needed it. But seriously, why not go over the top if you can?!
Morning Glory Muffins adapted from Eat Your Vegetables
1/2 c (3 ounces) dried cranberries, rehydrated in hot water and drained (or any combo of dried fruit to equal 1/2 c)
1/2 c white chips
2 c (8 1/2 ounces) all-purpose flour
1 c (7 ounces) sugar
2 t baking soda
2 t cinnamon
1 t ginger
1/2 t salt
2 c (7 ounces) peeled and grated carrots (Use a food processor if you have one)
1 large tart apple (6-7 ounces), grated
1/2 c coconut pulp and a handful of shredded coconut(or a heaping 1/2 c shredded coconut)
1/2 c (2 ounces) sliced almonds
1/2 c pecans
1/3 c (1 1/2 ounces) wheat germ (I used wheat bran)
4 1/2 t ener-g egg replacer whisked with 6 T water (or 3 eggs)
2/3 c vegetable oil (I have used half veg oil and half olive oil with no olive oil taste. you can also replace half the oil with applesauce)
2 t vanilla
Preheat oven to 375 and lightly grease 12 large muffin cups (or 24 reg muffin cups).
In a large bowl, whisk flour, sugar, baking soda, spices, and salt. Add carrots, apple, coconut, nuts, and wheat germ.
In a separate bowl, whisk eggs or egg replacer/water, oil, and vanilla together. Add to flour mixture and stir until evenly combined. Fold cranberries and chips into batter.
Divide batter among cups and bake 20-25 minutes, until golden brown. Let cool in pans for 5 minutes, then transfer to a rack to finish cooling.
Wednesday, April 4, 2012
Sweet Charity Pie
My google-fu must be weak today. For the life of me, I cannot figure out why this wonderful, dessert is called Sweet Charity Pie. Is it because the ingredients are cheap? Is it named after a restaurant? What!? I simply cannot stand the suspense!
Regardless of Sweet Charity Pie's nominal origins, I happened upon the recipe at Sweet Treats and More. Apparently, Debbie Mortensen was the creator of this recipe. (But who are you Mrs. Mortensen!?) Well, whoever you are, you have truly invented some jolly good pie.
 At first I thought the crust wasn't going to work out. You bake the crust mixture in a 9x13 pan and then put it into a pie crust. I thought that was peculiar. Why can't the crust mixture just be placed in the pie pan and then baked? Perhaps because you need to bake the topping part too? I think the crust would hold together better if it was baked in the pie pan. I wish I could ask Debbie the wherefores and how to's of preparing the crust in this fashion.
A big fan of cherries, I am not, so I used peach filling. The cherry filling tints the top layer so you can see the difference between the fruit-cool whip layer and the cream cheese layer. A darker filling is definitely more visually appealing. Alas, lesson learned. Next time I might try a can of strawberry filling. That way I'll get the colours I want, without having to subject myself to any nasty flavours.
Also, if you do happen to use peach filling, please do not forget, as I did, to cut said peach pieces. It will be much easier to eat that way.
Do make this pie. You shan't regret it.
Sweet Charity Pie originally from Debbie Mortensen
1 cup flour
1 cup finely chopped pecans
1/4 cup brown sugar
1/2 cup butter, soft
8 oz cream cheese, soft
1/2 tsp almond extract
1 cup powdered sugar
21 oz can Cherry Pie Filling (I used peach pie filling.)
1 (8 oz) carton of cool whip
Preheat oven to 375. In a medium bowl combine flour, pecans, brown sugar and butter. Use two butter knives or a pastry blender to cut in butter. Mix until well combined and crumble forms. Spread crumb mixture into a sheet cake pan and bake for 15-20 min until golden brown, stirring once half way through. Let cool, then press crumbs into a 9 in. round pie pan, reserving 1 c o crumbs for top. Refrigerate to completely cool.
In a mixing bowl, beat cream cheese, powdered sugar, and almond extract. Beat until smooth and creamy. In another bowl, combine pie filling and cool whip. Spread the cream cheese mix over top of crumb crust in pie dish. Some crumbs might lift as you try to spread the cream cheese layer. It helps if you dollop the cream cheese mix all over top of crust, then try to spread. Top with cherry pie-cool whip mix. Cover with reserved crust mix.
This post has been brought to you by reading too much Austen-esque literature.
Regardless of Sweet Charity Pie's nominal origins, I happened upon the recipe at Sweet Treats and More. Apparently, Debbie Mortensen was the creator of this recipe. (But who are you Mrs. Mortensen!?) Well, whoever you are, you have truly invented some jolly good pie.

A big fan of cherries, I am not, so I used peach filling. The cherry filling tints the top layer so you can see the difference between the fruit-cool whip layer and the cream cheese layer. A darker filling is definitely more visually appealing. Alas, lesson learned. Next time I might try a can of strawberry filling. That way I'll get the colours I want, without having to subject myself to any nasty flavours.
Also, if you do happen to use peach filling, please do not forget, as I did, to cut said peach pieces. It will be much easier to eat that way.
Do make this pie. You shan't regret it.
Sweet Charity Pie originally from Debbie Mortensen
1 cup flour
1 cup finely chopped pecans
1/4 cup brown sugar
1/2 cup butter, soft
8 oz cream cheese, soft
1/2 tsp almond extract
1 cup powdered sugar
21 oz can Cherry Pie Filling (I used peach pie filling.)
1 (8 oz) carton of cool whip
Preheat oven to 375. In a medium bowl combine flour, pecans, brown sugar and butter. Use two butter knives or a pastry blender to cut in butter. Mix until well combined and crumble forms. Spread crumb mixture into a sheet cake pan and bake for 15-20 min until golden brown, stirring once half way through. Let cool, then press crumbs into a 9 in. round pie pan, reserving 1 c o crumbs for top. Refrigerate to completely cool.
In a mixing bowl, beat cream cheese, powdered sugar, and almond extract. Beat until smooth and creamy. In another bowl, combine pie filling and cool whip. Spread the cream cheese mix over top of crumb crust in pie dish. Some crumbs might lift as you try to spread the cream cheese layer. It helps if you dollop the cream cheese mix all over top of crust, then try to spread. Top with cherry pie-cool whip mix. Cover with reserved crust mix.
This post has been brought to you by reading too much Austen-esque literature.
Wednesday, March 28, 2012
Bloody Banana Cinnamon Waffles
A few weeks ago I attempted to make strawberry freezer jam. Strawberries have been on sale for a dollar at Meijer's for a few weeks, so it seemed like a good time to experiment, in case something went awry. Wouldn't you know it, the jam never set up properly. Grrr. And I followed the recipe in the package to the letter too.
Instead of pitching a fit (and the jam) I decided that it would make perfectly awesome syrup.
Now what to put that strawberry syrup on? Obviously I would make waffles, not pancakes. That's a given. But what kind of waffles? I searched the internets and found this recipe for banana cinnamon waffles from Handle the Heat.
As luck would have it, I happened to have two very ripe bananas. Awesome! We hardly ever have over ripe bananas. These must be waffles of destiny. (Insert dramatic music here.)
I was a little worried while making the waffles. First, they started sticking to my waffle iron. Something that doesn't normally happen. After a bit of trial and error. I discovered that I needed to spray the iron with cooking spray after every other waffle. Second, they really smelled banana-y while cooking. Normal people would not think this is a cause for concern, unless those normal people have the same aversion to the aroma of bananas that I do.
Luckily the scent was short lived, and I didn't have any nausea flashbacks.
The strawberry syrup and waffles made a great pair. I can appreciate bananas when they are accompanied by strawberries. Even if the strawberries make the banana dish look like it's in dire need of a tourniquet.
The waffles were quite filling. I usually eat 3, but could only eat one and a half. I thought maybe it might have just been my appetite that day, but now that I think about it, Blockette usually eats two waffles, and only ate one. Oh and Mrblocko only ate two as well. Maybe its the combination of the whole wheat, flax and banana that makes them so hearty.
I'd totally make these waffles again, even if I didn't have any strawberry syrup. Although, I think next time I'd add some walnuts. Cause that would be like banana bread waffles!
Banana Cinnamon Waffles from Handle the Heat
1 cup all-purpose flour
3/4 cup whole wheat flour
1/4 cup ground flaxseed
2 tablespoons sugar
1 1/2 teaspoons baking powder
1 teaspoon ground cinnamon
1/4 tsp nutmeg
1/4 teaspoon salt
1 1/2 cups low-fat milk
3 tablespoons butter, melted
2 large eggs, lightly beaten
2 large ripe bananas, mashed
Combine flours, flaxseed, sugar, baking powder, cinnamon, and salt in a bowl.
Whisk together milk, butter, and eggs in a large liquid measuring cup or small bowl. Add milk mixture to flour mixture, stirring until blended. Fold in mashed bananas.
Preheat a waffle iron. Coat iron with cooking spray. Spoon about 1/4 cup batter onto hot waffle iron, spreading batter to edges. (I used a heaping 1/3c for my round waffle iron.) Cook 3-4 minutes or until steaming stops; repeat with remaining batter. (I set my waffle iron on a 4 out of 5. I usually make waffles set on 5 as I like them crispy. If you have your waffle iron set too high, the banana in the waffle will start to burn.) Makes about 1 dozen in a standard square waffle iron, and 9 in a round waffle iron.
Instead of pitching a fit (and the jam) I decided that it would make perfectly awesome syrup.
Now what to put that strawberry syrup on? Obviously I would make waffles, not pancakes. That's a given. But what kind of waffles? I searched the internets and found this recipe for banana cinnamon waffles from Handle the Heat.
As luck would have it, I happened to have two very ripe bananas. Awesome! We hardly ever have over ripe bananas. These must be waffles of destiny. (Insert dramatic music here.)
 |
| Here they are in all their syrup-y glory. Let's pretend that the waffles DON'T look like they're bleeding. |
 | |||
| And here they are nekkid. |
Luckily the scent was short lived, and I didn't have any nausea flashbacks.
The strawberry syrup and waffles made a great pair. I can appreciate bananas when they are accompanied by strawberries. Even if the strawberries make the banana dish look like it's in dire need of a tourniquet.
The waffles were quite filling. I usually eat 3, but could only eat one and a half. I thought maybe it might have just been my appetite that day, but now that I think about it, Blockette usually eats two waffles, and only ate one. Oh and Mrblocko only ate two as well. Maybe its the combination of the whole wheat, flax and banana that makes them so hearty.
I'd totally make these waffles again, even if I didn't have any strawberry syrup. Although, I think next time I'd add some walnuts. Cause that would be like banana bread waffles!
Banana Cinnamon Waffles from Handle the Heat
1 cup all-purpose flour
3/4 cup whole wheat flour
1/4 cup ground flaxseed
2 tablespoons sugar
1 1/2 teaspoons baking powder
1 teaspoon ground cinnamon
1/4 tsp nutmeg
1/4 teaspoon salt
1 1/2 cups low-fat milk
3 tablespoons butter, melted
2 large eggs, lightly beaten
2 large ripe bananas, mashed
Combine flours, flaxseed, sugar, baking powder, cinnamon, and salt in a bowl.
Whisk together milk, butter, and eggs in a large liquid measuring cup or small bowl. Add milk mixture to flour mixture, stirring until blended. Fold in mashed bananas.
Preheat a waffle iron. Coat iron with cooking spray. Spoon about 1/4 cup batter onto hot waffle iron, spreading batter to edges. (I used a heaping 1/3c for my round waffle iron.) Cook 3-4 minutes or until steaming stops; repeat with remaining batter. (I set my waffle iron on a 4 out of 5. I usually make waffles set on 5 as I like them crispy. If you have your waffle iron set too high, the banana in the waffle will start to burn.) Makes about 1 dozen in a standard square waffle iron, and 9 in a round waffle iron.
Tuesday, December 20, 2011
Hawaiian Smoothie
I was in the mood for a smoothie. Yeah. I realize it's December. Not exactly smoothie weather. It's not like it's been super cold or anything. I mean according to my Crocuses (Croci?) it's early spring. Sigh.
Anyhow, this is the Hawaiian smoothie from alla Poppy.

I made this version with 12 frozen canned mandarin oranges and 12 frozen pineapple chunks, also from a can. I omitted the coconut and marshmellows because I thought the smoothie was going to be sweet enough without them. I was right.
For me, this is a great way to get some fruit into my diet. I really don't eat enough fruit. Yeah Mom, I know the canned stuff is loaded with sugar, but it's better than no fruit at all.
Hawaiian Smoothie from alla Poppy
9-12 cubes of frozen canned pineapple
9-12 segments of frozen canned mandarin orange
about a half cup of yogurt
milk
flaked coconut
marshmellows
Put pineapple and orange in blender, add yogurt, and pour in a good amount of milk.(My blender needed about a cup.) Blend until smooth. Top with flaked coconut and marshmellows if you're feeling super fancy.
Anyhow, this is the Hawaiian smoothie from alla Poppy.

I made this version with 12 frozen canned mandarin oranges and 12 frozen pineapple chunks, also from a can. I omitted the coconut and marshmellows because I thought the smoothie was going to be sweet enough without them. I was right.
For me, this is a great way to get some fruit into my diet. I really don't eat enough fruit. Yeah Mom, I know the canned stuff is loaded with sugar, but it's better than no fruit at all.
Hawaiian Smoothie from alla Poppy
9-12 cubes of frozen canned pineapple
9-12 segments of frozen canned mandarin orange
about a half cup of yogurt
milk
flaked coconut
marshmellows
Put pineapple and orange in blender, add yogurt, and pour in a good amount of milk.(My blender needed about a cup.) Blend until smooth. Top with flaked coconut and marshmellows if you're feeling super fancy.
Wednesday, October 26, 2011
Microwave Apple Crisp
How is it that I have not written about this amazing apple crisp before? I got to thinking about it and I haven't made this awesome microwave apple crisp ever for Blockette. That means it's been at least 6 years since I've made it. I guess that I've just gotten so focused on baking new things that I lost touch with some of my favorite classics.
My mom and I used to make this all the time when I was a whipper snapper. It comes from Betty Crocker's Microwaving for One or Two. This was perfect for the two of us. We were never big eaters so most recipes that even served four left us with loads of leftovers. It was nice to have some dishes where we knew we wouldn't have to be eating the same thing for days on end.
 This is also the perfect dessert when you want apple pie, but are too lazy to make crust and want your dessert in 15 minutes or less. And let's face it, most of the time I'm too lazy to make a pie crust and I want dessert NOW!
Below is the recipe for two servings. You can easily half or double the recipe to your liking. If you are going to make a serving for one, just use a dash of the spices and nuke the apple crisp for about 3 minutes.
Microwave Apple Crisp for Two (A la Betty Crocker)
1 1/2 c peeled, sliced tart apples
2 T Flour (I've used All purpose and unbleached whole wheat. Both were tasty.)
2 T oats (the recipe says quick cooking, but I've used old fashioned and that works fine too.)
2 T brown sugar
2 T margarine or butter, softened
1/8 tsp cinnamon
1/8 tsp nutmeg
Spread apples in a 24 oz microwavable dish. Mix remaining ingredients until crumbly and sprinkle on top of apples. Nuke that bad boy for 5-6 minutes until the apples are tender. Serve with ice cream if you know what is good for you.
My mom and I used to make this all the time when I was a whipper snapper. It comes from Betty Crocker's Microwaving for One or Two. This was perfect for the two of us. We were never big eaters so most recipes that even served four left us with loads of leftovers. It was nice to have some dishes where we knew we wouldn't have to be eating the same thing for days on end.

Below is the recipe for two servings. You can easily half or double the recipe to your liking. If you are going to make a serving for one, just use a dash of the spices and nuke the apple crisp for about 3 minutes.
Microwave Apple Crisp for Two (A la Betty Crocker)
1 1/2 c peeled, sliced tart apples
2 T Flour (I've used All purpose and unbleached whole wheat. Both were tasty.)
2 T oats (the recipe says quick cooking, but I've used old fashioned and that works fine too.)
2 T brown sugar
2 T margarine or butter, softened
1/8 tsp cinnamon
1/8 tsp nutmeg
Spread apples in a 24 oz microwavable dish. Mix remaining ingredients until crumbly and sprinkle on top of apples. Nuke that bad boy for 5-6 minutes until the apples are tender. Serve with ice cream if you know what is good for you.
Subscribe to:
Posts (Atom)