I'm marking this recipe as a fail. It was super tasty but all the onions wound up giving me way too much gas and triggering my acid reflux. While I liked it a lot, it's a do not bake again.
Mejadra from serious eats
1 1/4 cups lentils
4 medium onions (1 1/2 lb before peeling)
3 T flour
1 c oil
2 t cumin
1 1/2 T coriander
1 cupbasmati rice
2 T olive oil
1/2 t turmeric
1 1/2 t allspice
1 1/2 t cinnamon
1 t sugar
1 1/2 c water
Salt andpepper
Place the lentils in a small saucepan, cover with plenty of water, bring to a boil, and cook for 12 to 15 minutes, until the lentils have softened but still have a little bite. Drain and set aside.
Peel the onions and slice thinly. Place on a large flat plate, sprinkle with the flour and 1 teaspoon salt, and mix well with your hands. Heat the sunflower oil in a medium heavy-bottomed saucepan placed over high heat. Make sure the oil is hot by throwing in a small piece of onion; it should sizzle vigorously. Reduce the heat to medium-high and carefully (it may spit!) add one-third of the sliced onion. Fry for 5 to 7 minutes, stirring occasionally with a slotted spoon, until the onion takes on a nice golden brown color and turns crispy (adjust the temperature so the onion doesn’t fry too quickly and burn). Use the spoon to transfer the onion to a colander lined with paper towels and sprinkle with a little more salt. Do the same with the other two batches of onion; add a little extra oil if needed.
Wipe the saucepan in which you fried the onion clean and put in the cumin and coriander seeds. Place over medium heat and toast the seeds for a minute or two. Add the rice, olive oil, turmeric, allspice, cinnamon, sugar, 1/2 teaspoon salt, and plenty of black pepper. Stir to coat the rice with the oil and then add the cooked lentils and the water. Bring to a boil, cover with a lid, and simmer over very low heat for 15 minutes.
Remove from the heat, lift off the lid, and quickly cover the pan with a clean tea towel. Seal tightly with the lid and set aside for 10 minutes.
Finally, add half the fried onion to the rice and lentils and stir gently with a fork. Pile the mixture in a shallow serving bowl and top with the rest of the onion.

Showing posts with label fail. Show all posts
Showing posts with label fail. Show all posts
Sunday, February 25, 2018


Tuesday, October 21, 2014
30 Days of Pumpkin-Day Twenty: Savory Pumpkin Dip Fail
We're two thirds of the way through pumpkin month! Can you believe it? And because not every recipe turns out the way you want it, I'm writing about this Savory Pumpkin Dip from My Whole Food Life.
No one in the house liked this recipe. No matter how much seasoning I added to the mixture, it still tasted like canned pumpkin. While we all really enjoy pumpkin in this house, we don't like it enough to just eat it straight from the can all by it's onsie.
Here is the recipe I used:
1 1/2 white beans ( 1/2 c more than the original recipe)
1 c canned pumpkin
1/4 c water
1 1/2 t smoked paprika (orig 1t)
1/2 t onion powder
1 t chili powder(orig 1/2t)
1/2 t kosher salt
In food processor combine all ingred til smooth. Serve immediately or refrigerate for later. makes about 1 1/2 cups dip.

Sadly, as much as I hate tossing out food, I had to pitch this dip. I'm thinking that if it contained 1/4-1/2 c pumpkin it might have been better? Maybe you just have to be a bigger fan of pumpkin than we are in the Blocko house?
Do you have any ideas how I might have salvaged this dip?
No one in the house liked this recipe. No matter how much seasoning I added to the mixture, it still tasted like canned pumpkin. While we all really enjoy pumpkin in this house, we don't like it enough to just eat it straight from the can all by it's onsie.
Here is the recipe I used:
1 1/2 white beans ( 1/2 c more than the original recipe)
1 c canned pumpkin
1/4 c water
1 1/2 t smoked paprika (orig 1t)
1/2 t onion powder
1 t chili powder(orig 1/2t)
1/2 t kosher salt
In food processor combine all ingred til smooth. Serve immediately or refrigerate for later. makes about 1 1/2 cups dip.
It even looks just like the stuff straight out of the can.
Sadly, as much as I hate tossing out food, I had to pitch this dip. I'm thinking that if it contained 1/4-1/2 c pumpkin it might have been better? Maybe you just have to be a bigger fan of pumpkin than we are in the Blocko house?
Do you have any ideas how I might have salvaged this dip?
Sunday, October 19, 2014
30 Days of Pumpkin-Day Eighteen: Pumpkin Indian Pudding
I'd never made Indian pudding before. As far as I can tell, it's called Indian pudding because it was a colonial variation on the British version of Hasty Pudding. Hasty Pudding was traditionally made with wheat, but as corn was more readily available in the new world, the settlers used that instead.
Sadly, something went terribly wrong with my hasty pudding. It got a nice pudding skin on it, but it never ever set up.

Oh sure it looks like it set up in the above photo...alas it did not. It was a great big ole soupy mess. I even tried baking it for longer. After an hour in the oven, the top started to get too dark for my liking.
The recipe says to let it sit for 15 min. I let mine sit for 2 hours.
No dice.
It was still as soupy as ever.
Not ever having Indian or Hasty pudding before, I'm not sure if that was how it was supposed to look. I'm going to guess from pictures on the blog "Kelly Bakes" that it was supposed to be much less soupy than my version. In her pictures, the dish looks like a soft, slightly under baked version of cornbread.
Luckily Blockette did not see this disaster. She would have likened it to something the cat leaves behind after it makes a hurky noise.
The dish tasted OK. Mrblocko wouldn't even try it. The consistency of the dish just threw him. It was a bit much for me as well, so the dessert met an untimely end with the garbage can.
I can't figure out where I went wrong. The original dish looks and sounds great. If you'd like to attempt the dish, head on over to Kelly Bakes for the recipe. Let me know if you have better luck than I did!
Sadly, something went terribly wrong with my hasty pudding. It got a nice pudding skin on it, but it never ever set up.
Oh sure it looks like it set up in the above photo...alas it did not. It was a great big ole soupy mess. I even tried baking it for longer. After an hour in the oven, the top started to get too dark for my liking.
The recipe says to let it sit for 15 min. I let mine sit for 2 hours.
No dice.
It was still as soupy as ever.
Not ever having Indian or Hasty pudding before, I'm not sure if that was how it was supposed to look. I'm going to guess from pictures on the blog "Kelly Bakes" that it was supposed to be much less soupy than my version. In her pictures, the dish looks like a soft, slightly under baked version of cornbread.
Luckily Blockette did not see this disaster. She would have likened it to something the cat leaves behind after it makes a hurky noise.
The dish tasted OK. Mrblocko wouldn't even try it. The consistency of the dish just threw him. It was a bit much for me as well, so the dessert met an untimely end with the garbage can.
I can't figure out where I went wrong. The original dish looks and sounds great. If you'd like to attempt the dish, head on over to Kelly Bakes for the recipe. Let me know if you have better luck than I did!
Wednesday, May 28, 2014
Vegan Lemon Curd
I attempted to make vegan lemon curd from this recipe via Lunchbox bunch.
It didn't turn out exactly as I'd hoped.

While it was good, it never set up like it should have so it was more like a thick lemon glaze.
It was still tasty. I used it in a frozen dessert instead of as a topping for toast.
Vegan Lemon Curd Spread via lunch box bunch makes 1 1/4 cups
1/2 cup almond milk, vanilla
1/4 cup water
1 Tbsp corn starch
6 T sugar
6 T fresh lemon juice
1 t lemon zest
5 T vegan buttery spread
pinch of salt
Dissolve corn starch in the cold soy milk and water in pot. Turn heat to med-high and continuously stir. Add in spread, juice and sugar and continue to stir until mixture starts to bubble and thicken. Reduce heat to low and beat with a hand-held beater for about 90 sec.Transfer mixture to serving dish and refrigerate until chilled. Store in fridge and eat in 2-3 days.
Friday, May 16, 2014
Hot Mess Circus Donuts
I got sick of grazing on Easter jelly beans so I thought I should make something out of them to be done with them in one fell swoop. After much searching I settled on these Jelly Bean Donuts from Melanie Makes.
Oh. My. Word.
What a hot mess they turned out to be.
First, they stuck to the pan and broke apart as a result of the stickage. Second, the ratio of jelly beans to donut was way way off. There were more beans than cakey donut! Third, the jelly beans got so chewy after baking it was almost like eating taffy. Last of all, they just looked plain ugly.

See.
Hot mess.
I think they look like a circus threw up on them.
Blockette thought they were great. Mrblocko and I not so much.
Here's what might have went wrong:
First, I made quite a few substitutions. I had cream in the fridge that needed to be used up so I used that instead of milk. I also used sour cream instead of yogurt. This may have made the batter thicker than it should have been. The thing is that the actual donut part tasted great, so I'm pretty sure these substitutions were not the problem.
I also don't think these substitutions would have made a difference in the volume of batter. The donuts on Melanie Makes look the same size as the ones I made, however her recipe states that it makes 12 donuts. I only got 6.
The substitution that may have caused the biggest problem was the jelly beans. Her recipe calls for Laffy Taffy Jelly beans. Mine were some other brand. Perhaps Laffy Taffy Jelly beans react differently to baking than the brand I used. (I think it was Jolly Rancher flavored Jelly Beans.)
Second, I think the jelly beans may have been better if they had been chopped up in the dough. Maybe they would have dissolved a little bit more upon baking.
Third, there were just too many jelly beans. If I were a brave baker, I'd use 1/2 c of jelly beans instead of the 1 c the recipe calls for.
Let me know if you are bold enough to test out these theories. I promised my husband that I would NEVER make these donuts again.
Oh. My. Word.
What a hot mess they turned out to be.
First, they stuck to the pan and broke apart as a result of the stickage. Second, the ratio of jelly beans to donut was way way off. There were more beans than cakey donut! Third, the jelly beans got so chewy after baking it was almost like eating taffy. Last of all, they just looked plain ugly.
See.
Hot mess.
I think they look like a circus threw up on them.
Blockette thought they were great. Mrblocko and I not so much.
Here's what might have went wrong:
First, I made quite a few substitutions. I had cream in the fridge that needed to be used up so I used that instead of milk. I also used sour cream instead of yogurt. This may have made the batter thicker than it should have been. The thing is that the actual donut part tasted great, so I'm pretty sure these substitutions were not the problem.
I also don't think these substitutions would have made a difference in the volume of batter. The donuts on Melanie Makes look the same size as the ones I made, however her recipe states that it makes 12 donuts. I only got 6.
The substitution that may have caused the biggest problem was the jelly beans. Her recipe calls for Laffy Taffy Jelly beans. Mine were some other brand. Perhaps Laffy Taffy Jelly beans react differently to baking than the brand I used. (I think it was Jolly Rancher flavored Jelly Beans.)
Second, I think the jelly beans may have been better if they had been chopped up in the dough. Maybe they would have dissolved a little bit more upon baking.
Third, there were just too many jelly beans. If I were a brave baker, I'd use 1/2 c of jelly beans instead of the 1 c the recipe calls for.
Let me know if you are bold enough to test out these theories. I promised my husband that I would NEVER make these donuts again.
Monday, February 17, 2014
Where I discover my dislike of warm almond milk
I love me some hot chocolate. Unfortunately milk doesn't really like me. I can have it in small amounts, just not 8oz in one sitting.
I've tried various brands coconut milk and rice milk and found them both to not be to my liking. Then I found Silk almond milk. While it doesn't taste a whole lot like dairy milk, I do enjoy the taste.
So it would be a logical conclusion that I would love a steaming cup of hot chocolate. I even found this recipe from Never homemaker where it actually calls for almond milk in the recipe. I took two sips and spit it out, cursing the recipe all the way to the sink.
Then I made myself a cup of instant hot chocolate with the almond milk.
Lather.
Rinse.
Repeat.
It wasn't the recipe from never homemaker...it was mine own tastebuds.
Sigh. I'm forced to settle for water based hot chocolate (boo.) or being doubled over in pain (boo. hiss.)
Alas.
I've tried various brands coconut milk and rice milk and found them both to not be to my liking. Then I found Silk almond milk. While it doesn't taste a whole lot like dairy milk, I do enjoy the taste.
So it would be a logical conclusion that I would love a steaming cup of hot chocolate. I even found this recipe from Never homemaker where it actually calls for almond milk in the recipe. I took two sips and spit it out, cursing the recipe all the way to the sink.
Then I made myself a cup of instant hot chocolate with the almond milk.
Lather.
Rinse.
Repeat.
It wasn't the recipe from never homemaker...it was mine own tastebuds.
Sigh. I'm forced to settle for water based hot chocolate (boo.) or being doubled over in pain (boo. hiss.)
 |
| via |
Friday, February 7, 2014
The Slow Cooker Black Bread That Almost Wasn't
I'm so angry the camera ate this picture. The Slow Cooker Black Bread from Kleinworth and Co turned out really really...special.
The darn thing was so moist I added an additional 2 cups...of super moisture absorbing rye flour and it was still very. Very. VERY wet when I put it in the crockpot.
I baked it for 2 hours on high. The amount of time I've found it takes to cook every other loaf of bread I've ever made in the crockpot. However, that was using this recipe from Artisan bread in 30 min a day. After 2 hours on high, this recipe for bread was no where near being done. We had to leave the house for over an hour so I turned the crockpot off, thinking that the residual heat from the ceramic insert would continue to bake the bread.
When we got home the bread was still not done. So I turned the crockpot back on and cooked it for another 45 min. The bread was still quite raw in the middle. By this time the outside was getting very brown.
I wrapped the bread in foil and baked it for another 30 min at 400F.
That should have done it.
But alas...
No.
The loaf did split on one side though. The bread looked sort of like a 3D pacman.
Most of it was done...mostly. I cut the more done exterior parts off of the round loaf and cubed those slices. I then put the pieces under the broiler to make croutons. Let me tell you, those crutons were something amazing dipped into baked potato soup. If only the whole loaf had turned out.
I tossed the doughy middle in pieces out the back door for the squirrels. The squirrels went mad for it. It was hilarious to watch them fight over the precious pieces. Who knew squirrels liked doughy brown bread so much!
I have no idea why the bread recipe was so moist, nor why it took so long to cook. It probably had to do with the fact that it calls for about 2 cups of "wet" ingredients and only 2 1/2 c of flour. Perhaps my 2 cup addition of rye flour made the loaf too dense to cook all the way through. It's really too bad because what did get cooked was scrumptious. I guess I'll just stick to my usual crockpot bread recipe from now on.
The darn thing was so moist I added an additional 2 cups...of super moisture absorbing rye flour and it was still very. Very. VERY wet when I put it in the crockpot.
I baked it for 2 hours on high. The amount of time I've found it takes to cook every other loaf of bread I've ever made in the crockpot. However, that was using this recipe from Artisan bread in 30 min a day. After 2 hours on high, this recipe for bread was no where near being done. We had to leave the house for over an hour so I turned the crockpot off, thinking that the residual heat from the ceramic insert would continue to bake the bread.
When we got home the bread was still not done. So I turned the crockpot back on and cooked it for another 45 min. The bread was still quite raw in the middle. By this time the outside was getting very brown.
I wrapped the bread in foil and baked it for another 30 min at 400F.
That should have done it.
But alas...
No.
The loaf did split on one side though. The bread looked sort of like a 3D pacman.
Most of it was done...mostly. I cut the more done exterior parts off of the round loaf and cubed those slices. I then put the pieces under the broiler to make croutons. Let me tell you, those crutons were something amazing dipped into baked potato soup. If only the whole loaf had turned out.
I tossed the doughy middle in pieces out the back door for the squirrels. The squirrels went mad for it. It was hilarious to watch them fight over the precious pieces. Who knew squirrels liked doughy brown bread so much!
 |
| via |
Monday, October 7, 2013
Watermelon Slushy Fail
A few weeks ago I bought this massive watermelon. The large ones were cheaper than the personal ones for some reason. A large watermelon is way too much for the three of us to eat before it spoils. I looked to see if there was some other way we could consume the melon aside from just eating it normally in cut up cubes.
I came across this recipe for Watermelon Lime Frosties over at My Life in Food. So I froze the remaining watermelon, which just happened to be exactly 3 cups-exactly what the recipe called for. It must be kismet, right?
Hmmm.
Not so much.
First off my wimpy blender did not like the frozen watermelon. I thought I was going to burn out the motor on the poor guy. As luck would have it, I did not and I managed to puree the mixture after adding an additional cup of water. That and pulsing and poking at the concoction for a good 20 min.
Then I thought to myself, "Man, this better be worth it."
Sadly, not so much. Although, it wasn't nearly as bad as the Cucumber Drink of Slime.
The drink was a beautiful pinkish red though. I think that was the biggest improvement over the Failed cucumber drink. It actually looked like it was going to taste good.
So what was the problem with the drink? It tasted bitter. I even added additional maple syrup - 3 additional Tablespoons for a total of 5 Tablespoons.
I'm pretty sure the culprit was the seeds. Huh? Well, you ask, why didn't I pick out the seeds? It was a seedless watermelon. What? I thought you said the seeds were the problem. Gee you should get your story straight.
Yes. The seeds WERE most likely the problem. Even seedless watermelon has seeds. They are usually those tiny puny little seeds that are impossible to pick out. Normally, they just get eaten and you can't taste them at all. But in pureeing the melon...they get pulverized and their bitter qualities overwhelm the entire drink. This is the only thing that I can think of that would make the drink bitter as the lime juice was sour, and the banana and maple syrup were sweet.
To be fair, this drink wasn't a total Fail. Blockette loved it. I'm not sure why. I gave her a big old glass and she slurped and gulped that bad boy down. I poured some of the leftovers into Popsicle molds, but tossed the rest. Mrblocko didn't even want to try it. I think he was still reeling from the cucumber drink debacle.
This slushy concoction could have been salvaged by adding some booze. Something like Malibu would have added sweetness and I believe the coconut flavor would have overwhelmed the bitterness. However, it was a school night and Alcohol and I are not friends. I didn't think the experiment was worth the pain I'd have to suffer the next morning.
Watermelon Lime Frosty from My Life in Food
3 c watermelon, cubed and frozen
1 ripe banana, peeled and frozen
2-5 T maple syrup
Zest from 2 limes
Juice from 2 limes (about 4 tablespoons)
1/2 -1 c water
Blend all ingredients until smooth, adding more water as needed to keep the mixture moving. Add booze as needed.
I came across this recipe for Watermelon Lime Frosties over at My Life in Food. So I froze the remaining watermelon, which just happened to be exactly 3 cups-exactly what the recipe called for. It must be kismet, right?
Hmmm.
Not so much.
First off my wimpy blender did not like the frozen watermelon. I thought I was going to burn out the motor on the poor guy. As luck would have it, I did not and I managed to puree the mixture after adding an additional cup of water. That and pulsing and poking at the concoction for a good 20 min.
Then I thought to myself, "Man, this better be worth it."
 |
| via |

The drink was a beautiful pinkish red though. I think that was the biggest improvement over the Failed cucumber drink. It actually looked like it was going to taste good.
So what was the problem with the drink? It tasted bitter. I even added additional maple syrup - 3 additional Tablespoons for a total of 5 Tablespoons.
I'm pretty sure the culprit was the seeds. Huh? Well, you ask, why didn't I pick out the seeds? It was a seedless watermelon. What? I thought you said the seeds were the problem. Gee you should get your story straight.
Yes. The seeds WERE most likely the problem. Even seedless watermelon has seeds. They are usually those tiny puny little seeds that are impossible to pick out. Normally, they just get eaten and you can't taste them at all. But in pureeing the melon...they get pulverized and their bitter qualities overwhelm the entire drink. This is the only thing that I can think of that would make the drink bitter as the lime juice was sour, and the banana and maple syrup were sweet.
To be fair, this drink wasn't a total Fail. Blockette loved it. I'm not sure why. I gave her a big old glass and she slurped and gulped that bad boy down. I poured some of the leftovers into Popsicle molds, but tossed the rest. Mrblocko didn't even want to try it. I think he was still reeling from the cucumber drink debacle.
This slushy concoction could have been salvaged by adding some booze. Something like Malibu would have added sweetness and I believe the coconut flavor would have overwhelmed the bitterness. However, it was a school night and Alcohol and I are not friends. I didn't think the experiment was worth the pain I'd have to suffer the next morning.
Hangover + walking into traffic = Pancake Mrsblocko
 |
| via |

Watermelon Lime Frosty from My Life in Food
3 c watermelon, cubed and frozen
1 ripe banana, peeled and frozen
2-5 T maple syrup
Zest from 2 limes
Juice from 2 limes (about 4 tablespoons)
1/2 -1 c water
Blend all ingredients until smooth, adding more water as needed to keep the mixture moving. Add booze as needed.
Friday, September 20, 2013
What Not To Do With Cucumbers
I planted one lonely cucumber plant. This spring I debated whether or not that was a good idea, you know, just in case the one plant dies...then you've got a backup.
Whoooo boy. Am I sure glad I only planted one cucumber. That sucker is prolific. I'm pretty sure there is a law of physics where you have to have at least 4 cucumbers on your kitchen counter at a time.
I've given cucumbers to the food pantry, my best friend, my husband's best friend, and Blockette's teacher. I still have an overabundance. Cucumbers up the wazoo.
What on earth was I going to do with all these cucumbers? I did a search online and found this recipe for a cucumber drink. It called for a pound of cucumber, 1/2 c lime, 1 1/4c mint, 1/2 c sugar and 1 c water.
Long story short, you make a simple syrup out of the sugar and water, then dump it and all the other ingredients into a blender and puree. After straining, you then add 3 more cups of water.
The recipe said to leave the skins on. That the skins would give the drink a lovely green color. Um no. It made the drink a pukey green color. That was problem number one.
Problem number two was my mint had gone to seed. I had a dilly of a time trying to get a cups worth of mint. And then there was the tiny matter of a giant moth that hid inside the mint I brought outside. I mean it wasn't Mothra, but it wasn't one of those dainty white ones. Think Silence of the Lambs. Yeah. There was lots of screaming.
The third issue was that I realized my lime juice had gone bad. So I mixed everything up without that. I tested the drink to see how it was before I went out and bought some lime juice. It tasted...ok, but it seemed like it would be a lot better with the lime.
So Blockette and I headed out to the store where I purchased some non-brown non-lumpy lime juice, which I added to my cucumber drink.
I poured the three of us each a glass.
We all took a sip and declared it "not bad." Then we had another sip. My family was silent. (Yeah. They are some smart peeps.) They all looked at me. Blinking. I quietly grabbed their glasses and dumped their contents down the drain, along with the remaining gunk in the pitcher.
Then my husband said, "Honey? Never EVER make that again."
Done. And. Done.
(Although, I think if I used better mint and peeled the cucumber...Kidding honey! Just kidding!)
Whoooo boy. Am I sure glad I only planted one cucumber. That sucker is prolific. I'm pretty sure there is a law of physics where you have to have at least 4 cucumbers on your kitchen counter at a time.
 |
| via |
I've given cucumbers to the food pantry, my best friend, my husband's best friend, and Blockette's teacher. I still have an overabundance. Cucumbers up the wazoo.
What on earth was I going to do with all these cucumbers? I did a search online and found this recipe for a cucumber drink. It called for a pound of cucumber, 1/2 c lime, 1 1/4c mint, 1/2 c sugar and 1 c water.
Long story short, you make a simple syrup out of the sugar and water, then dump it and all the other ingredients into a blender and puree. After straining, you then add 3 more cups of water.
The recipe said to leave the skins on. That the skins would give the drink a lovely green color. Um no. It made the drink a pukey green color. That was problem number one.
Problem number two was my mint had gone to seed. I had a dilly of a time trying to get a cups worth of mint. And then there was the tiny matter of a giant moth that hid inside the mint I brought outside. I mean it wasn't Mothra, but it wasn't one of those dainty white ones. Think Silence of the Lambs. Yeah. There was lots of screaming.
The third issue was that I realized my lime juice had gone bad. So I mixed everything up without that. I tested the drink to see how it was before I went out and bought some lime juice. It tasted...ok, but it seemed like it would be a lot better with the lime.
So Blockette and I headed out to the store where I purchased some non-brown non-lumpy lime juice, which I added to my cucumber drink.
I poured the three of us each a glass.
We all took a sip and declared it "not bad." Then we had another sip. My family was silent. (Yeah. They are some smart peeps.) They all looked at me. Blinking. I quietly grabbed their glasses and dumped their contents down the drain, along with the remaining gunk in the pitcher.
Then my husband said, "Honey? Never EVER make that again."
Done. And. Done.
 |
| via |
(Although, I think if I used better mint and peeled the cucumber...Kidding honey! Just kidding!)
Wednesday, July 3, 2013
Wild Rice Flat Bread Fail
I made this Wild Rice Flatbread from Pinch of Yum because I had all this leftover wild rice. The pictures on the website also looked so appetizing. Unfortunately, my flatbread did not turn out at all like the pictures.
Pinch of Yum's flat bread was a lovely golden brown. Mine was dark blackish brown. And before you ask if I burnt it, let me say, "NO! I did NOT!" It was that color after I pureed it.
 The darn thing also did not want to cook. After 15 minutes I tried to flip it using the towel technique mentioned in the recipe and the whole thing fell apart completely. It had not set at all. I was able to mash it back together in the pan and form a patty again.
Long story short, it took an hour in the oven before the rice flat bread had set up. This was not the quick lunch I was hoping for!
The crispy edges were OK, but the center was still quite mushy. I'm sure I could have continued to cook it for another 30-45 minutes, but I didn't feel like spending that much time on something that just turned out OK.
So what went wrong? I'm thinking because of the texture of the rice the original recipe resulted in a lighter bread, they used a wild rice blend. Mine was 100% wild rice. I think the starch from the regular rice may have help bind everything together. Also, I think that I just don't care for wild rice plain. Another reason for using a wild rice blend, it gives a bit of texture and flavor variety.
I wanted this recipe to work so badly, but I guess it just wasn't in the cards. Please let me know if you try it and how it works out for you!
Wild Rice Flatbread from Pinch of Yum
2 c cooked wild rice (or “instant” wild rice, wild rice blend, etc I suggest the wild rice blend)
1/2 c water
2 egg whites
1 clove of garlic
1 tbs. flaxseed meal
a sprinkle of red pepper flakes
1/2 tbs. olive oil
salt
pepper
Preheat to 425F. Grease a heavy skillet with oil. Spread it out so bottom and sides are well covered.
Place all ingredients in a food processor and blend until batter-like (about 30 seconds). Pour into pan. Bake for 15 min and remove from oven. Using a spatula, flip flatbread over and bake for another 15 min. Check doneness and bake for 5 min if needed. You’ll know when it’s done because it starts to pull away from the sides of the pan. (Mine never did this) Remove from oven, cool, cut, and serve with hummus or other dips.
Pinch of Yum's flat bread was a lovely golden brown. Mine was dark blackish brown. And before you ask if I burnt it, let me say, "NO! I did NOT!" It was that color after I pureed it.

Long story short, it took an hour in the oven before the rice flat bread had set up. This was not the quick lunch I was hoping for!
The crispy edges were OK, but the center was still quite mushy. I'm sure I could have continued to cook it for another 30-45 minutes, but I didn't feel like spending that much time on something that just turned out OK.
So what went wrong? I'm thinking because of the texture of the rice the original recipe resulted in a lighter bread, they used a wild rice blend. Mine was 100% wild rice. I think the starch from the regular rice may have help bind everything together. Also, I think that I just don't care for wild rice plain. Another reason for using a wild rice blend, it gives a bit of texture and flavor variety.
I wanted this recipe to work so badly, but I guess it just wasn't in the cards. Please let me know if you try it and how it works out for you!
Wild Rice Flatbread from Pinch of Yum
2 c cooked wild rice (or “instant” wild rice, wild rice blend, etc I suggest the wild rice blend)
1/2 c water
2 egg whites
1 clove of garlic
1 tbs. flaxseed meal
a sprinkle of red pepper flakes
1/2 tbs. olive oil
salt
pepper
Preheat to 425F. Grease a heavy skillet with oil. Spread it out so bottom and sides are well covered.
Place all ingredients in a food processor and blend until batter-like (about 30 seconds). Pour into pan. Bake for 15 min and remove from oven. Using a spatula, flip flatbread over and bake for another 15 min. Check doneness and bake for 5 min if needed. You’ll know when it’s done because it starts to pull away from the sides of the pan. (Mine never did this) Remove from oven, cool, cut, and serve with hummus or other dips.
Monday, March 25, 2013
Crochet Bath Puff
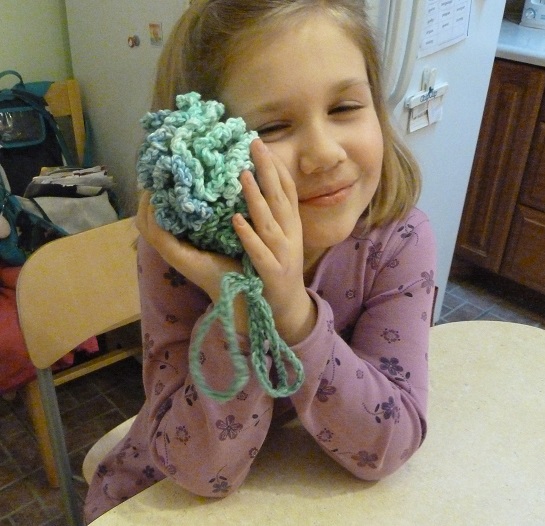
The yarn I used is called Lily Sugar'n Cream, and the color is country stripes. The poof took almost one full skein. Because the yarn I used was an ombre where it gradually changed from one color to the next, I opted not to use multiple colors as the pattern suggested.
Also, when making the tie thingie that scrunches the poof up, I didn't switch colors mid way. One of the comments suggested doubling the length of the tie and weaving it through the whole thing so it could tie at one end. The ends of the ties are slip stitched ends together, which eliminated the need for hearts at the end. This made for a loop where it can be hung in the shower.
Here's what the poof looks like stretched out:

Hmmm...not very much to my liking.
As a personal preference, I like my scrubbies to have a bit of exfoliating power. This had zero. It was just too soft! I know that there are some of you that like that sort of thing, but it's not my cuppa tea.
Now I don't know what to do with it. I've used it, so I can't really give it away, but I have no desire to use it again. Any suggestions? Should I unravel it and reuse the yarn for something else? Toss it? Let Blockette use it to wash her bike? I have no idea.
Friday, January 25, 2013
Chalkboard Journal Fail
This Christmas I decided to make something crafty for Blockette. She loves journals and notebooks to write and draw in. I thought that this Chalkboard journal from No.2 Pencil would be perfect.
Except that it wasn't.
I don't know what happened.
This time I followed the directions exactly. Not even taking a single short cut.
I even used 6 coats of Martha Stewart chalkboard paint compared to the 4 in the tutorial. Just in case.
I rubbed the surface with chalk and then wiped it off with a damp cloth. Just like the directions say.
Then I wrote on the journal cover. Seemed fine. I erased it with a dry cloth.
So I wrapped it and it sat around for a week.
Blockette was so excited when she opened it along with a brand new box of colored crayola brand chalk.
So of course she grabbed a piece of chalk and went to town on the cover to see if it worked.
This is what happened:

If you look in the upper right hand corner you can see 2 games of tic tac toe she played with her father.
How sweet!
Only...
They will NOT come off.
I tried wiping it off with a dry cloth and paper towel.
Then I made it damp.
Neither thing got the chalk off.
I even tried rubbing more chalk on the cover with the side of the piece of chalk. All that did was scratch the cover and change the hue to a slightly different shade of blue.
I don't know why it scratched the cover. I wasn't using my super Hulk like strength super powers or anything. Just a light gentle hand. Maybe I AM the Hulk?
Any tips or suggestions about what I might have done wrong? Or what I can do to fix this craft disaster?
Except that it wasn't.
I don't know what happened.
This time I followed the directions exactly. Not even taking a single short cut.
I even used 6 coats of Martha Stewart chalkboard paint compared to the 4 in the tutorial. Just in case.
I rubbed the surface with chalk and then wiped it off with a damp cloth. Just like the directions say.
Then I wrote on the journal cover. Seemed fine. I erased it with a dry cloth.
So I wrapped it and it sat around for a week.
Blockette was so excited when she opened it along with a brand new box of colored crayola brand chalk.
So of course she grabbed a piece of chalk and went to town on the cover to see if it worked.
This is what happened:

If you look in the upper right hand corner you can see 2 games of tic tac toe she played with her father.
How sweet!
Only...
They will NOT come off.
I tried wiping it off with a dry cloth and paper towel.
Then I made it damp.
Neither thing got the chalk off.
I even tried rubbing more chalk on the cover with the side of the piece of chalk. All that did was scratch the cover and change the hue to a slightly different shade of blue.
I don't know why it scratched the cover. I wasn't using my super Hulk like strength super powers or anything. Just a light gentle hand. Maybe I AM the Hulk?
Any tips or suggestions about what I might have done wrong? Or what I can do to fix this craft disaster?
Tuesday, January 15, 2013
Two Homemade Mustards
Lately I've been seeing a lot of things online for homemade mustards. The whole process seemed quite simple so I thought I'd give it a try myself.
I chose the recipe for Homemade Mustard from James's Recipes. I made one batch with Red wine (with pomegranite and acai) vinegar and honey, and another with Cider Vinegar and brown sugar.
 I let them cure for a week like the directions said before testing them.
The verdict was....undecided.
I had Mrblocko bring one of the jars with him to work to spread on his sandwiches instead of the store bought grainy mustard. After about a week he decided that he just didn't like it. Neither of us could figure out how to make the mustard more palatable.
Was it too salty, not salty enough? Too sweet, or not sweet enough? Too acidic, not acidic enough?
We just couldn't say.
Maybe we just like the chemicals they put in the store bought stuff?
Anyhow, this is one experiment I won't be attempting again. I'll leave that to the professionals!
Wholegrain mustard from James's Recipes
2 tbsp Yellow (white) Mustard Seeds
2 tbsp Brown Mustard Seeds
100ml White Wine or Cider Vinegar
1/2 tsp Sea Salt
1 tsp Sugar
In a small (non metallic) container, jar or glass tumbler, add the mustard seeds and cover with the vinegar. Leave to stand for 3 days – do not refrigerate. To prevent the kitchen from smelling of vinegar, cover with cling film. Check periodically – the seeds will swell as they absorb the liquid. Add additional liquid to prevent drying out, It doesn’t matter if you add too much. After 3 days, drain of the surplus liquid and reserve. User a hand blender, food processor or pestle & mortar to grind the seeds into a paste. Add the salt, sugar and continue to blend. Add a little extra of the liquid to get a mustard with a good consistency Bottle into sterilized jars and if possible leave to mature for a few days before using. It should keep for several months and doesn’t need refrigerating.
I chose the recipe for Homemade Mustard from James's Recipes. I made one batch with Red wine (with pomegranite and acai) vinegar and honey, and another with Cider Vinegar and brown sugar.

The verdict was....undecided.
I had Mrblocko bring one of the jars with him to work to spread on his sandwiches instead of the store bought grainy mustard. After about a week he decided that he just didn't like it. Neither of us could figure out how to make the mustard more palatable.
Was it too salty, not salty enough? Too sweet, or not sweet enough? Too acidic, not acidic enough?
We just couldn't say.
Maybe we just like the chemicals they put in the store bought stuff?
Anyhow, this is one experiment I won't be attempting again. I'll leave that to the professionals!
Wholegrain mustard from James's Recipes
2 tbsp Yellow (white) Mustard Seeds
2 tbsp Brown Mustard Seeds
100ml White Wine or Cider Vinegar
1/2 tsp Sea Salt
1 tsp Sugar
In a small (non metallic) container, jar or glass tumbler, add the mustard seeds and cover with the vinegar. Leave to stand for 3 days – do not refrigerate. To prevent the kitchen from smelling of vinegar, cover with cling film. Check periodically – the seeds will swell as they absorb the liquid. Add additional liquid to prevent drying out, It doesn’t matter if you add too much. After 3 days, drain of the surplus liquid and reserve. User a hand blender, food processor or pestle & mortar to grind the seeds into a paste. Add the salt, sugar and continue to blend. Add a little extra of the liquid to get a mustard with a good consistency Bottle into sterilized jars and if possible leave to mature for a few days before using. It should keep for several months and doesn’t need refrigerating.
Sunday, December 30, 2012
Xmas '12 cookies part 3: The Big Let Down
So far my Christmas Cookie Disasters haven't been so disastrous.
I wouldn't say these last too cookies weren't a disaster, they were just massive disappointments.
Let's start out with the Caramel Apple Fudge from Very Culinary.

Why do I keep thinking I can make fudge?
Isn't that the definition of insanity? Doing the same thing over and over and expecting different results?
I must have fudge insanity because I make it and every time it turns out gritty and grainy. The fudge also took 24 hours to set up in the fridge. I'm pretty sure it's not supposed to take that long.
I wish I could figure out what I was doing wrong while preparing fudge. I followed the directions to the letter. Maybe fudge and baklava are my kryptonite in the kitchen.
My mom took one bite of this fudge and I'm pretty sure she spit it out. She said it tasted like straight sugar. She couldn't taste the caramel or the apple pieces.
Then again, I made a box of cookies for Blockette's teacher and the next day Blockette came home with a note from her teacher saying her husband thought the apple bites were "heavenly."
So I'd say the reviews on this fudge were definitely mixed!
This brings us to the Pumpkin Pecan Polvorones/Russian tea cakes/Mexican wedding cakes from Cookie and Kate. I've been on such a massive pumpkin crush that I thought, "I'm sure if I combine my favorite cookie with pumpkin it will turn out amazing."
The thing was that the cookies themselves were not terrible. They were a very mildly sweet little tidbit, great for a mid morning snack.
So what was the problem?
They look just like Russian Tea Cakes.
 So when you bite into them...you think you are going to taste a Russian Tea Cake.
And these cookies? They are soooooo NOT a Russian tea cake.
NOT NOT NOT...to infinity.
I was so thrown by their appearance that I wound up tossing most of them. No one wanted to eat them and they went stale. Boooo hiss.
It's too bad that these cookies are camouflaged as Mexican Wedding Cakes. If they looked like something else, I think people would have eaten them instead of complaining about how they were NOT Polvorones.
In fact, the raw dough tasted better than the cooked version. As the dough is egg free, I think I might try making these and freezing them uncooked for a low sugar snack. Uncooked, they just look like raw cookie dough.
I got so much flack from my family over these cookies that next year, I'm going to tell them all that I made this same pumpkin version, but make the classic version instead. That way I won't have to share! How sneaky is that?!
Caramel Apple Pie Fudge from Very Culinary
3/4 cup apple cider
3/4 cup unsalted butter
1 (5 ounce) can evaporated milk
3 cups sugar
2 cups white chocolate chips
3/4 cup dried apple, finely diced
1 t vanilla
1 t cinnamon
1/2 t nutmeg
1/4 t all spice
1/4 cup Dulce De Leche
Line an 8×8 baking dish with parchment paper (13×9 inch pan if you like your fudge thinner.) Set aside. In a large saucepan combine the first four ingredients, bring to a rolling boil and stir continuously for 4 minutes (because the mixture burns easily.) Remove from heat. Add white chocolate, dried apple, vanilla, and spices; blend well, stirring for several more minutes until chocolate is almost completely dissolved. Pour into baking dish. Heat Dulche de Leche in the microwave for 15-20 seconds to loosen. Drizzle or drop dollops around in the baking dish and swirl through with a dull knife for a marbled effect. Refrigerate for at least 3 hours (or overnight), until hardened. Remove parchment paper from pan and place on cutting board. Cut into squares. Fudge can be stored in a covered container in the refrigerator for one week. Makes 16 big squares, or up to 64 little ones
For Pumpkin Russian Tea Cakes recipe see: Cookie and Kate
I wouldn't say these last too cookies weren't a disaster, they were just massive disappointments.
Let's start out with the Caramel Apple Fudge from Very Culinary.

Why do I keep thinking I can make fudge?
Isn't that the definition of insanity? Doing the same thing over and over and expecting different results?
I must have fudge insanity because I make it and every time it turns out gritty and grainy. The fudge also took 24 hours to set up in the fridge. I'm pretty sure it's not supposed to take that long.
I wish I could figure out what I was doing wrong while preparing fudge. I followed the directions to the letter. Maybe fudge and baklava are my kryptonite in the kitchen.
My mom took one bite of this fudge and I'm pretty sure she spit it out. She said it tasted like straight sugar. She couldn't taste the caramel or the apple pieces.
Then again, I made a box of cookies for Blockette's teacher and the next day Blockette came home with a note from her teacher saying her husband thought the apple bites were "heavenly."
So I'd say the reviews on this fudge were definitely mixed!
This brings us to the Pumpkin Pecan Polvorones/Russian tea cakes/Mexican wedding cakes from Cookie and Kate. I've been on such a massive pumpkin crush that I thought, "I'm sure if I combine my favorite cookie with pumpkin it will turn out amazing."
The thing was that the cookies themselves were not terrible. They were a very mildly sweet little tidbit, great for a mid morning snack.
So what was the problem?
They look just like Russian Tea Cakes.

And these cookies? They are soooooo NOT a Russian tea cake.
NOT NOT NOT...to infinity.
I was so thrown by their appearance that I wound up tossing most of them. No one wanted to eat them and they went stale. Boooo hiss.
It's too bad that these cookies are camouflaged as Mexican Wedding Cakes. If they looked like something else, I think people would have eaten them instead of complaining about how they were NOT Polvorones.
In fact, the raw dough tasted better than the cooked version. As the dough is egg free, I think I might try making these and freezing them uncooked for a low sugar snack. Uncooked, they just look like raw cookie dough.
I got so much flack from my family over these cookies that next year, I'm going to tell them all that I made this same pumpkin version, but make the classic version instead. That way I won't have to share! How sneaky is that?!
Caramel Apple Pie Fudge from Very Culinary
3/4 cup apple cider
3/4 cup unsalted butter
1 (5 ounce) can evaporated milk
3 cups sugar
2 cups white chocolate chips
3/4 cup dried apple, finely diced
1 t vanilla
1 t cinnamon
1/2 t nutmeg
1/4 t all spice
1/4 cup Dulce De Leche
Line an 8×8 baking dish with parchment paper (13×9 inch pan if you like your fudge thinner.) Set aside. In a large saucepan combine the first four ingredients, bring to a rolling boil and stir continuously for 4 minutes (because the mixture burns easily.) Remove from heat. Add white chocolate, dried apple, vanilla, and spices; blend well, stirring for several more minutes until chocolate is almost completely dissolved. Pour into baking dish. Heat Dulche de Leche in the microwave for 15-20 seconds to loosen. Drizzle or drop dollops around in the baking dish and swirl through with a dull knife for a marbled effect. Refrigerate for at least 3 hours (or overnight), until hardened. Remove parchment paper from pan and place on cutting board. Cut into squares. Fudge can be stored in a covered container in the refrigerator for one week. Makes 16 big squares, or up to 64 little ones
For Pumpkin Russian Tea Cakes recipe see: Cookie and Kate
Tuesday, December 11, 2012
Vegan PB mug cake FAIL!
What the?

In all the times I have made mug cakes, THIS has never happened.
The cake EXPLODED in the microwave.
This was supposed to be a Vegan Peanut Butter mug cake from Hot Pot Cooking.
The only thing I can think that could have caused this disaster was that this particular microwave mug cake called for a "Flax egg." A flax egg is part water and part ground flax seed. This mixture gels up and behaves very much like a real egg. It's pretty common in vegan cooking.
To add insult to injury, the gooey mess tasted horrible. This is another thing I can't figure out. Before I popped the mug into the microwave, I licked the spoon I'd used to mix the concoction. It tasted just fine. However, when I took a nibble of the gooey mess inside the cup, the offending substance coated my mouth. It was like a thick gel that was so gooey, it prevented me from being able to form enough saliva to spit it out.
Any ideas as to what might have caused this disaster? Was I right that the flax egg was the culprit? Could my ground flax seed have gone bad? Please share your thoughts!

In all the times I have made mug cakes, THIS has never happened.
The cake EXPLODED in the microwave.
This was supposed to be a Vegan Peanut Butter mug cake from Hot Pot Cooking.
The only thing I can think that could have caused this disaster was that this particular microwave mug cake called for a "Flax egg." A flax egg is part water and part ground flax seed. This mixture gels up and behaves very much like a real egg. It's pretty common in vegan cooking.
To add insult to injury, the gooey mess tasted horrible. This is another thing I can't figure out. Before I popped the mug into the microwave, I licked the spoon I'd used to mix the concoction. It tasted just fine. However, when I took a nibble of the gooey mess inside the cup, the offending substance coated my mouth. It was like a thick gel that was so gooey, it prevented me from being able to form enough saliva to spit it out.
Any ideas as to what might have caused this disaster? Was I right that the flax egg was the culprit? Could my ground flax seed have gone bad? Please share your thoughts!
Friday, November 23, 2012
Pinterest Fact or Fiction: Oven Door
Today we are going to discus the tip of Cleaning the oven door from DIY Home Sweet Home.
The trick is to make a baking soda paste, and apply it to your oven door. Then you let the baking soda marinate for 20 min. When you scrub the stuff off, Shazam! The oven door is magically super sparkly clean.
Let's take a look at my oven door before I started:

Ew.
Notice my little helper at the bottom left hand portion of the photo.
Apparently, open ovens, particularly those coated in baking soda are fascinating to little black cats. Playing keep away from the oven for 20 min is not my idea of good times.
Now after I had all that fun, I got to scrub the gunk off the door.
Aaaaaand then the oven door looked like this:

Hmm.
I included the paper towels I used to clean the oven in the photo 1.) so you could see that some of the dirt DID actually come off, and 2.) so I could tell the before and after photos apart in my camera.
Let's do a side by side comparison:
 People swear this works. It didn't work on my industrial strength super Hulking dirt.
I'm marking this one down as Pinterest Fiction.
From now on I'll just stick with the self cleaning mode on the oven.
The trick is to make a baking soda paste, and apply it to your oven door. Then you let the baking soda marinate for 20 min. When you scrub the stuff off, Shazam! The oven door is magically super sparkly clean.
Let's take a look at my oven door before I started:

Ew.
Notice my little helper at the bottom left hand portion of the photo.
Apparently, open ovens, particularly those coated in baking soda are fascinating to little black cats. Playing keep away from the oven for 20 min is not my idea of good times.
Now after I had all that fun, I got to scrub the gunk off the door.
Aaaaaand then the oven door looked like this:

Hmm.
I included the paper towels I used to clean the oven in the photo 1.) so you could see that some of the dirt DID actually come off, and 2.) so I could tell the before and after photos apart in my camera.
Let's do a side by side comparison:

I'm marking this one down as Pinterest Fiction.
From now on I'll just stick with the self cleaning mode on the oven.
Wednesday, November 21, 2012
Beer Flat Bread
I was making beer french fries, which seems to be the only fries we like to eat lately, and I kept thinking, "It's a shame I have to toss the beer that the potatoes have been soaking in."
Wasn't there something I could make with the extra starchy potato-y beer?
Of course there was, but would it turn out?
I decided to make Crispy Beer Flatbread from Yummly.
 The verdict was...
Meh.
The bread got chewy instead of crispy, and never really browned up properly. Strangely, it was better the second day when I nuked a slice for 10 seconds, wrapped in a paper towel.
I have no plans to make this again, but it was definitely an interesting experiment.
If you'd like to make this bread, don't use the leftover beer that your potato fries have been soaking in and I'm sure yours will turn out lovely.
Beer Flatbread from Yummly
2 cups all-purpose flour
1 tsp salt
3/4 cup beer
3 tbsps olive oil
1 clove garlic (crushed)
1 tbsp herbs (dried thyme, rosemary, oregano, and/or marjoram)
Preheat oven to 400. Put the baking tray into the oven. So it will be hot as well. Mix olive oil and garlic and set aside. Mix flour with salt and add beer. Mix with hands until dough is formed. Knead dough 5 min with slightly floured hands. Let rest dough 10 min. Stretch out dough onto parchment paper the size of baking sheet. Brush with oil and herbs. Put parchment on tray and bake 5-10 min (I baked mine for 20 and it still didn't get brown on top.) Bread should get brown and bubbly on top!
Wasn't there something I could make with the extra starchy potato-y beer?
Of course there was, but would it turn out?
I decided to make Crispy Beer Flatbread from Yummly.

Meh.
The bread got chewy instead of crispy, and never really browned up properly. Strangely, it was better the second day when I nuked a slice for 10 seconds, wrapped in a paper towel.
I have no plans to make this again, but it was definitely an interesting experiment.
If you'd like to make this bread, don't use the leftover beer that your potato fries have been soaking in and I'm sure yours will turn out lovely.
Beer Flatbread from Yummly
2 cups all-purpose flour
1 tsp salt
3/4 cup beer
3 tbsps olive oil
1 clove garlic (crushed)
1 tbsp herbs (dried thyme, rosemary, oregano, and/or marjoram)
Preheat oven to 400. Put the baking tray into the oven. So it will be hot as well. Mix olive oil and garlic and set aside. Mix flour with salt and add beer. Mix with hands until dough is formed. Knead dough 5 min with slightly floured hands. Let rest dough 10 min. Stretch out dough onto parchment paper the size of baking sheet. Brush with oil and herbs. Put parchment on tray and bake 5-10 min (I baked mine for 20 and it still didn't get brown on top.) Bread should get brown and bubbly on top!
Wednesday, July 11, 2012
Crockpot Coconut Beans and Rice Fail
It's funny what some people consider to be a failure. Technically, this dish was a total flop...or was it?
 I found the recipe for coconut beans and rice over at A Year of Slow Cooking. I made the huge mistake of not reading ALL the comments before preparing this dish. Apparently, loads of other people had trouble with their rice turning into a huge gelatinous mass.
See. the recipe says to cook the dish on low for 8-10 hours. My crockpot runs on the cool side so I thought I'd have no problem with that long of a cook time. NOPE! My rice was fully cooked after 3 hours. I thought, well the recipe says it needs 8-10 hours, it couldn't possibly be done in 3. So what did I do? I ignored it for the next 5 hours.
The result? Imagine a really stiff oatmeal. That was basically the texture of the rice.
While I did add twice the amount of beans, I also boiled them for 40 minutes instead of the suggested 10 minutes. (Red beans have a really tough skin and I wanted to make sure it got nice and soft.) I also added 1 lb of precooked sausage links, sliced into half moons. Neither of these additions I would think would make the rice so mushy. It HAD to have been the excessive cook time.
The weirdest thing about this dish?
 Blockette loved it.
And by loved, I mean LOVED.
She asked for leftovers for lunch and dinner every day. EVERYDAY people!
The child that hates beans loves overcooked beans and rice.
I guess when you are a toothless wonder, mushy food is your best friend.
It's for this reason that I can't say the dish was a total fail. When your kid likes something so much, and you don't is it a fail? Probably not. The fact that Blockette enjoyed the dish so much was pretty awesome, even if I did think it was not so wonderful.
I'm not sure if I will attempt to make this again. Mrblocko hated it so much, and I wasn't too keen on it either. It is a great way to stretch a buck. I have to admit I am curious about how the dish would taste if it wasn't over cooked. If I do give this recipe another try, I'll probably just make the dish on the stove.
Crockpot beans and rice from A Year of Slow Cooking
1 cup dried small red beans (soaked overnight, then boiled for 10 minutes)
1 large onion, finely diced
2 cloves garlic, minced
1 tsp red pepper flakes (I used a scant 1/2 tsp)
1 (14.5-ounce) can coconut milk (full fat is best. if you prefer to not use full-fat, add a drop or two of coconut extract to intensify the flavor)
3 cups chicken broth
1 1/2 cups long grain basmati white rice
1/2 teaspoon kosher salt
1 lb precooked sausage cut into half moons (optional)
2 limes, cut in wedges (optional)
Use a 4-quart slow cooker. Sort beans, and soak overnight in a bunch of water. In the morning, drain the water and dump the beans into a large pot of fresh water. Boil rapidly on the stovetop for at least 10 minutes before draining and putting into your crockpot.
Red beans MUST be boiled on the stove before added to the slow cooker to kill a possible toxin that occurs naturally.
Add onion, garlic, and red pepper flakes. Pour in the whole can of coconut milk (the creamy stuff, too), and chicken broth. Stir in sausage, raw rice and kosher salt. Cover and cook on low for 8-10 hours, (or 3 hours if you don't want a gooey gelatinous mass of goo) or until beans are bite tender. Before eating, squeeze on a bit of lime juice for a fun tropical twist.

See. the recipe says to cook the dish on low for 8-10 hours. My crockpot runs on the cool side so I thought I'd have no problem with that long of a cook time. NOPE! My rice was fully cooked after 3 hours. I thought, well the recipe says it needs 8-10 hours, it couldn't possibly be done in 3. So what did I do? I ignored it for the next 5 hours.
The result? Imagine a really stiff oatmeal. That was basically the texture of the rice.
While I did add twice the amount of beans, I also boiled them for 40 minutes instead of the suggested 10 minutes. (Red beans have a really tough skin and I wanted to make sure it got nice and soft.) I also added 1 lb of precooked sausage links, sliced into half moons. Neither of these additions I would think would make the rice so mushy. It HAD to have been the excessive cook time.
The weirdest thing about this dish?

And by loved, I mean LOVED.
She asked for leftovers for lunch and dinner every day. EVERYDAY people!
The child that hates beans loves overcooked beans and rice.
I guess when you are a toothless wonder, mushy food is your best friend.
It's for this reason that I can't say the dish was a total fail. When your kid likes something so much, and you don't is it a fail? Probably not. The fact that Blockette enjoyed the dish so much was pretty awesome, even if I did think it was not so wonderful.
I'm not sure if I will attempt to make this again. Mrblocko hated it so much, and I wasn't too keen on it either. It is a great way to stretch a buck. I have to admit I am curious about how the dish would taste if it wasn't over cooked. If I do give this recipe another try, I'll probably just make the dish on the stove.
Crockpot beans and rice from A Year of Slow Cooking
1 cup dried small red beans (soaked overnight, then boiled for 10 minutes)
1 large onion, finely diced
2 cloves garlic, minced
1 tsp red pepper flakes (I used a scant 1/2 tsp)
1 (14.5-ounce) can coconut milk (full fat is best. if you prefer to not use full-fat, add a drop or two of coconut extract to intensify the flavor)
3 cups chicken broth
1 1/2 cups long grain basmati white rice
1/2 teaspoon kosher salt
1 lb precooked sausage cut into half moons (optional)
2 limes, cut in wedges (optional)
Use a 4-quart slow cooker. Sort beans, and soak overnight in a bunch of water. In the morning, drain the water and dump the beans into a large pot of fresh water. Boil rapidly on the stovetop for at least 10 minutes before draining and putting into your crockpot.
Red beans MUST be boiled on the stove before added to the slow cooker to kill a possible toxin that occurs naturally.
Add onion, garlic, and red pepper flakes. Pour in the whole can of coconut milk (the creamy stuff, too), and chicken broth. Stir in sausage, raw rice and kosher salt. Cover and cook on low for 8-10 hours, (or 3 hours if you don't want a gooey gelatinous mass of goo) or until beans are bite tender. Before eating, squeeze on a bit of lime juice for a fun tropical twist.
Monday, May 21, 2012
Weird PB Banana Oatmeal Cookies
I was in the mood to bake and thought I'd try something a bit different. I was just shy of having enough brown sugar on hand for most of the recipes that sounded interesting to me, except for these oatmeal peanut butter banana cookies.
The fact that they were from Dr. Oz's website should have raised a red flag. Another red flag was that they have hardly any sugar in them. And by hardly any sugar, I mean there is 2 T from Honey/agave and the fructose in two bananas. But because they are from Dr. Oz his followers are brainwashed to believe that anything he spews out of his mouth or on his website must be full of awesome.
These cookies were the antithesis of awesomeness.
They were super bland. Not only were they not sweet, which is a no brainer if you think about it. They had zero flavor. I couldn't taste any peanut butter OR banana. Very, very odd.
And the picture of the cookies on the website? Oh they could not possibly be of cookies made from this recipe. They look like cookies that were made with a lot more flour than just 1/4 cup.
Here's the photo from Dr. Oz's website:
And here's a cross section of the cookies I made:
 They don't even look done in the middle. AND this is after baking them for 20 minutes when the recipe states you only need to cook them for 13-16 minutes.
I tried smashing them flat in hopes of getting them a little crisper on the inside. No dice. Even after flattening the cookies as thin as I could, and cooking them for 20 min, the middles were still on the soggy side.
Now I'm a fan of gooey under baked doughy in the middle cookies. But these cookies? Ick. It was more of a gummy, chewy, underdone sort of middle. Not a pleasing texture at all.
I wracked my brain to find a way to salvage these treats. I even schmeared on a nice thick layer of dulce de leche. Even that didn't do much to improve the taste of these little villains.
Then it hit me!
The inside of these cookies reminded me of when you cook a bowl of oatmeal in the microwave. You know, the oatmeal gets a bit rubbery because the oats have soaked up all the moisture. All you need to do is add milk and the texture goes from spackle, back to that of something edible again.
So for breakfast the next day, I crumbed up the rest of the cookies in our bowls along with walnuts, a sprinkle of brown sugar and cinnamon, popped it into the microwave with some milk, and TA DA!
 Delicious breakfast!
Mrblocko and Blockette added raisins to their oatmeal cookie bowls. That's not my thing so I had mine "plain."
I can see the merits of making a batch of these cookies for the specific purpose of using them for a quick breakfast, but for just the cookies? No way.
Dr. Oz's Weird Peanut Butter Banana Cookies that You Should Just Eat Crumbled up in a Bowl Like Oatmeal
2 ripe bananas
1/3 cup peanut butter
2 tbsp 2% milk
1 tsp vanilla extract
2 tbsp agave or Honey
1 large egg
2 1/2 cups quick-cooking or rolled oats
1/4 cup whole wheat flour
Dash ground cinnamon
Preheat oven to 350°F. Make banana puree by mashing the bananas with a fork until smooth. Whisk in the peanut butter, milk, vanilla, agave, and egg. Add the remaining ingredients and stir until well combined.
Drop dough onto a cookie sheet that has been sprayed or lined with parchment paper. Bake 13-16 minutes or until pale golden brown. Cool for 5 minutes.
The fact that they were from Dr. Oz's website should have raised a red flag. Another red flag was that they have hardly any sugar in them. And by hardly any sugar, I mean there is 2 T from Honey/agave and the fructose in two bananas. But because they are from Dr. Oz his followers are brainwashed to believe that anything he spews out of his mouth or on his website must be full of awesome.
These cookies were the antithesis of awesomeness.
They were super bland. Not only were they not sweet, which is a no brainer if you think about it. They had zero flavor. I couldn't taste any peanut butter OR banana. Very, very odd.
And the picture of the cookies on the website? Oh they could not possibly be of cookies made from this recipe. They look like cookies that were made with a lot more flour than just 1/4 cup.
Here's the photo from Dr. Oz's website:
 |
| Source |
And here's a cross section of the cookies I made:

I tried smashing them flat in hopes of getting them a little crisper on the inside. No dice. Even after flattening the cookies as thin as I could, and cooking them for 20 min, the middles were still on the soggy side.
Now I'm a fan of gooey under baked doughy in the middle cookies. But these cookies? Ick. It was more of a gummy, chewy, underdone sort of middle. Not a pleasing texture at all.
I wracked my brain to find a way to salvage these treats. I even schmeared on a nice thick layer of dulce de leche. Even that didn't do much to improve the taste of these little villains.
Then it hit me!
The inside of these cookies reminded me of when you cook a bowl of oatmeal in the microwave. You know, the oatmeal gets a bit rubbery because the oats have soaked up all the moisture. All you need to do is add milk and the texture goes from spackle, back to that of something edible again.
So for breakfast the next day, I crumbed up the rest of the cookies in our bowls along with walnuts, a sprinkle of brown sugar and cinnamon, popped it into the microwave with some milk, and TA DA!

Mrblocko and Blockette added raisins to their oatmeal cookie bowls. That's not my thing so I had mine "plain."
I can see the merits of making a batch of these cookies for the specific purpose of using them for a quick breakfast, but for just the cookies? No way.
Dr. Oz's Weird Peanut Butter Banana Cookies that You Should Just Eat Crumbled up in a Bowl Like Oatmeal
2 ripe bananas
1/3 cup peanut butter
2 tbsp 2% milk
1 tsp vanilla extract
2 tbsp agave or Honey
1 large egg
2 1/2 cups quick-cooking or rolled oats
1/4 cup whole wheat flour
Dash ground cinnamon
Preheat oven to 350°F. Make banana puree by mashing the bananas with a fork until smooth. Whisk in the peanut butter, milk, vanilla, agave, and egg. Add the remaining ingredients and stir until well combined.
Drop dough onto a cookie sheet that has been sprayed or lined with parchment paper. Bake 13-16 minutes or until pale golden brown. Cool for 5 minutes.
Tuesday, March 20, 2012
Baby Bundt Fail
Oh how I wanted these little baby bundts to turn out. It seems like I'm either hit or miss with bundts. When they turn out, they are something spectacular. My successful bundt posts have even gotten the most traffic on my blog. Unfortunately, these pumpkin spice pudding bundts from Nutmeg Nanny fell into that "miss" category.
These mini bundts are made from are a very simple cheater cake recipe that uses cake and pudding mixes. Sounds pretty righteous eh? It should have been. I mixed up all the batter and put it into my mini bund pan.
 Everything is looking fine right? Mini bundts filled 3/4 to the top. But wait! The recipe says that it should yield 12 mini bundts. Uh oh. The Nutmeg Nanny must have a different size bundt pan than I do.
No problem though. Right? So I'll just cook these little guys for a bit longer than the recipe says. And sure enough, after 25 minutes, a toothpick came out clean. So out of the oven they came.
Here's where a picture would have been great. I thought I'd taken one, but alas. The little bundts came out of the oven domed over the top of the pan. Woah. They mega rose! Maybe I filled them up too much. But wait, as you can see in the above picture, I filled them 3/4 full.
The recipe didn't say that they needed to cool in the pan for any specified time, so after about 5 minutes I began to freak that they might decide to stick to the pan. I turned these little cakes out onto a cooling rack like I would any muffin or cake. Ten minutes later I had this:

 Here's a slightly better picture with my hand for scale (and my daughter photobombing in the corner.)
I wish I knew what I did wrong.
How did they taste? Meh. I made a cinnamon glaze for them and it never set up. (Maybe dessert was just doomed the day I made this.) I think the runny cinnamon glaze was probably the best part.
As I am my own worst critic, I hated them. Mrblocko said it was good, just not his favorite dessert ever, and that I make lots of other things he likes better. I'm pretty sure he was just being nice. Now Blockette? She thought this was the best dessert ever on the planet/history of time. At least someone was over the moon about them!
Pumpkin Pudding Bundt from Nutmeg Nanny
1 Jiffy yellow cake mix (9oz.)
1 Jello Pumpkin Spice instant pudding mix (3.4oz.)
1/3 C. vegetable oil
1/2 C. water
2 eggs
Preheat oven to 350 F. In bowl add dry ingredients. Whisk together. Add rest of ingredients and mix until combined. Generously spray your mini-tube pan. Fill each cup and bake for 15 – 20 min until done.
These mini bundts are made from are a very simple cheater cake recipe that uses cake and pudding mixes. Sounds pretty righteous eh? It should have been. I mixed up all the batter and put it into my mini bund pan.

No problem though. Right? So I'll just cook these little guys for a bit longer than the recipe says. And sure enough, after 25 minutes, a toothpick came out clean. So out of the oven they came.
Here's where a picture would have been great. I thought I'd taken one, but alas. The little bundts came out of the oven domed over the top of the pan. Woah. They mega rose! Maybe I filled them up too much. But wait, as you can see in the above picture, I filled them 3/4 full.
The recipe didn't say that they needed to cool in the pan for any specified time, so after about 5 minutes I began to freak that they might decide to stick to the pan. I turned these little cakes out onto a cooling rack like I would any muffin or cake. Ten minutes later I had this:

Wha'happen?!!!!
Nice little cakie cake went splat.

I wish I knew what I did wrong.
How did they taste? Meh. I made a cinnamon glaze for them and it never set up. (Maybe dessert was just doomed the day I made this.) I think the runny cinnamon glaze was probably the best part.
As I am my own worst critic, I hated them. Mrblocko said it was good, just not his favorite dessert ever, and that I make lots of other things he likes better. I'm pretty sure he was just being nice. Now Blockette? She thought this was the best dessert ever on the planet/history of time. At least someone was over the moon about them!
Pumpkin Pudding Bundt from Nutmeg Nanny
1 Jiffy yellow cake mix (9oz.)
1 Jello Pumpkin Spice instant pudding mix (3.4oz.)
1/3 C. vegetable oil
1/2 C. water
2 eggs
Preheat oven to 350 F. In bowl add dry ingredients. Whisk together. Add rest of ingredients and mix until combined. Generously spray your mini-tube pan. Fill each cup and bake for 15 – 20 min until done.
Subscribe to:
Posts (Atom)