Showing posts with label Halloween. Show all posts

Monday, November 3, 2014

Halloween 2014

This year Blockette wanted to be Athena.  I think this was the first year I said, "Yeah, I can do that!"
without hesitation.

 Everything just sort of fell together.  AND I spent less than $10 on supplies.  Over half that cost was because I bought 3 different shades of gold paint in order to get the color I wanted.

The owl was borrowed from my mom.  The tunic was from last year's Medusa costume.  I already had the purple fabric.

                         
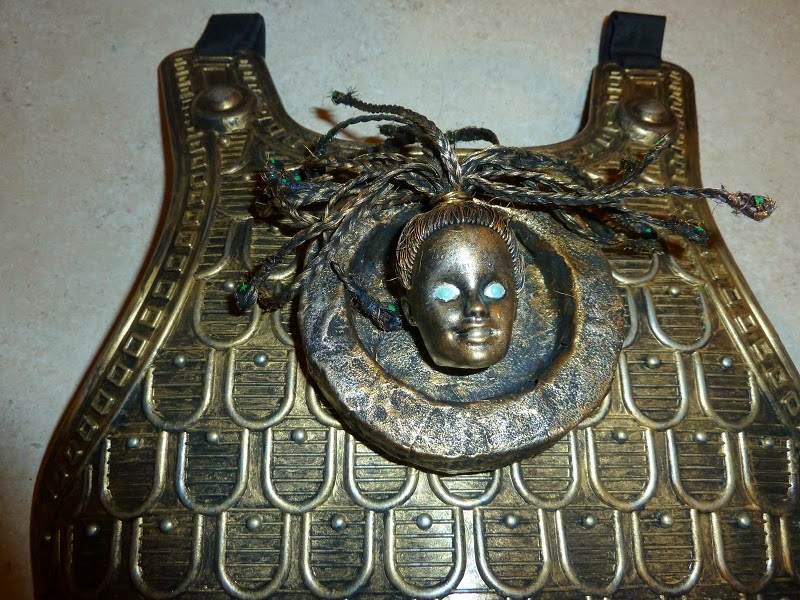
 Blockette's armor was a plastic black and silver colored breast plate armor I found at the dollar store.  Medusa's head is also a dollar store find.  I made the medallion out of paper mache.  Barbie and the medallion both got a base coat of matte black spray paint before being dry brushed with several different coats of gold acrylic paint.  Since the breast plate was already black, it saved me the spray paint step.  I gave everything a coat of clear matte spray paint too.
 If you look closely at Medusa, you can see that each of her hair braid snakes have green eyes.  Also, her eyes glow in the dark, courtesy of some blue glow in the dark nail polish.

Then, there is THE HELMET....


I'm so proud of this thing.  It's made of cardboard, paper mache, brown paper bags and paper towels.  oh yeah...and the bristles of a broom.  The pictures do NOT do it justice.  It looks WAY cooler in person.  I followed these tutorials from Constructables and Instructables, for the construction of the helmet.  Then, because I hadn't done papermache for nearly 30 years, I followed these instructions from DLTK.

The helmet took about 3 weeks, including researching and planning.  It was a lot of hurry up and wait because I'd cut something out and then have to wait because my model was in school, or because I was waiting for the layers of paper mache or coats of paint to dry.

A fun side note: the circular medallion like objects on the helmet are cut from paper towels!  They gave the perfect amount of texture when dry brushed with gold paint.

The bristles on top of the helmet are from a broom.  I thought about painting them red, but was afraid it might not turn out right, so I left them black.  I think the contrast looks very striking.

Finally, I used the handle from the broom for the spear.  The tip of the spear is cut from a sheet of glittery craft foam that had a sticker backing.

Blockette wanted to wear sandals trick or treating.  I told her that her toes would freeze and fall off.  Instead we decided that it would be ok for her to wear her tennis shoes.  After all, they were Nike. Nike was the goddess of victory, and Blockette thought the pun was really cool!


Monday, November 12, 2012

Pumpkin PB Oatmeal Bars

I was in a pumpkin-y sort of mood so I made these pumpkin peanut butter oatmeal bars from Averie Cooks.

What's great about these bars is they are Gluten and Vegan Free.  Yes!  Fear not, activists, they are NOT made from any Vegans.  Well, I suppose you could use Vegans if you really wanted to, but I find they are too crunchy, even in milk, cow or otherwise.

Here is a finished photo of the yummy pumpkin peanut bars, right out of the oven.

Sure, I could have stopped there, but Averie from Averie Cooks, started talking about frosting at the end of her recipe and I was totally sold on that idea.  What dessert isn't made better by frosting?  She even gave three suggestions: Cream cheese, Dark Rum Caramel and peanut butter chocolate.

Well, I didn't have any cream cheese, so that one was out.  I was also lacking the cream and dark rum needed for the caramel frosting.  So Peanut butter chocolate it was.

Let me wax poetic for a bit about this frosting...it was, I kid you not, the shiznat.

I stored the bars in the fridge, so the frosting stayed nice and firm.  It was like a medium soft fudge.  Oh my stars and whiskers.  I'm drooling right now just thinking about it.

In fact, I liked the frosting so much that I'd turn the bar on its side, eat the pumpkin oatmeal part first, just so I could eat the frosting by itself.

I don't know if it was the frosting that put these bars over the top, but they are super rich.  Originally, I cut the bars into 5 rows and then divided those rows in half, for a total of 10 bars.  After one bar that size, I felt kinda sick from all the sugar.  So, I cut the rows into thirds.  That seemed like a perfect size. No one complained about the decreased size, or asked for seconds.

Next time I make these I will probably reduce the amount of sugar in the bars and the frosting.  Although, that change will most likely result in me needing to slice the bars larger.  Guess it's a trade off!

Pumpkin Peanut Butter Oatmeal Bars with Chocolate Frosting from Averie Cooks
 1/2 c peanut butter
1 c pumpkin puree
2 c oats (whole rolled, not quick cook)
1 c brown sugar, packed
1/2 c white sugar
1 T pumpkin pie spice
1 heaping t cinnamon
2t-1 T vanilla
Optional: raisins, nuts, chocolate/white/peanut butter chips (I used a scant cup each of white and semi sweet chips)

Combine all ingredients.  Spread batter (will be moist) into a foil-lined and spayed 8 x 8 (or 9x9) pan.  Bake at 350F for 22-25 min or until toothpick inserted in center comes out clean.  The bars may still look underdone. They will continue to set up as they cool.  Let bars sit while preparing the frosting.

choco PB frosting from Averie Cooks
1 c chocolate chips
1/4 c butter/margarine
1/4 c peanut butter
2 T milk/cream (add more/less depending on desired consistency of frosting)
1 t vanilla extract
1 c sifted powdered sugar

Nuke chips for 30 sec. Stir. Repeat.  Add soft butter. Stir until combined.  The heat from the melted chocolate will melt the butter. Add  the  peanut butter.  Stir until fully blended. Add milk and vanilla. Stir.  Finally, add sifted powdered sugar.  Mix it up one final time until you can't see any white specks from the powdered sugar.

Once the bars have cooled slightly, spread on that delicious frosting.  Store bars in the fridge to speed up the cooling process. Do not slice bars until they have cooled completely.

Bars may be stored on counter, fridge or freezer.

Wednesday, October 31, 2012

Tuesday, October 30, 2012

Roast Pumpkin Seeds

What?  I never posted about Roasted Pumpkin Seeds?  How can that be?

Here is our gracious donor.  Let's call him Jack.

Why yes, I did rent a purple fog machine, and set fire to my living room for this picture. Why do you ask?

Jack yielded a generous cup of seeds for roasting.

Here is what some of them look like after my family attacked the pan:

Pumpkin seeds are super easy to roast.  All you need is a bit of time and patience.

Step 1: Scoop out all the goo and guts from your pumpkin. 
Step 2: Separate the goo from the seeds.
Step 3: Rinse the seeds off.
Step 4: Pat the seeds dry with a clean dish towel. 

Do NOT use paper towels for this step.  The seeds will still be slimy and stick something awful to the paper towel.  It will make you gnash your teeth and cry for your mommy.

Step 5: Set the seeds out, in a single layer, on a rimmed baking sheet to dry. 

This will take a few hours depending on the humidity of your house.  Feel free to let them sit overnight.

Step 6: When the seeds are dry and no longer slimy, preheat your oven to 250F.
Step 7: Toss seeds with 2 tsp olive oil.  Use your fingers to coat the seeds.
Step 8: Generously sprinkle salt on the seeds.

Don't get fancy and use Kosher salt here.  You want the smaller crystals from ordinary table salt.  Kosher is too chunky and doesn't adhere as well.

Step 9: Bake for 1 hour, turning once.  When the seeds are done, they will be a light golden brown.

The seeds always taste best right from the oven, but if you have leftovers, store them in an airtight container.

Monday, October 31, 2011

'11 Happy Dance # 30: DIY Harry Potter Wands

Happy Halloween from Hogwarts!

In celebration of this festive fun occasion...let's make some Harry Potter wands!  I found this cool idea over at Cut out and Keep.

First thing you need is some sort of base for your wand.  I used those disposable round pointy wooden chopsticks.   They are on the short side, but that is ok since these wands were for Blockette.

Next, hot glue on some beads and what not.  I used the glue gun to add various bumps and nodules.
As I used shiny painted and plastic beads, I needed to give my wands several coats of primer.  Spray paint would have worked well, but I just had regular acrylic craft paint, so I used that.  I painted the one on the left with a red base coat and the one on the right with black.

Next, I used a dry brush technique to apply several different shades of brown.  I thought the one on the left looked a little boring, so I added some white dots.  Finally, I sprayed them with a coat of matte sealer so the paint wouldn't wear off after a few play sessions.

Viola! There you have it, DIY Harry Potter wands.  Sure beats spending $18-40 at Universal Studios, Warner Brothers or Alavans, particularly when I already had the paint, beads and glue in my crafting stash, I "liberated" the chop sticks from a Chinese fast food place, and borrowed the Matte sealer from my best friend's husband.

Oh, and Blockette LOVES them.  The redish one with the polka dots is her favorite.  She is swishing and flicking all about the house saying things like Alohomora or Riddikulus every chance she gets.

Sunday, October 30, 2011

'11 Happy Dance #29: Snowy's Halloween Costume

A few weeks ago Blockette won this little white poodle for completing her reading assignments on time. And that was how Snowy came to join our wee little band of crazies.

Last week Blockette asked me if I could make Snowy a skirt.  I told her "sure" and left it vague as to when said clothing was going to be completed. Today she asked me again(in her sweetest, most polite, non whiny voice), and of course, as I feel like I got hit by a mac truck, I told her, "Not today." 

Blockette was crestfallen but was trying hard not to show it.  Then she said, "Oh mom, but I really wanted her to have a Halloween costume." 

Sigh.  She's been super good and helpful lately.  I knew it wouldn't be too hard if I just sat down and focused. 
I present to you, Ballerina Snowy with her white tutu, jewel collar and snowflake earrings (and one very happy little girl.) 

Monday, October 24, 2011

'11 Happy Dance # 28: Halloween Fairy Dress

The other day I wrote about the white under dress I made for Blockette.  I whipped up another one lickety split that was large enough for her to wear a coat underneath.

I had bought this fabric years and years ago, and tried to make a Roman dress out of it.  It was an epic fail so I passed the whole thing onto my best friend.  She made a skirt out the fabric for herself.  Then a few weeks ago she cleaned out her craft room and asked me if I wanted first dibs on the fabric she was going to get rid of.  In that pile was a small amount of this fabric.  Turns out there was exactly enough to make this dress.

The camera did not like this fabric at all.  The threads going in one direction are red and the threads going in the other are green.  I guess that messes with the camera's digital something or another.  You'll just have to trust me that the fabric looks really neat in person.
I only took a picture of the back of Blockette this time.  I think she was trying to be ethereal or something, but it came off looking like someone told her they cancelled Christmas.

The wings I bought at Joann Fabrics for $4.  Four Dollars!  Yeah, I can swing that for a costume, especially when she is going to wear the wings over and over.  Now she has 4 different pairs of fairy wings to suit her every mood.  (Pink, red, blue and the autumn leaf ones)

Oh and I thought that I would add, her sash is the scarf I wore to my best friend's wedding.  It is perfect since I have no intention of making her another over dress or bodice before Halloween.

Saturday, October 22, 2011

'11 Happy Dance # 27: Chemise for Blockette

Blockette decided that she wanted to be a fairy princess for Halloween. I thought that was awesome because we already had most of what she needed for her costume.  I mean I already made her a Renaissance dress for her birthday.  All she really needed was an underdress.

I've made Renaissance shirts to wear under a bodice for myself before.  I didn't think that a dress along the same lines in Blockette's size would be too hard to whip up.

Looks pretty cool.  I used an old white sheet that had a hole in it.  I even used the top edge of the sheet so I didn't have to hem it.

Here is Blockette in her full fairy glory. (Please ignore the funky hair do. It was crazy hair day at school for spirit week.)

So the dress fits great, except for the fact that we live in Illinois.  Halloween usually requires several layers to ensure not freezing to death while one goes begging door to door for sweets.  I did not make the dress big enough for her to wear layers underneath it.  Doh!  Back into the crafting room for me.

Sunday, October 31, 2010

Spooky Dinner

First of all, let me say Happy Halloween! Mrblocko and Blockette are out panhandling for sweeties while I am at home playing on the computer waiting to pass out candy to all the kids that never show up. So far they've been gone for a half hour and I've only eaten one piece of candy. I deserve some sort of medal for that...or another piece of candy.

Anyhow, all week I told Blockette that we were having spiders for dinner on Saturday while it was just us girls. Heh, she was pretty worried for a while. Sometimes she can't tell when I'm pulling her leg. I like to keep her on her toes. It's only fair. She keeps me on mine!!!

So yesterday I asked her if she would help me prepare our spooky dinner. She was pleased to find out our spiders were really hot dogs and spaghetti. I got the idea for the spiders from The Family Kitchen. I think the coolest part about making them is when they are fully cooked, the spiders dance around in the pot.Spiders weren't the only thing we had for dinner. We also had spider eggs (acini de pepe noodles), worms (more spaghetti noodles), Ogre skin with rolly polly bugs and witches' finger nails (salad with craisins and sunflower seeds) and brains. Well, Blockette had brains. They were too disgusting for me.

The brains were actually Blockette's idea. She thought scrambled eggs would make good brains. Don't ask me how she came up with that. I don't have a clue. It was my brilliant idea to add purple food coloring to the eggs before I cooked them. If you've ever tried to make purple frosting you know that purple food coloring makes everything elephant gray. Bleck. They made for some realistic looking brains. The photo does not do them justice in all their gory glory. In case you were wondering how to eat a spider, the best way is to shove the whole thing in your mouth at once. Then you can feel them squirming around. Oh, and you gotta dip them in blood(ketchup) too. Or if you want to live dangerously, you can do like I did and consume them with dragon's blood (Sweet Baby Ray's Honey Chipotle BBQ Sauce.)

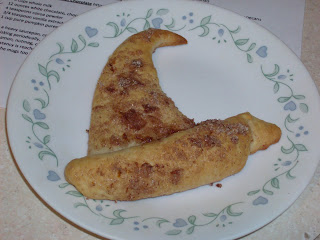
After all that gory stuff, you gotta cleanse your palette with something sweet...witch hats! I totally stole the idea from Little Nummies. I made ours with cinnamon sugar that had been infused with orange zest. Who would have thought crescent rolls could make something so cute?

Our spooky dinner was a total hit, which means I'm going to have to find something even cooler for next year!

Friday, October 29, 2010

Halloween Parade!

Please click on the pictures to enlarge so you can see Blockette's facial expressions. In case you can't tell, she is Rosetta from Tinkerbell. The striped pants were her idea.

"Hmm Where is she???"
"I don't see her. Mommy said she'd be here."
"Heh. I know mommy's over there but I'm going to actually look at her. Why don't I make goofy faces for my adoring fans? They've all come to see me, right? I should give them a good show."

Thursday, November 19, 2009

More Leftover Halloween Candy Recipes

Here are some more recipes I thought would be a great way to use up leftover Halloween candy. Since ours is finally gone, I won't be testing these delicious looking recipes any time soon. I'm posting them here so I can find them easily next year.

Snickers Carmelitas from Cookie Madness.
Snickery Peanut butter and oat cookies from Cookie Madness.

Candy bar stuffed baked apples from CDKitchen. (uses toffee and nougat based candy)

Butterfinger Delight from Recipezaar. (ice cream and pudding bar)
Butterfinger cookies from CD Kitchen. (peanut butter cookie)
Chocolate fudge Butterfinger cookies from Picky Palate.
Butterfinger pie from Recipezaar. (cream cheese and cool whip based pie)

Candy bar croissant from Recipezaar. (uses refrigerator croissants and misc candy)

Milky Way Bundt from CDkitchen.
Halloween candy bundt from Baking Bites (brown sugar bundt with misc candy)

Monday, November 16, 2009

O.M.G. Becky, look at her Bundt

How did you celebrate National Bundt day???? Did you even know Nov 15 was National Bundt day? I would not have been thusly informed, were it not for the Food Librarian's I Like Big Bundts: 30 Days of Bundt Cakes. Really, how complete was my life not knowing this...not very I'd say.

Now that the Food Librarian's 30 Days of Bundt Cakes is over, I must admit I'm a bit sad. I really looked forward to a daily bundt recipe. I think she is enough of a bundt freak that she'll be making more in the not so distant future. At least I hope she didn't burn herself out completely. That would be a travesty. Maybe if she becomes the anti bundt queen she'll send me some of her swanky bundt pans. I totally have bundt pan envy. I mentioned a while ago I had chopped up a cup and a half of Halloween candy with the intention of using it in a bundt cake. Blockette has been eyeballing that container of candy bits every time she is in the kitchen. Whenever I would start moving and clanking around in the kitchen, she would ask if I was going to make the candy cake. I figured it was time to end Blockette's suspense. Besides, I couldn't let a mega holiday like National Bundt Day go by without paying due homage.

The recipe I used was Vanilla Bundt Cake with Halloween Candy Bits from Natalie's Killer Cuisine. The cake itself was a bit dry and on the dense side. This may have been because the batter was not mixed properly. Blockette has a creaping nose crud cold and I had to keep putting the hand mixer down to blow her nose. (Don't worry. I washed my hands at least once during the baking process. Mmmm mucus cake!)

There is also a possibility that I baked the cake too long and that was why the cake wasn't as moist as I would have liked. The recipe suggested baking between 30-50 minutes. I baked this bundt for 45 minutes. I checked the cake at 30 minutes and it was quite jiggly in the middle. I set the timer for another 15 minutes. I bet the cake would have been better if I took it out at 40 minutes.

I don't know that I"ll try this recipe again. I came across 2 other candy bar bundt recipes that I'll give a test drive once we are overloaded with candy again. I'll post links to them later in the week, along with several other recipes that call for leftover Halloween candy.

I sprayed the bejeezus out of the pan with Pam with flour. When I thought there was enough I gave it another coat. I also sprayed the pan immediately before pouring in the batter. There was only minor stickage in 3 spots when I unmolded the cake. I was able to stick them back on cake. The top of the cake is so mottled looking from all the different candies that the minor patchwork is not noticeable.

Also, if you take a good look at the picture above, the cake is sitting on a cooling rack. For some reason I turned the cake onto a cooling rack instead of a plate. That was not a brilliant move. I very carefully cut a few slices from the cake while it was on the rack and then moved it to a plate. I tried to move it to a plate before I cut into it, but the darn thing started to crack. Hopefully, I'll remember not to do that with the next bundt I make.

One more thing, this is the first cake I made from scratch. I usually just wimp out and use the mix from a box. I was feeling pretty special making a cake from scratch until I found out that Mrblocko had made a cake from scratch before we met. At least when I made my first cake from scratch I didn't use a tablespoon of salt when the recipe called for a teaspoon!!!!

Vanilla Bundt Cake with Halloween Candy from Natalie's Killer Cuisine
1 stick Butter, room temperature
1 cup Sugar
1 Egg, room temperature
2 Egg Whites, room temperature
3/4 cup Milk
2 tsp Vanilla Extract
2 cups AP Flour
2 tsp Baking Powder
1/4 tsp salt
1 1/2 cup Halloween Candy, chopped

preheat oven to 350 degrees Cream the butter and sugar until fluffy, about 3 minutes. Add the egg/egg whites and mix until fully combined. In a separate bowl combine the flour, baking power and salt. Set aside. Add the milk and vanilla extract to the egg moisture, mix until fully combined. The mixture may look curdled, don’t worry it’s not. Add your dry ingredients and mix until just fully combined. Chop up your candy ahead of time and add the candy bits to the cake batter and fold until combined. Pour in a prepared bundt pan and bake 40 minutes. Top with powdered sugar.

Wednesday, November 11, 2009

Mystery Surprise Chocolate Chip Cookies

I mentioned in my Trouble with Halloween post that I was going to wait to make these cookies until Blockette had eaten all her Halloween candy. We were having some difficulties getting her to eat her Tuna Noodle Hotdish. I figured cookies had a higher bribery power than plain candy. Since these cookies had Halloween candy inside them, they were worth their weight in gold to the fussy four year old. She ate her dinner and got her just reward.

I found the recipe for Snicker Surprise cookies on What's Cookin Chicago. They couldn't be easier to make. First, whip up a batch of your favorite chocolate chip cookie dough. Use a small cookie scoop and form all the dough into balls. Take one dough ball and smoosh it flat. Take half a Halloween size candy bar and place it in the middle. Take another dough ball and cover the top of the candy. Smoosh the dough around to form a large dough ball. I stuck mine in the freezer for later consumption. I used them right from the freezer, with no defrosting, and they took about 15 min to bake.

Can I say how much I love having frozen cookie dough in the freezer? No. I can't. There aren't words enough! I don't understand why I didn't do this before??? I can make just enough for "right now" and not have to worry about the leftovers sobbing in the pantry about how they would much rather be in my belly than the cold impersonal pantry. For those of you who don't know, cookies are quiet in the freezer. It's like they are in suspended animation. Sometimes they cry out, but it's really muffled. Maybe we've just got a good seal on the freezer door. All I know is I'm not eating a cookie (or 2 or 3 or 4) every time I go in the kitchen.

I used the Toll House Chocolate Chip Cookie recipe for the cookie dough. For half the batter I used regular semi-sweet chips, and the other half I used mini semi-sweet. I was curious as to which version would taste better. The verdict was, that they were both good for different reasons. The mini chip cookies had small bits of chocolate in each bite. Chocolate in each bite is never a bad thing. The regular chip cookies had a stronger chocolaty flavor when you got a chip. You also got to taste the plain dough. All good things. I'll make a half and half batch again so we can get the benefits of both tasty cookie versions.

The cookies in the small batch you see below contained: Milky Way, Twix and Snickers. Further research is needed to be sure which cookie-candy combo was the best. There are still untested mystery cookies with Butterfinger, Crunch and Kit Kat in them. I don't think a verdict can be reached until all versions have been sampled.

A really weird thing happens to some of the cookies while they are baking. See this one?
All the chocolate melted off and pooled at the base of the cookie. You can see the caramel and nougat from the Milky Way peeking out from the top. Nekkid candy bar ain't got no clothes on!!!! Don't worry. I personally put this one out of it's misery. And yes, I did rejoice in the carnage.

Thursday, November 5, 2009

The Trouble with Halloween

Every year I expect a ton of kids, so I buy a ton of candy. Kids just don't trick or treat in our neighborhood. Why? Because we live in an subdivision where the houses are small and old. Technically, we're not even in city limits. Two blocks over, the houses are twice the size, and built in the past 5 or so years. Besides, they give out some swanky loot over there. Mrblocko took Blockette out trick or treating in that subdivision and she came back with a My Little Pony! Talk about hitting the jackpot!

I know this, but can never recall this factoid when it comes time to purchase Halloween candy. This year I bought a large bag and 2 small bags of candy. Can you say overkill? At least this was an improvement from last year when I bought 3 large bags of candy. Next year I'll buy one large or 2 small and hopefully that will work out much better. Watch, next year will be the year we get inundated with Trick or Treaters.

So, what should I do with all the leftover candy? If I keep it in the house I'm the one who ends up eating it all. We only let Blockette eat one or two pieces at a time. If she eats any more than that in one sitting, she is bouncing off the walls, more than normal. At that rate, it would take her until New Year's to finish all the candy. My butt cannot afford to have all that candy lingering in the house that long. I don't want Halloween Candy lurking about in December. That would cut into my Christmas cookie eating.

This year, I weeded through Blockette's candy differently. As a rule, Mrblocko gets the 3 Musketeers and I get the 100 Grand and Heath bars. I took out all the really chewy and hard candy that she might have a choking issue with. She's not a huge fan of suckers so I took those out too. That cut down her candy by nearly half. Mrblocko took that to work with him on Monday.

There was still waaaay too much chocolate in the house to tempt me. I found a recipe for a bundt cake that called for 1 1/2 cups of chopped candy. I cut that up on Tuesday and stuck it in a container. If the candy is chopped I won't eat it, and when I feel like baking a cake I'll have the main ingredient all ready. I'll probably make that cake in the near future. I've been yearning to bake a bundt cake since the Food Librarian started I Like Big Bundts: 30 Days of Bundt Cakes. (Anyone who makes 30 bundt cakes in 30 days is aces in my books! Go Food Librarian!!!)

That made a dent in the candy, but not nearly enough. I remembered seeing Snicker Surprise Cookies on Joelen's blog, What's Cookin, Chicago? So on Wednesday I made Chocolate Chip Cookie dough and halved mini Snickers, Milky Way, Twix, Kit Kat and Crunch bars. I stuck the candy bar pieces inside cookie dough balls. The "surprise" cookie dough is chillin in the freezer for another day, one where we are lacking in sweets. I'll post how that went as well when I get around to baking them. These will truly be surprise cookies because I don't remember which candy is inside which cookie dough ball!

All this reduced the candy by half again. There was still so much candy. I took out a bunch of the duplicate candies and sent them to work with Mrblocko. That cut the candy by nearly half yet again. This is a much more manageable amount of candy. It still fills in a medium size bowl. I think now I'll be able to restrain myself from eating it while Blockette is at Preschool. OK, so that's a lie. The truth is I'll only eat one piece instead of five.

Saturday, October 31, 2009

Trick or Treat


HAPPY HALLOWEEN!!!!!