Showing posts with label Birthday. Show all posts

Monday, September 30, 2013

Butterscotch Marshmallow Bars

I made these Mello Scotch Bars from Shugary Sweets for my birthday.  Yeah, I know.  I'm weird.  I didn't want cake.  Cake was too much effort with the baking, and the cooling, and the frosting, and the keeping the cat from eating the frosting. 

Yeah. 

My birthday, and If I gotta make something for myself I don't want to have to spend all day doing it.


I'm so fancy with my photo props: house phone, water bottle, plastic wrap.  Just keepin it real!

The bars were very sweet, but I have a massive sweet tooth so that's ok.  Some people might think that a tiny bar is no comparison to a big ole slab of cake.  To you I say, "Plbbt."  The candles stuck in these bars just fine.

I was a bit worried that the marshmallows would turn into little pebbles after coming out of the oven.  No pebbles here.  Hooray! 

Butterscotch Marshmallow Bars from Shugary Sweets
1/2 c butter
1 c butterscotch chips
2/3 c br sugar
2 eggs
1 t vanilla
1 1/2 c flour
2 t baking powder
1/2 t salt
2 c marshmallows, (the little ones, not the roasting variety unless you wanna cut them up but that's too much work)
1 c semi-sweet chocolate chips

Preheat oven to 350 F. Spray 13×9 baking dish with Pam.  (Or better yet, line the pan with parchment for super easy removal from the pan.) In sm micro safe bowl, nuke butterscotch chips and butter for 30 sec at a time, stir between each time until chips are melted. Set aside. In lg bowl, add br sugar, eggs, and vanilla. Mix in melted chips, flour, baking powder and salt. Fold in choc chips and marshmallows. Pour batter into dish and bake 18-22 min. Cool to room temp, then cut into bars. Chill for at least an hr before serving to allow bars to set.

Tuesday, August 28, 2012

Renaissance Festival Fun

This year, instead of having a birthday party for Blockette, we decided to take her to the MN RenFest. Even though there is a Ren Faire much closer to us in WI, Mrblocko and I are partial to the one in MN.

Mrblocko and I have pretty much taken a break from the Ren faires since Blockette was born.  There was always one reason or another why we couldn't go.  So we just made some time and figured out a way to go.  As luck would have it, an extremely shirt tail relative was able to get us free tickets. Score!

Blockette wasn't too sure about the whole thing at first.  She wondered why everyone was so "fancy."  Then I think that it hit her it was one big game of pretend and dress up.   Then she was upset we didn't all go completely in costume.  Maybe next time.

As it was, she was pretty fairy-ied up with her wings, wand and new crown-tiara-head dress thingie.

I really wished I'd taken more pictures.  Particularly of the faun.  She had hooves and everything.  She gave Blockette the bell for her wand from a secret fairy stash.  I think I was too in awe of the cuteness to remember I had a camera dangling from my wrist.

Here are a few pictures I DID remember to take of Blockette's favorite parts of the Festival.

First: The Secret Fairy Garden.

Blockette liked it so much we went through twice.  
Truth be told, this is one of my favorite places at the festival too.

You really have to know that this garden is there.  The entrance is in this weird spot where it doesn't look like much.  Then you go around this hedge and you come to a hobbit house.  This year they had a little person pretending to be a hobbit.  Blockette thought that was awesome too.  She had a grand old time chatting that young lady up. 

After the hobbit house you wander through this wooded path.  This in itself is awesome as it is the only truly shaded place in all of the festival grounds. 

The path takes you past several small fairy cottages.  It's sort of sad that they have to be roped off.  It would have been cool to take some closer pictures.  Why do people have to be dorks and ruin things for everyone? 

Anyhow.  The enchanted forest was right up our alley.  If you ever go to the MN Ren Fest, you've got to check it out.

Blockette's second most favorite thing at the fair was: The Mermaids.
This was a new feature at the Fair this year.  I opted to sit under a tree while Mrblocko stood in line with Blockette for 20 minutes. 

Blockette said it was totally worth the wait in the sun to see the mermaids.  She informed me that some of them were the tricky mean kind like the ones on "The Pirates of Caribbean: On Stranger Tides."  Although, apparently the mermaid in the tank was one that wanted to be caught to see people.  I guess she was from the Ariel/Little Mermaid school of thought.  

I did ask Blockette if they were REAL mermaids and she gave me a weird look and said, "Oh of course they were."  (Cause why would they advertise they had mermaids if they weren't real?)

All in all Blockette had a smashing time.  She can't wait to go back!

Monday, August 27, 2012

Cookie Dough Brownies

I was originally going to make Pudge Cake from Cookies and Cups for my birthday.  The bottom layer is a boxed brownie mix, baked in a 8" cake pan.  Then, you have a nice thick layer of salmonella free chocolate chip cookie dough.  And if that isn't enough, you've got a top layer of Funfetti cake.  Finally there's the obvious frosting, and decorative cookies.

Doesn't that sound sinful amazing?

Yeah.

Then I remembered that the day after my birthday we were driving up to Minnesota.

There was no way we could eat that entire massive cake in one day.  Nor would it stay fresh in the fridge.  I'm sure I could have frozen it, but there was no room in the freezer.  (I had made huge batches of spaghetti, turkey stock, and chili recently.)

So it was back to the birthday cake drawing board.  I settled on cookie dough brownies from Buns in my Oven.

Although, it wasn't really settling.

These brownies were exactly what I was craving!   Chocolate Fudgy brownies and cookie dough.  Yeah!

I used a box mix for my brownies, but you could jazz this up and make it from scratch.  You could even make one of those fancy box mixes with chocolate chunks or caramel.  I wasn't feeling fancy so I went with the standard fudgy brownie.

As these brownies are super rich, we didn't finish them in time either.  There was much less to try to fit into the freezer, esp considering I left a few in the fridge for our cat sitter.


I can only think of two bad things about these brownies:
1.) The cookie dough has a tendency to fall away from the brownie.  Blockette actually preferred eating her dough separate from the brownie.  I just smooshed them down together and forced them to stick.  Not a big deal in my book.

2.) I ate the last one on Friday for at lunch. Wah!


Cookie Dough Brownies from Buns in My Oven
1 recipe or box of brownie mix, prepared and baked
3/4 cup salted butter, room temperature
3/4 c brown sugar, packed
1/2 c sugar
3 T milk
1 1/2 t vanilla
1 1/2 c flour
1 1/2 c chocolate chips (I used semi sweet)

Bake brownies per package instructions, in a 8x8 or 9x9 pan lined with foil, and sprayed with cooking spray.  I like fudgy brownies, so I followed those directions.  Let the brownies cool completely.  Cream butter and sugars until light and fluffy. Beat in milk and vanilla until well combined. Slowly add flour and mix until combined.  Fold in chocolate chips. Top the baked and cooled brownies with the cookie dough.  Store leftovers in the fridge or freezer.

Tuesday, January 31, 2012

The Richest Chocolate Cake EVAH

This is the first time I've really felt successful making a cake and frosting from scratch. The cake didn't fall or explode. It was moist, light and fluffy, not hard and dry like a brick. The frosting even set up and kept the layers in their appropriate layer-y height and location.  No shifting earthquake cakes here!
Look at that. Chocolate-y chocolate-y chocolate. Four layers of it. Don't you want a glass of milk just looking at that photo?

Mrblocko asked for a Chocolate cake for his birthday, and that is exactly what he got. I used the chocolate cake recipe from Chef in Training.  It might as well have been called Death By Chocolate Cake. It really is THAT rich.

As I was putting together the frosting I thought, no way this is all going to fit in the stand mixer.  And NO WAY all this frosting is going to get used up for this one cake.  But with using the frosting as a generous filling between the 4 layers of cake, there was exactly the right amount of frosting. 

When I was slicing up the cake Mrblocko balked at the size I had put on his plate.   I told him, "Trust me, this cake is super rich. It will be enough."  And it was. The next time he even asked for a smaller slice.  I've discovered I don't feel all twitchy and sluggish if Blockette and I share a small piece.  She can only finish half a small slice anyhow.

The cake on the blog Chef in Training has a dark chocolate frosting piped at the base, chocolate drizzled over the top and crushed Skor candy bars pressed into the sides.  To me, the cake I made is the chocolatiest cake on the planet.  I can't even wrap my head around those extra chocolate-y additions.  My brain gets all hurty and I have heart palpitations.  I guess it's a good thing I left the cake all plain Jane with it's decorations.  (Blockette wanted sprinkles, but Mrblocko said NO WAY.  It was his cake so he was the boss.  Although sprinkles would have been cute on the outside edge, but oh well!)

OK.  Here is the part where I come clean.  This cake is not entirely from scratch.  It uses a chocolate cake mix, AND a pudding mix.  There's just so much that gets added to this cake that it might as well have been from scratch.  It certainly beats a regular boring old cake from the box mix.  No contest.

Here's the recipe if you think you can handle the chocolate.  (You can't handle the Truth! chocolate!) Just make sure to have a gallon (or two) of milk handy.


The Most Chocolate of Chocolate Cakes from Chef in Training
1 box Devil's Food cake mix
1 small pkg Jello instant chocolate pudding mix
1 c sour cream
1 c vegetable oil
4 eggs, beaten
1/2 c milk
1 tsp vanilla
2 c mini chocolate chips (This is one whole bag)

Preheat oven to 350 F.  In large bowl, mix everything except for chocolate chips. The batter will be thick.  Stir in chocolate chips.  Pour batter into two 9-inch cake pans. (You could use whatever cake pan you choose. Just follow cooking time and temperature on the back of the Devil's Food box and add about 10 additional minutes to whatever the original cooking time requires.) Make sure to do the toothpick test to check if it is done or not. It usually takes about 45 minutes for two 9-inch cake pans. (My cake rose over the top, of my 9" cake pans.  Luckily they did not overflow.  So keep this in mind if you plan on using a 8" cake pan.)

After cake is baked, let cool completely. Place the 2 cakes onto a wire rack and stick them in the freezer. It is so much easier to cut them when they are a little frozen and they don't crumble as much. (I just put the cakes on racks in my cake carrier, and then stuck the whole thing outside.  It was below 32F so that worked out great.) Once cakes have cooled completely (or are slightly frozen) cut in half width wise so you have 4 equal circles. 

While cake is cooling prepare the frosting.

Chocolate Frosting:
2/3 c milk
2 tsp vanilla
1/2 c chocolate syrup
2T really strong coffee
8 c sifted powdered sugar
1 c cocoa
1 c butter

Mix milk, vanilla, chocolate syrup, and cooled coffee. In a large separate bowl, beat softened butter, powdered sugar, and cocoa.Slowly add in wet ingredients until you reach desired consistency. Beat an additional 5 min to get a fluffy consistency.

To start the frosting process,  put a little glob of frosting on the cake stand so that the base cake stays put. After the base cake is in place, frost the top of it generously. Place the second layer cake on top. Frost the top of it generously. Repeat until the fourth layer is placed on top. Then frost all around the cake carefully to keep layers from shifting.

Press some crushed Skor Candy Bars onto the sides of the cake. You can also drizzle the top with melted chocolate chips for an added look of beauty. (and insanity.)

P.S. This cake is so rich and huge it took the 3 of us, who are chocolate LOVERS, a whole week of eating a slice, every day, sometimes twice a day, to devour.  The cake, kept chilled, stayed moist, but not soggy, the entire time.  

Wednesday, August 24, 2011

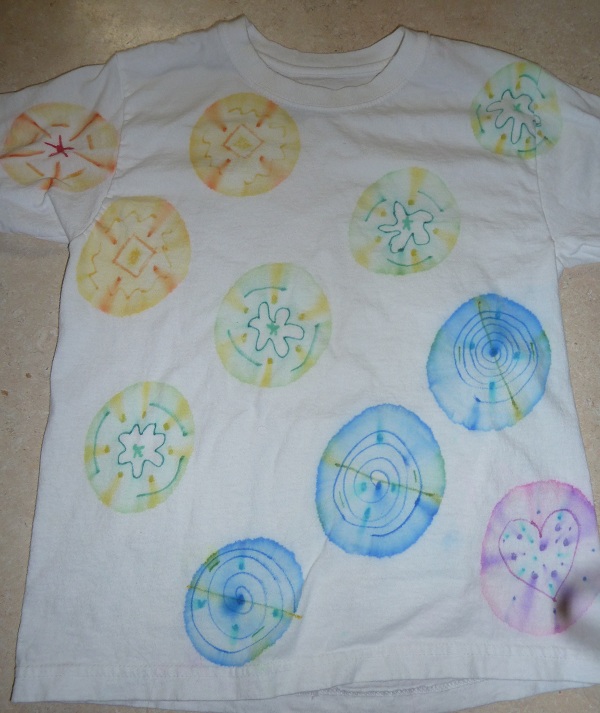
'11 Mixed Emotions Dance #20: Sharpie Tie Dying

At Blockette's Birthday Party, I had all the kids make these fun "tie dye" shirts with sharpies. I first saw Sharpie tie-dying tutorial on the blog Sun Scholars.  The same tutorial is available at Steve Spangler Science. That site gives the science behind this fun experiment.  I mean, (Waves hands) it's magic! 

Now did I remember to take ANY pictures of the kid's shirts before or after?  No. I did have an extra shirt leftover so I made another shirt especially for the purpose of putting pictures on this blog. 

So here is what you do.  Take plastic cups and place them inside your shirt. Put a rubber band at the lip of the cup to stop the spread of the color.  Then draw your design with sharpies.  The more abstract the better. 
Then...the magic.  Isopropyl Alcohol.  You can find this stuff in any grocery store or pharmacy in the first aid section.  I used an old medicine dropper for babies to apply the alcohol.  I found that 5-7 drops did the job nicely.
Woah.  You tell me that it isn't magical. 

OK.  Now for the not so magical part.  When I washed the shirt Blockette made, it bled.  HUH?  These are sharpies.  They aren't supposed to bleed.  Some of the color from her design got on the back of her shirt when I washed it.  Not only that, but I found pink on one of my gray shirts that was in the same load.  I heat set the (dry) shirts from the party for 30 minutes in a hot dryer before I washed it (in cold water), just like the directions said.  That was supposed to set the dye.  I did a Google search and found about 20 different blogs and tutorial websites.  None of them had a problem with bleeding.  Sharpies just aren't supposed to bleed.  The ink is not water soluble. 

Now, that pink dye could have been from the new pink clothing Blockette got for her birthday.  They had never been washed before.  Perhaps they were the cause of the pink on my shirt?  I thought that if the alcohol made the sharpie ink spread, maybe I could get whatever that pink stuff was to spread right off the shirt.  So I used the dropper to put alcohol on my gray shirt (which had already been in the dryer).  Wouldn't you know it, that pink came right out!  Whew!

The thing is, even if the new clothes were the cause of the pink on my shirt, it didn't explain why the other colors on Blockette's shirt got on other parts of her shirt.  That's the real mystery.

So here is the part where I sort of mess up the shirt I just made above.  I wanted to soak the shirt in vinegar to help preserve the color, but I only had a tiny bit.  I poured that on there and let it soak on the shirt for 2 hours.  Then I rinsed the shirt out in cold water.  Because I was anxious about the color bleeding issue I washed the shirt I made above in warm water with an old white sheet...before I set it in the dryer.  DOH!
So the shirt faded quite a bit, but there was no color bleeding onto the white sheet.  Blockette loves the shirt because the colors are light and pastel now.  So dainty and girly, doncha know?  I'm glad she doesn't think I ruined it, as the shirt was in her size.

If you are going to attempt this, here is what I suggest doing:
1. Wait until the alcohol has dried completely. 
2. Iron the shirt or stick it in the dryer to heat set your design.
3. Soak the shirt in vinegar and water overnight.
4. Rinse the shirt in cold water.
5. Stick the shirt in the dryer again to be on the safe side.
6. Wash the shirt in cold water with dark clothes.

Tuesday, August 23, 2011

The Party

Last weekend we had a birthday party for Miss Blockette.  This was the first real party that she's had.  We told her that she could invite 9 friends.  It took her almost a month to narrow down who she wanted to invite.  I really expected half the kids we invited to show up, but only one wound up not being able to make it.  I guess that's what happens when you have a party the weekend before school starts...everyone is home and looking for something to do.

One of the biggest struggles with this party was that Blockette's best friend "M" is a boy.  And a boy who doesn't like "girly stuff" to boot.  Guess what kind of party Blockette wanted?  Yeah, super girly.  I continually had to remind her how "M" would not have fun at that kind of party.


We finally came to a compromise of a rainbow theme.  Yeah rainbows are sort of girly, but not nearly as girly as princesses, fairies or unicorns.  I think it was all just on the edge of "M's" comfort zone.  I think he was relieved that Mrblocko was there to help balance out all that estrogen.

Blockette and I made paper buntings to decorate our garage.  We made a bunting that had 6 suns, one that had 6 rainbows, and one that had 6 clouds.  (I finally found a use for some of the T-shirt yarn I made last year.  It was perfect for bunting string, and to rope off the driveway.) From the bunting I hung all the milk jug butterflies we made earlier that week with a single strand of embroidery floss.  I'm bummed that I didn't get a good picture of them.  I also forgot to give them out at the end of the party.  (Anyone want a milk jug butterfly?)

The morning of the party it was pouring.  I wasn't quite sure how we were going to do ALL the games inside the garage, but I figured we'd just make it up as we went along.  That morning weather.com said there was a 50% chance of rain...until after her party was over.  DOH!  But, luckily, it stopped raining, and the sun even came out enough to dry up all the huge puddles in the front yard.  (The backyard was still a muddy lake, but that was no surprise.)

We played lots of games, although I think toss a water balloon at Mrblocko was their favorite game.  We also made sharpie tie dye shirts, which I will write more about later, and decorated cupcakes.  OK.  That was most likely the kids favorite thing.  They had M&M's, sprinkles, jimmies, marshmellows, blue sugar, and gold gel icing to decorate with.  Although, I'm sure more of the decorations went into their mouths than on the actual cupcakes.  (And that is saying something!)

The kids were surprised when they bit into their cupcakes to discover all the colors inside. It was a bit fussy, but not nearly as much trouble as the disaster of a rainbow cake that I made two years ago.  The exclamations from all the kids was worth the effort to make the cupcakes.  I'd definitely make them again.

I wish I'd taken more pictures of the party itself, but Mrblocko and I were too busy making sure all the kids were having fun.  I'm so glad Mrblocko was there to help.  Things would not have gone half as well if I'd been there by myself.