Wednesday, October 31, 2012

Her Royal Highness

When I asked Blockette at the beginning of October what she wanted to be for Halloween, she replied without hesitation, "Cleopatra."

Mrblocko thought this might be a tall order, but I did a search on google and pinterest and got some really great ideas.  I knew that this was a costume that I could make with no problem.

I set a challenge out for myself to use what I had, spending as little money as possible.  I did end up buying the turquoise fabric and the turquoise fabric paint, although, I used a gift card from JoAnn Fabrics that I got for my birthday.  I'll use the fabric paint for something else, and I'm sure the shawl will get used in some other project as well. I'm labeling those things as a gray area.

Everything else I found in my craft room! 

Blockette's dress is made from an old sheet that had a hole in it.  The gold fabric I got from my best friend a few years ago when she was cleaning out her fabric stash.  The gold fabric was stretchy and thin, so I fused it to some denim fabric.  The denim came from torn jeans also given to me by my best friend.  I had the red and black fabric paint from a previous project.  I also used Velcro and yarn to attach the cuffs, collar, belt and crown.  They were also leftover from long ago projects.

I'm pretty happy with how it turned out.  I did have a moment at the School's family Halloween party last Friday when I saw another girl wearing a store bought "Queen of the Nile" costume.  I got kind of freaked out that Blockette's costume was so obviously homemade.  However, Blockette LOVES her outfit, and in the end, that is the most important thing.

Happy Trick or Treating!

BOO!


Tuesday, October 30, 2012

Roast Pumpkin Seeds

What?  I never posted about Roasted Pumpkin Seeds?  How can that be?

Here is our gracious donor.  Let's call him Jack.

Why yes, I did rent a purple fog machine, and set fire to my living room for this picture. Why do you ask?

Jack yielded a generous cup of seeds for roasting.

Here is what some of them look like after my family attacked the pan:

Pumpkin seeds are super easy to roast.  All you need is a bit of time and patience.

Step 1: Scoop out all the goo and guts from your pumpkin. 
Step 2: Separate the goo from the seeds.
Step 3: Rinse the seeds off.
Step 4: Pat the seeds dry with a clean dish towel. 

Do NOT use paper towels for this step.  The seeds will still be slimy and stick something awful to the paper towel.  It will make you gnash your teeth and cry for your mommy.

Step 5: Set the seeds out, in a single layer, on a rimmed baking sheet to dry. 

This will take a few hours depending on the humidity of your house.  Feel free to let them sit overnight.

Step 6: When the seeds are dry and no longer slimy, preheat your oven to 250F.
Step 7: Toss seeds with 2 tsp olive oil.  Use your fingers to coat the seeds.
Step 8: Generously sprinkle salt on the seeds.

Don't get fancy and use Kosher salt here.  You want the smaller crystals from ordinary table salt.  Kosher is too chunky and doesn't adhere as well.

Step 9: Bake for 1 hour, turning once.  When the seeds are done, they will be a light golden brown.

The seeds always taste best right from the oven, but if you have leftovers, store them in an airtight container.

Monday, October 29, 2012

Phylo Apple Triangles

A few weeks ago I was rooting around in the freezer, and I found this weird package.  I opened it up and discovered it was filo dough!  I had no idea how it got in there, or how old it was, as it was no longer in its original packaging.

I opened up the zip bag and it looked and smelled to be in useable condition.  Not being one to want to waste good food, I set out on an internet quest to find a good recipe for those thin pastry sheets.

I thought these apple bourekas from Steamy Kitchen were going to be the winner until I found the recipe for Apple Triangles from Cannella Vita.  They were essentially the same recipe, except the one fromm Cannella Vita uses applesauce instead of sliced apples.

This seemed like the way to go as I didn't want to spend all that time chopping and peeling if the Phyllo turned out to be freezer burnt or something like that.
I did have to throw some of the pastry out.  It was just too flaky to work with. 

Because the dough was more fragile than normal, I took two sheets at a time, brushed the top sheet with butter and sugar, folded them into thirds, then placed a spoonful of applesauce on the edge, and folded them up like a flag.  Grabbing the sheets two at a time seemed to make them a bit more sturdy when I brushed on the butter.  I folded the dough because I was afraid it would tear if I attempted to cut it.  Finally, I brushed the triangle pouches with butter to help seal the edges before dusting them with sugar and cinnamon.

The philo leftovers from my freezer yielded 10 apple-y pouches.

Surprisingly, they tasted great!  I could tell that the pastry was the tiniest bit stale, but neither Blockette nor Mrblocko could. 

They were a tasty quick unexpected treat.  I'd totally make them again!

Filo Apple Triangles from Canella Vita
1/2 tsp cinnamon
1/2 cup apple sauce (I used a single serving container of cinnamon applesauce)
3/4 cup unsalted butter, melted  (I used salted butter, but unsalted would be better here)
1/3 cup granulated sugar

Preheat the oven 375°F.  Stir the cinnamon into the apple sauce. Cut phyllo sheets in half horizontally and cover with a damp towel. Lay 1 sheet on your work service and using a pastry brush, brush with butter then sprinkle with sugar and follow with 2 more sheets {cover the remaining with a damp cloth}. Slice lengthwise into 3 strips. Place a heaping teaspoon of apple sauce at one end and fold into a triangle as you would a flag. Arrange on a parchment lined baking sheet. Brush with melted butter and sprinkle with sugar.Bake at 375 for 10-15 minutes or until golden brown and crispy.

Friday, October 26, 2012

Hardwater Stains . . . Revisited

Since the vinegar and paper towel trick worked so well on my kitchen faucet, I thought I'd test it out on my dishwasher.

Here is the before:

And the after:
 

What a disappointment. I was hoping for the same results I had with the sink. The vinegar did take off some of the hard water, but not nearly enough to make me happy.

I left the vinegar on for the same time that I did with the sink too.

Oh well. Off to find a new solution for the dishwasher I guess.

Thursday, October 25, 2012

Thankful Thurs #43

source
1.  Getting the leaves up in the backyard before it rained.

2. Blockette scoring two goals in her soccer game on Sat.

3. A lovely Anniversary hangin' out at home.

4. My mom seems to be doing better from her injury.

5. Raking up all the leaves from our neighbor's tree in the front yard.

6. Staying under budget at the grocery store when I was positive I was going to go over.

source
7. Easy clean up at Wednesday Night church dinner. 

8. Not being afraid to speak up about the store's coupon policy when the cashier doesn't want to honor it.

9. The banana fairy (who writes notes on bananas) is back!

10. A few days of gorgeous warm weather.

11. Seeing more bald eagles flying overhead at work.

12. My best friend got a job, and had her first day!  (woot woot!)

Wednesday, October 24, 2012

Super moist Cinnamon Cake

I had originally planned to make this 5 min cinnamon cake from Budget Savvy Diva for Church.

Don't they look tasty?

Hmmm....

I made them the night before and they were super moist.  So moist that you needed a plate and fork to eat them without making a complete mess.  Well, that wouldn't work because this was for a meet and greet with our new associate pastor.  The bars needed to be something you could eat in hand.

Great.

So I whipped up a batch of Lazy Bars, this time with chocolate cake mix.  It was all I had time to make.  They at least, turned out OK.  (Let's just not talk about how I was so tired when I made the chocolate lazy bars that I opened an egg on the counter instead of in the bowl.  And how I had to yell for Mrblocko to get some paper towels because the egg was running everywhere as our counter top is NOT level.  No.  Let's not talk about that part.)

Let's keep talking about the Cinnamon cake instead.

Anyhow...I put some of the sliced gooey bars on a plate in the fridge, and some on layers of wax paper in the freezer.  Keeping the bars uncovered in the fridge dried them out enough so they held their shape better.  I thought they tasted weird, so I decided to play it safe and NOT bring them to church.

Strangely enough, the ones in the freezer tasted much better.  I'm not sure what that was all about.

I can't say I'd recommend making these bars.  They weren't my favorite, but Blockette and Mrblocko seemed to enjoy them.  Make them at your own risk!

5 Minute Cinnamon Cake from Budget Savvy Diva
1 + 2/3 cups all-purpose flour
1 cup sugar
1 cup milk
2 teaspoon vanilla
2 1/2 teaspoons baking powder
pinch salt
large egg

TOPPING
1/2 cup brown sugar
1 teaspoon cinnamon
1/4 cup melted butter
1/4-1/2c chopped walnuts

Preheat Oven at 350. Grease a 13×9 pan. In a bowl mix all cake ingredients and place in pan. Sprinkle brown sugar,cinnamon; walnuts on top of cake. Drizzle melted butter over top. Bake for 30 minutes.

I also made a glaze of:
2c powdered sugar
4T milk
1 t vanilla

Combine ingredients.  Add more milk as needed to reach desired consistency.  Drizzle over slightly warm bars.

Tuesday, October 23, 2012

Three Variations on the Microwave Oatmeal Cookie

A little less than a month ago, I wrote about this Microwave Oatmeal cookie.  I couldn't help thinking, about other versions of this recipe.

First I made a version with Biscoff instead of Peanut butter:
(1/4c oats, 1T brown sugar, 1T biscoff, 1T strawberry yogurt, 1t cornstarch, 1/4t vanilla, 1/4t cinnamon, 1T chocolate chips.)

I am the biggest fan of Biscoff, but I thought this tasted sickeningly sweet.  Maybe because there is so much sugar in the Biscoff, it didn't need the extra tablespoon of Brown sugar? 

There won't be any more microwave cookies with Biscoff in the future works for me.

So, I thought I'd try a version with Dark Chocolate Peanut butter:
(1/4c oats, 1T brown sugar, 1T Dark chocolate peanut butter, 1T strawberry yogurt, 1t cornstarch, 1/4t vanilla, 1/4t cinnamon, 1T coconut flakes, 1T chopped banana chips.)

As the chocolate peanut butter belonged to Blockette, I was "forced" to share this cookie with her.  We agreed that while we liked this version, the cookie with the peanut butter and blueberry craisins was much tastier.

Then I got all crazy and made this:
(1/4c oats, 1T pancake syrup, 2T peanut butter, 1t cornstarch, scant 1/8t almond extract, scant 1/2t apple pie spice, 1T golden raisins.)

I got tired of trying to figure out ways to make the yogurt flavors work within the recipe, so I wondered what the cookie would taste like if I removed it altogether. To make up for the lack of moisture, I doubled the amount of peanut butter.  I only ever eye balled it, I'm guessing the peanut butter was somewhere bettween 2 and 3 Tablespoons.  I also swapped the brown sugar out for pancake syrup.  I thought that a liquid sweetener would help bind up the mixture as well as add some interesting flavors.  To play off the maple in the syrup, I used apple pie spice instead of just cinnamon.  The last swap I made was for almond extract, in place of the vanilla.  Almond extract seems more powerful than vanilla, so I reduced the amount by half.  Finally, I used golden raisins as my mix-in.  Golden raisins are a bit more plump and moist.  I thought they would take to the microwave process better than the regular kind.

This was my favorite version of this cookie. It is much drier and crumblier than all the other versions though.  It reminds me of my favorite flourless peanut butter cookie, which is quite crumbly.  Of course, if you don't LIKE a crumbly peanut butter cookie, then this version is totally not for you.

One final note, as this is a drier cookie, it only needs to be nuked for 40 seconds, vs the 50 seconds for the other versions.

Please let me know if you try any of these versions, or if you come up with new versions you like as well!

Monday, October 22, 2012

Crab Penne al Telephono

Apparently there is this restaurant in the Philippines called Cibo's.  I'd never heard of it before, 'cause, well it's in the Philippines.   It's not like I can hop in the car for a quick trip or anything like that.

I have seen several blogs that "hack" their Penne al Telephono though.  It sounded mouth watering good.  Then I saw a little blurb at the bottom of one post that said if you want to copy their Rigatoni Alphonso, just add crab sauteed in butter, and swap the penne for rigatoni.  Sign me up for that!

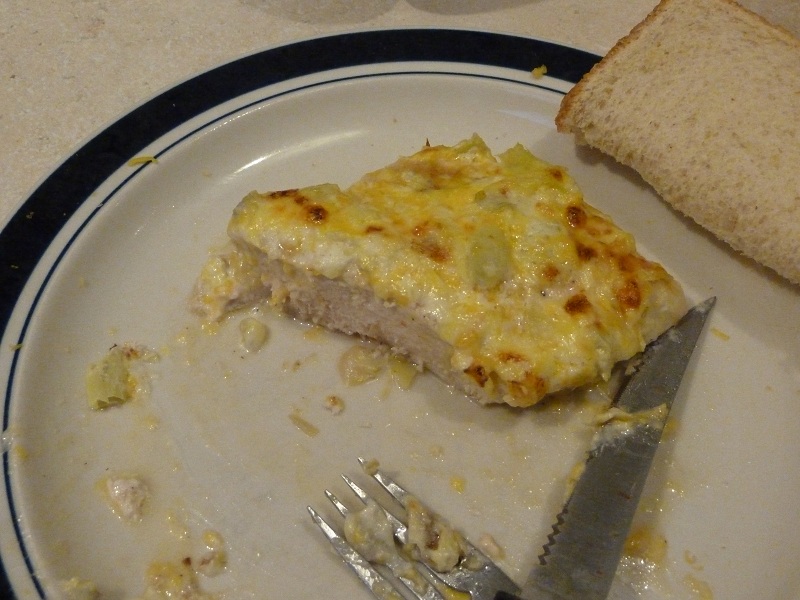
Oh. My. Word.  This dish was KA-Ray-Zee good.

Insane.

I may have peed myself a little it was so good.

Yes, I literally patted myself on the back when I made this.

The recipe I used was from Pepper.ph.  I had to make a few minor changes to the recipe, but nothing majorly flavor altering.

First, they were all out of rigatoni at the store.  I don't get it, but there was zero rigatoni on the shelf.  Maybe everyone was making this recipe?  I don't know!  I figured since the non crab version used penne, I'd settle for that noodle shape.

Next, I discovered that I only had diced tomatoes in my pantry.  The recipe calls for crushed tomatoes, so I threw a can of fire roasted tomatoes into the blender and pulsed it so it was just slightly chunky.

Finally, I used imitation crab meat.  Yes.  I know that some of you are screaming in horror.  I've said it once and I'll say it again: I live in the midwest.  Fresh crab is insanely expensive.  I don't even want to think about it.  So I used the fake stuff.  As we don't live anywhere close to getting fresh from the ocean crab, no one in my family can tell the difference.  If you are lucky to live on the coast, by all means use the real stuff!

One thing I didn't change was the call for cream.  I knew it would make or break this dish.  I rarely use actual cream, so I thought it was time for a little treat.

Blockette wanted to know what made the dish pink and I told her it was the tomatoes and cream.  She eyed me funny and sceptically asked, "What kind of cream?"  I replied, "Cream.  Cream cream."  To which she replied, "No.  What KIND of cream."  Wherein I had to explain that it wasn't sour cream or cream cheese, but cream.  The kind of cream that they make ice cream with."  Never mind that she watched me make dinner and pull the tiny milk carton out of the fridge. 

The ice cream part must have intrigued her because after that, she dug right in.  I swear her eyes rolled to the back of her head.  Now she wants to eat this every week!  I told her that wasn't going to happen, but that I would make the dish again.

Crab Penne al Telephono from Pepper.ph
2 tbsp extra virgin olive oil
2 tbsp chopped onion
1 tsp garlic
1 regular can crushed tomatoes (I used a 15oz can)
2 tsp sugar
1/2 tsp fine salt (I omitted this as the bouillon was salty enough)
1/8 tsp pepper
1/2 cup water
1/2  chicken bouillon cube (I measured out a cup of boiling water, dissolved the cube and then dumped out half of the broth mixture.)
1 cup  cream
1 package of imitation crab meat
1/2 cup grated mozzarella cheese (I used a preshredded Italian blend, and it was probably closer to 1 c cheese.  )
1/2 lb uncooked penne pasta

Cook pasta  directed in package. Meanwhile, heat pan and sauté onion and garlic until soft. Add in crushed tomatoes and water. Season with sugar, salt, pepper and chicken broth. Simmer for 20 minutes or until thick. Add crab and cream and simmer for another minute. Add pasta, and then cheese.  Stir for 1-2 min until cheese is melted and stringy.

p.s. It is sadness that this dish isn't nearly as good in leftover form.  I can never seem to get cream based pasta dishes to taste as amazing as they did the first time around.

Friday, October 19, 2012

Art by Blockette

This is Blockette's latest creation.  The whole design is only about 3x3 inches.

Blockette named the girl in this picture Amphles, because she wanted a name that had four consonants in a row.  I'm not sure why.  Sometimes it's best not to ask these things.

All 4 girls are Amphles, but they are in costumes of different lands.

I don't know exactly what prompted her to draw this, but my guess is that it has to do with the world mythology book she checked out of the library the other day.  That, and playing (what is probably too much) Titan Quest on the computer with her father.

I know I'm biased, but I think it's pretty awesome for a 7 year old.

Thursday, October 18, 2012

Thankful Thurs #42

1. Mrblocko making the executive decision for none of us to go to Blockette's soccer game in the pouring rain.  Even though they are just 7 and 8 year olds, their games aren't cancelled unless there is lightning.

Source
2. I'm nearly finished with Blockette's Halloween costume!

3. My new winter coat arrived and it is beautimus.

4. I'm starting to get used to the tree being gone.

5. Girly time with Blockette while Mrblocko is out with his friends.

6. I got a free oil change by donating some of Blockette's coats.

7. No other work was needed on my car.  (I was pretty sure they were going to find something horrendous, but not even my filter was dirty!)

8. I only just got sick of grilled burgers this weekend. (We ate them every weekend this summer.  Mrblocko just put the grill away as it is getting too cold and windy for the grill to heat up properly.)

9. Blockette finally got a new, harder spelling list, after almost two months of school.  Maybe now she won't zone out in the middle of the test?  (fingers crossed)

10. The school ordered me a raincoat that wasn't 12 sizes too big.  It came today, just in time for the rainy afternoon!

11. My mom didn't break anything when she decided to test out her acrobatic skills in the Metro.

Wednesday, October 17, 2012

Carrot Cake in a Mug

I'm one of those weird ladies that likes sweets, but doesn't always want chocolate. Since we are talking all about mug cakes this week, I thought I'd throw a non chocolatey mug cake into the mix.

Sure, there is the ever delicious Coffee Cake in a mug.  That is a great substitute for a sweet, cakey, but non chocolate craving.  But what if you want to pretend to be healthy? With 2 Tablespoons of butter and 3 Tablespoons of sugar, no amount of squinting and hopping on one foot will enable you to pretend that dessert is any kind of good for you.

But do you know what IS good for you?

Carrots.

So I looked for a microwave carrot cake recipe.  Most of them call for eggs.  I did find two without! 
One from Spicy Treats and another from Mix it Up.  The recipe from Spicy Treats only called for 3 T  shredded carrots, 2 T oil, and 2 T sugar.  The recipe from Mix it up required 1/4 c (4T) shredded carrots, 1 T oil and 1 T sugar.  As the purpose of this experiment was to find a healthier non chocolate microwave mug cake, I went with the recipe from Mix it up.


The resulting cake was not as moist as a normal carrot cake, but still pretty tasty.  I found myself missing the pineapple, walnuts and coconut that are usually in the full size carrot cakes made from scratch, so I tried a different version.


This one I added 1 T chopped walnuts and 1 T sweetened coconut.  I also used pineapple juice instead of milk.  Because of the added sugar in the coconut, I decreased the sugar from 1 T to 1/2 tsp.

Sadly, I couldn't taste any pineapple flavors in this cake.  What would have been better would have been to add 1 T crushed, drained pineapple in place of the oil, AND swap the milk for juice.

The coconut was a bust as well.  Microwaving this cake completely dried out the coconut shreds.  They were almost chewy and rubbery at the same time.  Not so great.  What would have been better would have to make a simple glaze and top it with toasted coconut.  Of course that would add more sugar.

I think the verdict is still out on this cake...going to have to do a bit more experimenting if you ask me!

Carrot Cake in a mug from Mix it up (original recipe with none of my experimental changes)
3 tbsp flour
1 tbsp sugar
1/4 tsp baking powder
A pinch salt
1 tsp cinnamon
1/6 tsp ginger
A pinch cloves
1 tbsp applesauce or oil
3 tbsp milk
1/4 tsp vanilla extract
1/4 cup shredded carrots
Combine dry ingredients in one bowl.  In another bowl mix together wet ingredients. Add the shredded carrots to the wet ingredient bowl.  Then, gradully mix the dry ingredients into the wet ones until combined.  Pour batter into a ramekin or mug and microwave for 2 minutes. (This was the first time I actually followed the recommended baking time for a microwave cake!) If cake is still gooey, microwave for 20 seconds longer, or until the cake is fully baked. 

Tuesday, October 16, 2012

Chocolate Mug Cake with Yogurt

Another microwave cake recipe?

Yup.

You betcha.

This one is called eggless microwave brownie, and hails from the blog, Cook's Joy.
I thought it was pretty normal as far as mug cakes go.  It was neither super cake-y nor super lava-y. 

This recipe only calls for 2 T of sugar, but as it is powdered sugar, there are less grams of sugar than say a packed 2 T of brown sugar.  However, it does contain 1.5 T of yogurt, and even the low sugar versions of yogurt are pretty high in sugar.  So I don't think this version is any lower in sugar than the "original".

The recipe also calls for 1.5 T oil vs the 2 T in the original.  However, there is some fat in the milk and yogurt (depending on your brand), so it probably evens itself out.

What tips the scales is that this recipe includes Nutella, which also contains sugar and fat.  However, I've been known to scoop a big ole dollop of Nutella into the original version on more occasions than not. 

One thing I didn't like about this cake was how much it deflated after sitting.  You can see the mark from where the cake rose to on the inside of the mug.  It fell nearly an inch.  It didn't have any affect on the taste of the cake, I was just disappointed that my cake lost so much volume.

Overall, I don't think this version of the microwave cake is any better or worse for you that the original version.  I did prefer the richer chocolate taste of the original.  The original version also contains less ingredients and therefore, takes less time to prepare.  It's for those reasons that I'll stick with the original version when that craving for something rich and chocolatey.

Here's the recipe for the version with yogurt if you'd like to test it for yourself:

Eggless microwave brownie with yogurt from Cook's Joy
2 tbsp all purpose flour
2 tbsp powdered sugar
1 tbsp cocoa powder
1/2 tsp baking powder
A pinch of baking soda
1/2 tsp vanilla
1.5 tbsp yogurt
1.5 tbsp milk
1.5 tbsp oil
1 tbsp Nutella

In a microwaveable mug, combine the first 5 ingredients.  Then add the remaining ingredients and stir until combined.  Microwave 45 sec -2 minutes (It was cooked after 45 sec for me) and let stand 1 min before eating.

Monday, October 15, 2012

Low Sugar Cakey Chocolate Mug Cake

Because I can't ever stop trying to find something better than what I've had before, I decided to give this Eggless low fat Chocolate mug cake from Vegas and Food a taste test.

While I really like the "original" high sugar/fat mug cake, it really should be reserved for a special occasion, or a horribly hormonal day.  The "healthy" whole wheat version has become impractical. For some reason the applesauce keeps getting moldy two days after I open the jar.  NO GOOD!  So I needed to find a different version that was lower in sugar and in fat.

Like most cake like of mug cakes made I've made, this one was cooked to my liking in 30 seconds!  Again, the original recipe called for microwaving the cake for 2 minutes.  If I cooked this cake for two minutes, I'd have a chocolate brick.

This recipe actually has less sugar than the healthy version.  Here's how that breaks down:
"Original": 4 Tablespoons of sugar
"Healthy":  2 Tablespoons of sugar
This version: 1 Tablespoon of sugar

As for a fat comparison:
"original": 2 Tablespoons of oil
"Healthy": 1/4 c applesauce instead of oil
this version: 1 T oil

Obviously, the "healthy" version is the lowest in fat, but this recipe does have half the sugar of the "healthy" version.  Perhaps that makes up for the fat?  You'll have to be the judge of that.

This recipe is significantly less sweet than the other mug cakes.  If you have a mega sweet tooth, this is not the cake for you.  My sweet tooth must be shrinking because, while I noticed the reduced amount of sugar, I didn't mind it.  I suppose if you want a sweeter taste, you could always use 1T of splenda instead.  Maybe it's just me, but splenda tastes sweeter than sugar.

For this recipe, I opted to bake the cake in a ramekin, instead of a mug.  This was the first time I did this. I mixed everything in the ramekin too so there was only one dish to clean.  This was harder to do without spilling.  Mugs are a lot taller, so the ingredients don't "jump" out like they do when you mix them in a ramekin.

I'm not sure if it was the recipe itself, or baking it in a ramekin, but this was the most cake-like in texture of all the mug cakes I've made.  The other cakes went from being like a lava cake to rubber in just a few seconds.  This recipe stayed moist and fluffy, without the fudgy lava at the bottom.  While the majority of the time I prefer the texture of a lava cake, having a cake-y version in my arsenal is nice.   

Cake-y Low Sugar Mug Cake from Vegas and Food
3 tablespoons all-purpose flour
1 1/2 tablespoons unsweetened cocoa
1 tablespoons sugar
1/8 tsp baking soda
1/8 tsp salt
1 teaspoon vegetable oil
3 tablespoons milk
1/4 tsp vanilla
1T nutella (optional)
1T mini chocolate chips (optional)

In the mug, mix together all purpose flour, cocoa, sugar, baking soda and salt.
Add oil, milk and vanilla and mix well with a spoon. Make sure there are no lumps underneath.
Microwave for 30 seconds to a minute. Take out and allow to cool.  (I've tried versions with  and without nutella and chips.  They are both great.  The version with nutella and chips will need a few extra seconds to cook properly.)

Friday, October 12, 2012

Ten more things you might not know about me

Source
1. I can't stand it when people write "chow" instead of "ciao," or "wala" instead of "voilà." It's like the visual equivalent of fingernails on a blackboard.

2. My 12 year old car has just over 53,000 miles on it.

3. I can't seem to throw away twist ties.
Some day all those twist ties I've saved will, in turn, save the world.  Seriously.

4. I have very vivid, graphically violent nightmares.

5. I will roll my eyes at you if you complain that a coffee cake doesn't taste like coffee.

6. No matter how hard I try, I can't do more than two things at once.

Source
7. I LOVE peeling sunburned skin.
 It makes me giggle when I get one of those BIG sheets of skin.  There is something so disturbing and satisfying about it.

8. I yell at the computer when I see some sort of DIY project that only costs $10 (or something along those lines).
Sure it only costs that much except for the hundreds of dollars worth in power tools you used to assemble said project!!!!
(Yeah I just yelled that in my head as I typed it.) 

source
9. I cursed like a sailor when my daughter was born ... before I had the epidural.
No Joke.

I got dirty looks from the nurses and everything.
I'm pretty sure I made up some new words too. 

10. To me, it's less scary to walk into oncoming traffic than to make small talk with someone other than a close friend.

Thursday, October 11, 2012

Thankful Thurs #41

1. The tree is down so it can't fall down.

2. My goofy crazy mom.

3. Blockette keeping up a good attitude when she had a day off of school.  (Only one "I'm bored!")

4. I'm getting a new toasty warm winter coat! (Thanks Mom!)

5. I saw my coupon for DSW wasn't valid for another 3 days BEFORE I left the house.  (Winter boots will have to wait until then!)
Watch out kitty!  That moose is gonna eat you!

6.Slowly making progress on Blockette's Halloween costume.

7. Not busting out in hysterical laughter when one of the little 4 year old girls in Sunday school said her missing cat was eaten by a moose.

8. I only almost got hit by a car today. 

9. I restrained myself from hitting above mentioned vehicle with my stop sign.

10. No one was injured when one bus hit another bus in the bus line up yesterday.

Wednesday, October 10, 2012

Artichoke Crusted Chicken

I made this Artichoke Crusted Chicken from Sugarlaws out of food boredom.  We'd been eating a lot of variations on burgers or pasta with red sauce lately.  I thought I should switch up the meal plan and throw some chicken in there. 

Of course, I saw this as an opportunity to test out a new chicken recipe.  Why not?

This was the first time Blockette had artichokes.  Although she discovered she did not like them, she was a very big girl about it and didn't whine or complain.  (Hooray!)  Because she was such a trooper, I told her that when we had the leftovers, I would let her scrape off the artichokes.

The thing was, I didn't particularly care for the artichokes either.  When it came down to eating the leftovers, I scraped off the cheesey artichoke topping, chopped up the chicken and tossed it into a jazzed up pot of ramen.  

Both Blockette and I had no complaints about eating the leftovers like this.  The one great thing about this recipe is how moist it made the chicken.  The chicken was not even a tiny bit dry from reheating it in the noodle-y soup broth. 

Mrblocko ate his artichoke chicken cold and said he liked it.  Maybe he is a bigger fan of artichokes than Blockette and I are.  Then again, maybe he was just really hungry.

If you'd like to test this recipe out yourself, here you go.  This recipe serves two.

Artichoke crusted chicken from Sugarlaws
2 six-ounce chicken breasts, pounded thin
2 tbsp olive oil
1/4 cup mayonnaise
1/4 cup artichoke hearts, drained and chopped (I used canned artichoke hearts, but frozen ones that have been thawed would be fine)
1/3 cup grated white cheddar cheese
Salt
Pepper

Salt and pepper the chicken and sauté the chicken in oil on medium-high heat, for 6 minutes on each side. Mix together the mayonnaise, artichoke hearts and cheddar cheese until evenly distributed.  Spread the mixture over the sauteed chicken breasts, and then broil on high until the cheese is melty and bubbling.  (Anywhere from 3-9 minutes) Do not take your eyes off them — broiling can lead to burning faster than you can imagine. 

Tuesday, October 9, 2012

Beefaroni from a can never tasted like THIS!!!!

When I was a little girl I loved the pastas in a can. Spaghetti O's - oh yes! Beef-a-roni- you betcha! Chef Boyardee was my bestest bud...until he wasn't. I swear one day I woke up and thought they were gross.

I tried twice to serve these instant meals to Blockette when she was a toddler. Each time she did not keep them down. Now, she was still having texture issues at the time, so that could have been the result of her gag reflex being triggered.  I wasn't about to test that theory out for a third time.

At least I wasn't tempted until I saw this recipe for a version of Homemade Beefaroni from Cooking During Stolen Moments.  It just sounded soooo good.

It had been years and years since Blockette had a major texture issue with food, and this recipe looked and sounded scrumptious. 

So I went ahead and made it.

The smell of the sauce cooking filled the house with the most mouth watering aroma.
  
Blockette took one bite and exclaimed, "Don't tell daddy you made this!  I don't want to share it with him!

I told her that Daddy would know right away we ate something good for dinner cause he'd get a whiff of the scrumptious smell as soon as he walked in the door.

Still, she did not want to share.

This picture was taken five minutes after I dished up her bowl.  I think she may have inhaled her dinner.

When she finished her meal, Blockette stated, "You know mom, I think I might like this beefaroni better that frozen pizza."

Whoa....

I asked her if she was sure, and her reply was, "Well...I think they are tied for first place."

There is one tiny bad thing about this dish.  It's not technically even a bad thing.  It's the leftovers. They don't taste nearly as awesome as the food right off the stove.  They are still really yummy, just not "better than pizza" good. 


Homemade Beefaroni from Cooking During Stolen Moments
1 lb. ground beef
2 14.5 oz cans tomato sauce (I used about 28 oz of pureed tomatoes from my garden)
1/2 c. grated Parmesan cheese
1/4 c. water (I added a little bit more water than this as my tomato puree seemed a bit thick)
1 T. sugar
1 t. each garlic powder, salt and Italian seasoning
1/4 t. black pepper
1 lb. cooked pasta (I used ziti)

Brown ground beef in a sauce pan and drain. While the meat is browning, boil noodles. Once meat has browned, stir in remaining ingredients, except pasta. Simmer about 10 minutes, to let the flavors combine. Stir in the pasta until coated.

Monday, October 8, 2012

Timber!

Well, we finally did it.

This weekend we got the tree in our front yard removed.
I was very sad about it, and tried to use every argument in the book.  The tree was diseased and needed to come down, and me ignoring that wasn't going to change the fact that the tree could fall over and hurt someone or something.

Here's the before picture of our house:
I was standing across the street in our neighbor's yard, tilting the camera to try to get all the tree in.  I'm noticing now, that I missed a few feet at the top! 

The red arrow on this picture is to show this particular branch.  That particular branch, which was about the length of the arrow when it was cut, fell across the entire street and knocked leaves off the tree that was about 3 feet behind where I took this picture.  The tree is a lot bigger than it looks!

You can totally tell from this picture that there is something wrong with the tree.  It has no leaves and all it's neighbors are barely turning colors.

Here's the after picture:
Poor sad nekkid little house.

The pile of wood that is there was all that the tree removers didn't turn into wood chip.

Not a lot of wood. Basically the trunk and the lower big branches.

We took a few of the smaller pieces for our fire pit, and the tree removers took the rest.  At least that was the plan.  They went to cut down another diseased tree a few houses down, and they said they were going to pick up the wood when they were done.  We had 3 people, including the mailman, ask if they could have the wood not 15 minutes after the tree cutters drove down the street.  Two people just came and loaded up their car trunks without asking, and another person came to the door to see if we were selling the wood.  Who knew that wood turned people into vultures. 

Here's a good picture of what the Emerald Ash Borer does to your tree:
I didn't peel that bark away.  It fell off in the tree removal process.

That's what those pests do.  They lay their eggs in the tree and the larvae burrow their way around and eat their way out.  The bark gets detached from the interior wood and the tree dries out and rots and then falls over and goes smash. 

If you look carefully you can see little holes in the two logs next to the squiggly log.  Those are from our friendly neighborhood woodpecker.  He was none too happy that these men were cutting down HIS tree.  He was still trying to eat the bugs when they whipped out their chainsaws.  Poor little guy. 

Well, I guess he could just go in the back yard and snack on the bugs in the ash tree back there. 

Friday, October 5, 2012

Pinterest fact or fiction 6: Armpit stains

Normally, I'm not a sweater. My m.o. is to get hot, clammy and then pass out. You can imagine my surprise when I started my job as a crossing guard and I came home dripping with sweat. I was happy to be sweating because it meant that I wasn't passed out in the middle of the street from heat exhaustion.

What I wasn't too happy about was what the sweat did to my shirt.

Ew!  Nasty yellow armpit stains.

So unlady like!

A pin from One good thing by Jillee claims that if you take one part Dawn dish soap, and two parts hydrogen peroxide, with a sprinkle of baking soda, all your yellow armpit woes will be vanquished.

So I tried it.


The stain is lighter, but still there.  I'd say it's not exactly the miracle it claimed to be.

Thursday, October 4, 2012

Thankful Thurs #40

1. Cheering on my niece at her last track meet of the season.

2. Not getting horrified when Blockette kicked her fit up to 11 at the above mentioned track meet.

3. Perfect weather for both Blockette's soccer practice AND her game.

4. Blockette seems to finally be getting the hang of this new big girl version of soccer.  While she hasn't scored any goals, she isn't chasing the ball around the field so much, and opening herself up to passes.

5. Finding time to read over the weekend.

6. Being able to go on CROP walk on Sun.

7. Naps.

8. The huge eagle that soared over the street at work this AM. 

9. The girl who very shyly gave me a fun size snickers bar as she crossed the street.  (She is a 5th grade Patrol who helps the younger kids get to class.  I come early specifically to get her safely across the street.)
The bananas are just for size reference.  They really didn't do any attacking.

 10. I got all the tomatoes picked before the hard frost hit. 
(See photo above of my bounty.  I had to toss 36 wonky, cracked, buggy, or rotting tomatoes.)

Wednesday, October 3, 2012

Stove Top Mac N Cheese - meh

Friday is soccer night for us.  Somehow, Blockette got put on a team that holds practice right when we would normally be eating dinner.  That leaves me with two choices: 1.) eat a snack before we leave, and then eat dinner when we get home.  2.) eat dinner before we leave and a snack when we get home.

Option one isn't very viable because I sit through the practice with a grumbly tummy, then I am too hungry and crabby to make or wait for dinner.  Or on occasion, Blockette is too tired to eat from her workout.

So that leaves option two, eating an early dinner.

I thought this Stovetop mac and cheese from Evil Shenanigans would be a good option for us.

It was quick, and full of carbs for energy!

When I went to make the recipe I discovered didn't have any dried mustard.  I did a search online and read that you could swap 1 t dried mustard for 1 T prepared mustard.  I found loads of sites that said this.

I don't know if it was my mustard substitution, but I thought the dish tasted very mustardy, and not much like anything else.  I also used sharp cheddar, which I thought would give off a strong flavor. The macaroni still tasted only like mustard.

When I finished preparing the mac, I didn't like the lack of sauce.  (I'm from the super creamy mac n cheese school of thought.)  I added 1/4 c sour cream in hopes of fixing this issue.  It did help some.

Blockette absolutely loved this dish.  I can't figure out why.  Maybe because it was bland?  Or because she was hungry?

There were lots of leftovers.  Instead of nuking them in the microwave to reheat, I put them in a saucepan on low heat.  The sauce got very grainy and ugly.  I kept adding milk to the pan in hopes of smoothing things over.  This helped, and also made the macaroni not taste like mustard anymore. Oh yes.  It definately did not taste like mustard.  It tasted like nothing at all.  Just the texture of cooked noodles.
UGH.

Luckily, the second time around we had the macaroni as a side dish with grilled pork chops.  The pork chops were so good that they overshadowed the blandness of the noodles.

At this time, there was one serving left.  I was not ready to give up on this dish yet.  I stuck the leftovers in a microwave safe dish with a tiny splash of water. Nuked it and then added a small handful of shredded Mexican blend cheese.  I nuked the dish again to melt the cheese.  Next, I added a dash of Bavarian seasoning, and shook on a layer of bread crumbs.

Success!

I wish I'd thought of those additions sooner!

Below is the original recipe for the Mac.  Feel free to add extra cheese, Bavarian Seasoning and bread crumbs to your liking!

Stove top Macraroni from Evil Shenanigins
8oz macaroni, or any smallish tube shaped pasta
1 tablespoon butter
6 oz evaporated milk
6 oz freshly grated cheddar cheese
1 egg, beaten
1 teaspoon dry mustard powder
1/4 teaspoon red pepper
Hot sauce, to taste
Salt and pepper

Boil the pasta according to package directions, but reduce the cooking time by one minute. Drain and pour back into the cooking pot. Over medium-low heat, add the butter and stir until melted. Mix the egg, milk, and spices and pour over the pasta. Stir until it begins to thicken, about three to five minutes. Remove the pan from the heat then add the cheese in four installments, making sure the first is melted completely before adding the next.

Tuesday, October 2, 2012

Sept Cross Stitch

Just a wee bit of stitching on some wee little designs.

This design is Snowy Night by Prairie Schooler, from 2008 Just Cross Stitch Ornament magazine. It was stitched over one on 25 ct off white fabric.  I had stitched the design before many years ago as a gift, but that one was on black fabric.  I was surprised how much of the white fabric shows through the stitches.  It's less noticeable in person because the actual design is so small.


This design is Sugar Plums  by Country Cottage, from 2009 Just Cross Stitch Ornament Magazine.  It is also stitched over one on cream 25 count fabric.  I changed the color of the pillow from bright white to a more muted cream.  The white just looked to garish against the antique-y feel of the fabric.  I also changed the lacey border from white to a greyish periwinkle blue.  I thought about changing it to the same cream that I used for the pillows but it didn't stand out enough for my liking.  Of course I didn't write the color down that I used because I was forgetful and lazy.


This last design is the top part of When Witches Go Riding by Prairie Schooler.  I have plans to make this into a bookmark some day.  I used: GAST espresso bean for the black, Crescent colors lobster claw for the orange, GAST Butternut squash for the yellow, and WDW Monkey Grass for the small "x"s in the border.  I used a scrap of 28 (I think) count linen that my lovely friend Julie gave me.  (I asked her if she had any leftover scraps from completed projects and she gave me this huge bag of stuff.  Jackpot!  Whoohoo!)

 That's it for the month.  Maybe I'll eventually get around to finishing these projects into ornaments and a bookmark in the not too distant future.

Monday, October 1, 2012

September Reads

1. Grave Mercy by Robin LaFevers
When I first started reading this book, I didn't realize it was by the same author of both Beastology and Thodosia Series.  The writing style is so different.  This book was written for a teen audience, while the others were written for middle elementary kids.  Grave Mercy is set in a slight alternate Medieval Brittany (France).  The old gods were incorporated into the Catholic Religion as saints, and some of the churches serve that god/saint.  Ismae was marked as a child to serve St. Mortain, the god of death, as an assassin.  Ismae is sent to find out who is plotting treason against the Duchess of Brittany, and eliminate them.  I enjoyed the intrigue, but even more so the character development.  The Assassin Nuns isn't too shabby of a plot point.  This is the first book in the "His Fair Assassin" Series.  I look forward to the sequels.

2. The Queen's Governess by Karen Harper
This is another work of historical fiction, although this book is based on the lives of real people. Katherine Ashley was the Governess to Queen Elizabeth I.   Not much was known about Katherine Ashley, so a good deal was left up to the author's imagination.  I liked how she was made to come from a poorer branch of her family, and by luck managed to make it into Anne Boleyn's household.  The story covers a large span of time, from before the birth of Elizabeth, to well into her reign.  I enjoyed the interaction between Kat and Elizabeth.  I liked that Kat became like a second mother to her.  Some of the reviews complain that the author writes like what she is saying is fact.  Huh?  Isn't that what you do when you write a book?  Make it sound realistic?  There is an afterward that discuses the historical in/accuracies.  What else do you want?  A big label on the cover.  People take themselves too seriously when reading books based on actual people.  Sometimes you just need to let go and enjoy the ride. ::: steps off soapbox:::

3. Museum of Theives by Lian Tanner (Book 1 in the Keepers Trilogy) - target audience: middle school.  In this story, the children of the city of Jewel are chained to their parents or guardians until the age of twelve.  (The world is just too unsafe for children to go about doing anything on their own.  Even dogs are outlawed.) Goldie is at the ceremony for her separation when a bomb goes off.  When the "Blessed Guardians" decide to revoke the separation, Goldie runs away.  She finds her way to this museum that shifts and moves like it is alive. The museum contains many horrible things like war and pestilence, which is what actually keeps the city safe.  Someone wants these evils set loose again. Goldie and the other residents of the museum work to calm the museum and save the town.  I thought that the concept of a museum that was "alive" was a neat one.  It's a good read for kids who like a bit of fantasy and a bit of dystopia.  Neither genre is overwhelming.  It's not so fantastical where magic is being slung all over the place, there are some unusual creatures, but not in excess.  It's also just dystopian where things are excessively restricted for kids, but it's not like kids have to kill each other like in The Hunger Games.

4. City of Lies by Lian Tanner (Book 2 in the Keepers Trilogy) - This book was about the neighboring town that the first book in this series was set in.  The sister of one of Goldie's friend, gets kidnapped.  She goes off to save her and gets tied up in the goings on during the Festival of Lies.  Goldie manages to discover how to use the magic of the festival to her advantage.  A fun quick read.  I'm looking forward to the finale of this trilogy.