

Friday, May 31, 2013
Wednesday, May 29, 2013
Green T-shirt Makeover
Here is my boring green shirt. ZZZZZZzzzzz.

I found it on clearance at JoAnn Fabric of all places. It had some weird sort of stain on the front. While I managed to remove the stain, I've had this shirt for almost a year and NEVER worn it.
Aside from being boring, the shirt was just a tad too short. It sat right at the waistband of my jeans. Every time I raised my arms you could see my belly and all it's lovely stretchy stretch marks.
No thanks.
Something had to be done.
Mrblocko had this shirt that he bought from our vacation in Oregon many many moons ago. He has since lost quite a bit of weight so the shirt is too big for him. The shirt also has some unattractive sweat stains in the armpits. So instead of pitching that shirt, I hacked it up!
Here's the finished product:

I used the bottom of the gray shirt where it was already hemmed to lengthen the green shirt. I stitched over the existing hem stitching on the green shirt to attach the gray band.
And here it is on:

Ta da! No more peek-a-boo belly.
Yay!
Tuesday, May 28, 2013
Robe for Blockette
We are trying to teach Blockette to be modest. This has involved her wearing a robe when she comes out of the shower instead of making a nakid dash from the bathroom to her bedroom.
Wouldn't you know it but the kid outgrew the durn thing? The nerve of the child.
Do you have any idea how hard it is to find a robe this time of year?
IMPOSSIBLE!!!!
Because apparently kids only wear robes when it's cold out. Sigh.
So I tried to find some free instructions for making a robe online. I came up with this and this. Except it wasn't exactly what I wanted. Then I realized what I wanted was a smaller version of a rob I had bought back in the late 80's. It's so old that I got it from Pier One Imports back when they sold clothing. Anyone else but me remember that?
So I traced the robe and scaled it down a bit, but not too much because I didn't want to have to make another robe next year.
My bestie was even nice enough to let me go shopping in her fabric stash. I found this nice purple lightweight paisley stuff. It worked perfectly.

Please excuse the weird photo. Apparently we must twirl when I'm photographing clothing.
Blockette says she feels like she is wearing a kimono, in a good way. She's actually not too far off. It's really a lot like a summer kimono called a yukata.
Friday, May 24, 2013
Dumbledore's Army T-shirt Reduction
While doing spring cleaning back in March, I came across two of the exact same shirts in Mrblocko's t-shirt drawer. There is a long story about why he has two of these shirts. The Reader's Digest version is that there was a mix up by the post office, and the shirt got lost so a second one was ordered. Of course after the second one arrived, the first one mysteriously showed up.
I think this shirt is the coolest ever, because c'mon it's Dumbledore's Army. So Mrblocko let me have his spare shirt.
Except, ahem...

The shirt was like a tent on me. Yikes! Look at that armhole!
I found this tutorial on how to transform a large t-shirt into a fitted one over at a.steed's.life.
 Ah. That's so much better. Now I'm not, as we say in Minnesota "drownDing" in my own clothes.
I think this shirt is the coolest ever, because c'mon it's Dumbledore's Army. So Mrblocko let me have his spare shirt.
Except, ahem...

The shirt was like a tent on me. Yikes! Look at that armhole!
I found this tutorial on how to transform a large t-shirt into a fitted one over at a.steed's.life.

Wednesday, May 22, 2013
Dusty Rose Colored Shawl
I hope you aren't sick of shawls. They are like potato chips to me lately. I can't seem to stop!

This shawl is the Iris Shawl pattern that I found on Ravelry. I used Caron Simply soft for this shawl too. It is so smooth and easy to crochet with. I used about 1 and a half skeins of Rose yarn and about 3/4 skein of off white.
The shawl was designed to be made with a fingering weight yarn, but I wanted it to be larger and have a bit more substance to it. Although, personally, I think I'd like this shawl better if it was light and airy. However, this shawl is not for me, so it's a moot point! I'm confident that it will find the perfect person.
Because I used a thicker yarn, I bumped up the hook size from an F to an I.
As you can see, this is a huge shawl. The point goes past Blockette's knees! Sometimes when I make these shawls I worry that I am making them too big, then I remember that not everyone is short like me and they might want that extra length!
Tuesday, May 21, 2013
Sloppy Lentils
Sloppy Lentils? What kind of dish is that? It's like Sloppy Joes, but instead of ground meat, it's got lentils.
Did you know there are umpteen kajillion meatless versions of sloppy joes out there? I chose this particular recipe because it contains Kitchen Bouquet. I only ever use Kitchen Bouquet once or twice a year when I make mashed potatoes and gravy.
Kitchen Bouquet gives gravy that something extra that makes you say, "MMMM! What is that?!" It also gives things a nice brown caramelized color. In this recipe, it makes the end product look more like the color of Manwich. That's a good thing when you are trying to get your 7 year old to eat something different.
 I'd say this was the dish I made over Lent that Mrblocko liked the least. And there was so much of it!
After dinner, Mrblocko and I decided this lentil concoction would taste better over a baked potato instead of on a hamburger bun. It did. Loads better. I topped mine with some shredded cheddar and dill pickle relish. YUM!
Sloppy Lentils from Feral Kitchen
1 c lentils (rinsed and picked over)
3 c water
3/4 c chopped onion
3/4 c chopped red bell pepper (I used half a chopped roasted red pepper)
1 t olive oil
1 14.5 ounce can diced tomatoes (I used roasted diced tomatoes)
8oz tomato paste
3/4 c ketchup
2 T brown sugar
2 t garlic, minced
1 t dried mustard
1/4 t black pepper (to taste)
2 t kitchen bouquet (browning sauce for color)
Cook lentils and water in covered pan on med low for 30 min until lentils cook. Drain. Mash lightly with potato masher. Meanwhile, in skillet saute onions and pepper in oil. Cook til onions are translucent. Add remaining ingredients except for lentils. Cook med low, covered, for about same time as lentils, stirring occasionally. When lentils done, add to tomato mixt, taste, and season. Add water if necessary. Ladle on warmed whole wheat burger buns or baked potatoes, garnish with pickles and cheese. Makes lots!
Did you know there are umpteen kajillion meatless versions of sloppy joes out there? I chose this particular recipe because it contains Kitchen Bouquet. I only ever use Kitchen Bouquet once or twice a year when I make mashed potatoes and gravy.
Kitchen Bouquet gives gravy that something extra that makes you say, "MMMM! What is that?!" It also gives things a nice brown caramelized color. In this recipe, it makes the end product look more like the color of Manwich. That's a good thing when you are trying to get your 7 year old to eat something different.

After dinner, Mrblocko and I decided this lentil concoction would taste better over a baked potato instead of on a hamburger bun. It did. Loads better. I topped mine with some shredded cheddar and dill pickle relish. YUM!
Sloppy Lentils from Feral Kitchen
1 c lentils (rinsed and picked over)
3 c water
3/4 c chopped onion
3/4 c chopped red bell pepper (I used half a chopped roasted red pepper)
1 t olive oil
1 14.5 ounce can diced tomatoes (I used roasted diced tomatoes)
8oz tomato paste
3/4 c ketchup
2 T brown sugar
2 t garlic, minced
1 t dried mustard
1/4 t black pepper (to taste)
2 t kitchen bouquet (browning sauce for color)
Cook lentils and water in covered pan on med low for 30 min until lentils cook. Drain. Mash lightly with potato masher. Meanwhile, in skillet saute onions and pepper in oil. Cook til onions are translucent. Add remaining ingredients except for lentils. Cook med low, covered, for about same time as lentils, stirring occasionally. When lentils done, add to tomato mixt, taste, and season. Add water if necessary. Ladle on warmed whole wheat burger buns or baked potatoes, garnish with pickles and cheese. Makes lots!
Monday, May 20, 2013
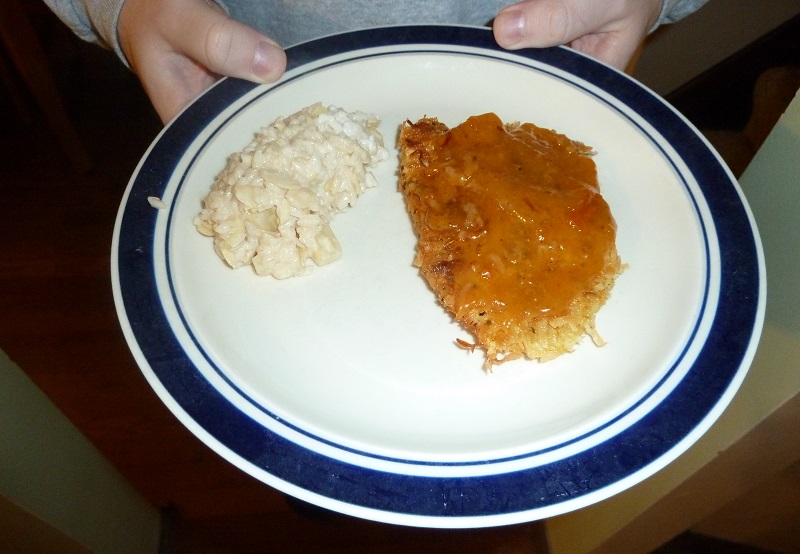
Coconut Rice and Fish
Woah, I just realized I never posted about some of the meatless dishes we ate over Lent.
I'd been wanting to try this Coconut Tilapia with Apricot Dipping Sauce from All Recipes for at least a year. Since fish is not my favorite thing I usually find excuses to make something else for dinner. I was determined to make it this year.
This was the recipe I mentioned in this post a few weeks ago that called for creole seasoning.
I thought this dish would go well with rice, but I wanted to jazz things up a bit so I made Tropical Rice from Steamy Kitchen.
 I really liked the apricot dipping sauce went well with the toasted coconut in the "breading" on the fish. It also almost nearly masked the fish taste. It was just fishy enough that I knew I was eating fish, but not enough so to be bothersome.
The heat from the creole seasoning helped balance the sweet from the sauce. The spice neutralized the sauce from making the dish overly sweet.
As for the rice. I really liked it. Blockette and Mrblocko didn't.
The rice gets cooked in coconut milk and stock. It also has crushed pineapple in it.
Sounds like a great match for the coconut fish doesn't it?
For some reason that rice did not want to cook. I cooked it 10 min longer than the package suggests and it was still "al dente."
Mrblocko is not a fan of rice to begin with, and hates chewy rice. I thought adding some chopped slivered almonds might help with the texture. I thought they tasted great, but not to mrblocko. I'm wondering if he doesn't care for coconut milk. There are a few things I've made with coconut milk that he didn't care for either. I'm just realizing that as I write this, so I should probably keep that in mind for future reference.
Anyhow, we had lots of leftover rice that I happily ate all myself.
Coconut Tilapia with Apricot Sauce from All Recipes
1 c flaked coconut, finely chopped
2 T flour
1 T Creole seasoning
4 (4 ounce) fillets tilapia
1/2 c cornstarch
1 (4 ounce) carton egg substitute (I used 1 egg, beaten with a splash of milk)
1/2 c veg oil
Apricot Dipping Sauce
1/2 c apricot jam
2 t spicy mustard
1 t prepared horseradish
Place conrstarch on rimmed plate. Beat egg with milk on separate rimmed plate. On another rimmed plate combine coconut, flour and Creole seasoning. Coat fish with cornstarch, then egg. Press fillets in the coconut mixture coating all sides.
Heat canola oil in a frying pan to a temperature of about 350 F (175 degrees C). Fry fillets one or two at a time on both sides until golden brown. Remove to drain on a paper towel. Prepare the apricot dipping sauce by stirring together the jam, mustard, and horseradish in a small bowl. Serve the tilapia accompanied by the dipping sauce.
Tropical Rice from Steamy Kitchen
2 c jasmine rice (I had medium grain rice)
1 1/4 c chicken or veg broth
1 c good, thick coconut milk
1 c crushed pineapple
2 Tsoy sauce (or Tamari on a gluten-free diet)
1 T sesame oil
1 T brown sugar
1/4 c finely chopped green onion (Mine were all wilty when I went to use them so I left it out.)
Optional toppings: macadamia nuts, almonds, toasted coconut flakes
Rinse rice several times until water runs clear. Drain rice. In med pot, add rice, broth and coconut milk. Boil on high. Once boiling, turn heat to low, and cover. Cook 20 min. Turn off heat and do not open lid. Let sit off the heat 10 min to finish steaming. Fluff rice with fork and add pineapple, soy sauce, sugar and oil. Top with chopped green onion and optional toppings.
I'd been wanting to try this Coconut Tilapia with Apricot Dipping Sauce from All Recipes for at least a year. Since fish is not my favorite thing I usually find excuses to make something else for dinner. I was determined to make it this year.
This was the recipe I mentioned in this post a few weeks ago that called for creole seasoning.
I thought this dish would go well with rice, but I wanted to jazz things up a bit so I made Tropical Rice from Steamy Kitchen.
The heat from the creole seasoning helped balance the sweet from the sauce. The spice neutralized the sauce from making the dish overly sweet.
As for the rice. I really liked it. Blockette and Mrblocko didn't.
The rice gets cooked in coconut milk and stock. It also has crushed pineapple in it.
Sounds like a great match for the coconut fish doesn't it?
For some reason that rice did not want to cook. I cooked it 10 min longer than the package suggests and it was still "al dente."
Mrblocko is not a fan of rice to begin with, and hates chewy rice. I thought adding some chopped slivered almonds might help with the texture. I thought they tasted great, but not to mrblocko. I'm wondering if he doesn't care for coconut milk. There are a few things I've made with coconut milk that he didn't care for either. I'm just realizing that as I write this, so I should probably keep that in mind for future reference.
Anyhow, we had lots of leftover rice that I happily ate all myself.
Coconut Tilapia with Apricot Sauce from All Recipes
1 c flaked coconut, finely chopped
2 T flour
1 T Creole seasoning
4 (4 ounce) fillets tilapia
1/2 c cornstarch
1 (4 ounce) carton egg substitute (I used 1 egg, beaten with a splash of milk)
1/2 c veg oil
Apricot Dipping Sauce
1/2 c apricot jam
2 t spicy mustard
1 t prepared horseradish
Place conrstarch on rimmed plate. Beat egg with milk on separate rimmed plate. On another rimmed plate combine coconut, flour and Creole seasoning. Coat fish with cornstarch, then egg. Press fillets in the coconut mixture coating all sides.
Heat canola oil in a frying pan to a temperature of about 350 F (175 degrees C). Fry fillets one or two at a time on both sides until golden brown. Remove to drain on a paper towel. Prepare the apricot dipping sauce by stirring together the jam, mustard, and horseradish in a small bowl. Serve the tilapia accompanied by the dipping sauce.
Tropical Rice from Steamy Kitchen
2 c jasmine rice (I had medium grain rice)
1 1/4 c chicken or veg broth
1 c good, thick coconut milk
1 c crushed pineapple
2 Tsoy sauce (or Tamari on a gluten-free diet)
1 T sesame oil
1 T brown sugar
1/4 c finely chopped green onion (Mine were all wilty when I went to use them so I left it out.)
Optional toppings: macadamia nuts, almonds, toasted coconut flakes
Rinse rice several times until water runs clear. Drain rice. In med pot, add rice, broth and coconut milk. Boil on high. Once boiling, turn heat to low, and cover. Cook 20 min. Turn off heat and do not open lid. Let sit off the heat 10 min to finish steaming. Fluff rice with fork and add pineapple, soy sauce, sugar and oil. Top with chopped green onion and optional toppings.
Friday, May 17, 2013
We're So Picky!
I hate my bathroom. It's sooo UGLY. Although, it is an improvement from when we moved in 7 years ago. It had fake plastic tile sheeting on all the walls. Like the stuff you might line a shower with. Over all the walls.
And when we took that down...Pepto Bismal pink walls.
Did I mention the cabinet and floor were green?
Yeah.
We repainted the walls but the cabinets and floors were a project that got moved to the bottom of the list. They are still at the bottom of the list. And I still hate them.
Blockette didn't quite understand how I could not like the bathroom when my favorite color is green. I like green, just not that shade of green, and not in my bathroom.
Now when I say the cabinets are green, I mean they are mostly green. Whoever painted them, just took the cabinets that were there for God knows how long and painted them. They did not sand them first. How do I know this? The paint is peeling off the cabinets.
I got sick of looking at the peeling paint and in 15 min Blockette and I did this:

Here's a close up:

And of the other side:

We did this with our fingers. The paint came off in great big sheets. There is something so satisfying about peeling off great big sheets of ugly paint. Sort of like peeling a sunburn, without the pain of getting burned in the sun!
Blockette is hooked on paint peeling. Every time we are in there at the same time she asks when we can do it again. I think a few more steamy showers and we'll have another go at a peel-o-rama. I figure by the end of the summer we'll have the entire cabinet stripped of all it's paint!
And when we took that down...Pepto Bismal pink walls.
Did I mention the cabinet and floor were green?
Yeah.
We repainted the walls but the cabinets and floors were a project that got moved to the bottom of the list. They are still at the bottom of the list. And I still hate them.
Blockette didn't quite understand how I could not like the bathroom when my favorite color is green. I like green, just not that shade of green, and not in my bathroom.
Now when I say the cabinets are green, I mean they are mostly green. Whoever painted them, just took the cabinets that were there for God knows how long and painted them. They did not sand them first. How do I know this? The paint is peeling off the cabinets.
I got sick of looking at the peeling paint and in 15 min Blockette and I did this:

Here's a close up:
And of the other side:

We did this with our fingers. The paint came off in great big sheets. There is something so satisfying about peeling off great big sheets of ugly paint. Sort of like peeling a sunburn, without the pain of getting burned in the sun!
Blockette is hooked on paint peeling. Every time we are in there at the same time she asks when we can do it again. I think a few more steamy showers and we'll have another go at a peel-o-rama. I figure by the end of the summer we'll have the entire cabinet stripped of all it's paint!
Wednesday, May 15, 2013
Garden Spring 2013
This year I tripled the size of my garden. Originally the plan was to plant the two 4'x4' gardens in the back yard. I mean we cut down our huge diseased tree in the backyard so we should have a ton of sun there. Right?
Now that the neighbor's trees all have leaves, I discovered that the ONLY place we have full sun is the area directly over Blockette's swing set. The rest of the yard gets only morning sun and afternoon shade. Not the best for growing sun loving veggies. So we are weirdos and have our veggie garden in the front yard where we get early morning shade.

Here's what we planted this year:
I just want to say that it was my family that picked out all these veggies. Well, I picked out the sweet pepper and strawberries. Blockette was the one who said we had to get peas, beans, cucumber and summer squash. Mrblocko wanted the spaghetti squash and the jalapeno.
Luckily the food pantry near us excepts surplus garden harvests, so when we have more squash than we can eat it will go to good use.
Now that the neighbor's trees all have leaves, I discovered that the ONLY place we have full sun is the area directly over Blockette's swing set. The rest of the yard gets only morning sun and afternoon shade. Not the best for growing sun loving veggies. So we are weirdos and have our veggie garden in the front yard where we get early morning shade.

Here's what we planted this year:


I just want to say that it was my family that picked out all these veggies. Well, I picked out the sweet pepper and strawberries. Blockette was the one who said we had to get peas, beans, cucumber and summer squash. Mrblocko wanted the spaghetti squash and the jalapeno.
Luckily the food pantry near us excepts surplus garden harvests, so when we have more squash than we can eat it will go to good use.
Tuesday, May 14, 2013
Kiln Fired Bird
Lookie what Blockette made for me for Mother's Day!

She made it in art class in school.
I love how the wing is textured, and the multicolored tail, and it's black hair. What? You've never seen a bird with hair before? You must live a very sheltered life cause I have one hanging in my kitchen now!
Blockette was soooo proud when she gave it to me. Her face was practically glowing! She was so happy I thought she was going to cry! Somehow that makes the gift all the more special, knowing she felt she worked hard and did her best on it.
Sunday, May 12, 2013

Friday, May 10, 2013
Drop Biscuits and Sausage Gravy
I made Pioneer Woman's Sausage Gravy and Biscuits the other day for dinner. They were so easy, which was good cause I was in a rush. In such a rush that I forgot to take a picture.
Please head over to the Pioneer Woman's blog to see what I'm talking about.
 Homer Simpson tells us to drink 8 glasses of gravy a day. I'd gladly do that with this Sausage gravy. I'd say I like this recipe even better than the one I made from Alton Brown.
Now, the biscuits. They were not Mrblocko's favorite.
You see they were drop biscuits.
OMG. They were the easiest biscuits this side of popping open a can.
But Mrblocko didn't particularly care for them!!!
What?!
See this is another new thing I learned about Mrblocko. (I'm not sure if this is a good thing or a bad thing that I keep learning all these new likes and dislikes after nearly 12 years of marriage.) He likes flaky, not crumbly biscuits. The more like a croissant, the better. Me, I don't think it matters as I'm letting the bread get all soaked in delicious sausage gravy.
Drop Biscuits with Sausage Gravy from Pioneer Woman
Biscuits
3 c Flour
2 T Baking Powder
1/2 t Salt
1-1/2 stick (3/4 C) Cold Butter, cut in pieces
1-1/4 c Buttermilk
Gravy
1 lb Breakfast Sausage, Hot Or Mild
1/3 c Flour
4 c Whole Milk (I used skim)
1/2 t Seasoned Salt
2 t Pepper, More To Taste
Biscuits: 400 F. Add flour, baking powder, and salt to bowl of food processor. Add butter pieces and pulse til butter completely cut into flour mix. While pulsing drizzle in buttermilk til dough just comes together and is no longer crumbly. Drop in clumps on 2 sheets, bake 15-17 min, til golden brown. (Optional: Brush with melted butter when biscuits first come out of oven.)
Gravy: Tear sausage into small pieces and place on single layer in lg skillet. Cook over med high til browned. Reduce heat to med-low. Sprinkle half flour and stir so sausage soaks it all up, then add a little more until just before sausage looks too dry. Stir and cook it for a minute or so. Slowly pour in the milk, stirring constantly. Cook til it thickens. Stir frequently for about 10-12 min. Add salt and pepper. Cook til thick. Add more milk if gets too thick too soon (1/2 c milk or more as needed). Taste and adjust seasonings.
Spoon sausage gravy over warm biscuits and serve immediately!
Please head over to the Pioneer Woman's blog to see what I'm talking about.

Now, the biscuits. They were not Mrblocko's favorite.
You see they were drop biscuits.
OMG. They were the easiest biscuits this side of popping open a can.
But Mrblocko didn't particularly care for them!!!
What?!
See this is another new thing I learned about Mrblocko. (I'm not sure if this is a good thing or a bad thing that I keep learning all these new likes and dislikes after nearly 12 years of marriage.) He likes flaky, not crumbly biscuits. The more like a croissant, the better. Me, I don't think it matters as I'm letting the bread get all soaked in delicious sausage gravy.
Drop Biscuits with Sausage Gravy from Pioneer Woman
Biscuits
3 c Flour
2 T Baking Powder
1/2 t Salt
1-1/2 stick (3/4 C) Cold Butter, cut in pieces
1-1/4 c Buttermilk
Gravy
1 lb Breakfast Sausage, Hot Or Mild
1/3 c Flour
4 c Whole Milk (I used skim)
1/2 t Seasoned Salt
2 t Pepper, More To Taste
Biscuits: 400 F. Add flour, baking powder, and salt to bowl of food processor. Add butter pieces and pulse til butter completely cut into flour mix. While pulsing drizzle in buttermilk til dough just comes together and is no longer crumbly. Drop in clumps on 2 sheets, bake 15-17 min, til golden brown. (Optional: Brush with melted butter when biscuits first come out of oven.)
Gravy: Tear sausage into small pieces and place on single layer in lg skillet. Cook over med high til browned. Reduce heat to med-low. Sprinkle half flour and stir so sausage soaks it all up, then add a little more until just before sausage looks too dry. Stir and cook it for a minute or so. Slowly pour in the milk, stirring constantly. Cook til it thickens. Stir frequently for about 10-12 min. Add salt and pepper. Cook til thick. Add more milk if gets too thick too soon (1/2 c milk or more as needed). Taste and adjust seasonings.
Spoon sausage gravy over warm biscuits and serve immediately!
Wednesday, May 8, 2013
Red Shawl and Blocking
Yes, another shawl for church. I found this pattern for free over on Ravelry. It was originally called Cheche a la Sauce, which is French for something or another. I have no idea. I tried to do a google translate and it came up with Fez sauce. Okaaay.
I thought the chart was confusing for the directions at the beginning of the row. I just winged it and made it so each row had the same amount of stitches or spaces.
The pattern is quite vague on how many rows to make the first motif. I wanted this shawl to be on the large side, so the first motif has 24 rows.
The yarn I used was nearly 2 skeins of Autumn Red by Caron Simply soft. I used a H hook.
I was running quite low on yarn so I made the final motif with only 3 picots and 4 triple crochet instead of 6 picots and 7 triple crochet.

When I finished the shawl I realized that I was going to have to block the shawl to get the final motif to look right.
Blocking is when you wet your knit or crochet item and pin it down so it will retain its shape when it drys.
The above picture shows unblocked parts on the left. See how smooshed looking they are? I like how open and lacy they looked once they were pinned to the towel lined bed.
I was amazed how different the finished product looked once it had dried. The whole thing was much larger too.
 The whole thing goes almost to Blockette's knees!
I just love the rich vibrant red. Blockette chose the color for this shawl. She sure chose wisely. Hopefully it will put a smile on someone's face.
I thought the chart was confusing for the directions at the beginning of the row. I just winged it and made it so each row had the same amount of stitches or spaces.
The pattern is quite vague on how many rows to make the first motif. I wanted this shawl to be on the large side, so the first motif has 24 rows.
The yarn I used was nearly 2 skeins of Autumn Red by Caron Simply soft. I used a H hook.
I was running quite low on yarn so I made the final motif with only 3 picots and 4 triple crochet instead of 6 picots and 7 triple crochet.

When I finished the shawl I realized that I was going to have to block the shawl to get the final motif to look right.
Blocking is when you wet your knit or crochet item and pin it down so it will retain its shape when it drys.
The above picture shows unblocked parts on the left. See how smooshed looking they are? I like how open and lacy they looked once they were pinned to the towel lined bed.
I was amazed how different the finished product looked once it had dried. The whole thing was much larger too.

I just love the rich vibrant red. Blockette chose the color for this shawl. She sure chose wisely. Hopefully it will put a smile on someone's face.
Tuesday, May 7, 2013
No Bake PB Pie
I love desserts that require minimal effort don't you?
This no bake peanut butter pie from The Domestic Rebel fits that bill.
Not only is it easy, but it's scrumdiddilyumptions to boot. Unfortunately, it fell off the ugly tree and hit every branch on the way down.

But it's not what's on the outside that
counts, its the peanut butter and chopped up peanut butter cups that
counts. Well, the chocolate sauce is on the outside, and that counts
for a lot too.
Maybe my mom was wrong.
It's not what's on the inside or the outside that counts, unless it's chocolate.
Then it all counts.
No-Bake Peanut Butter Cup Pie from The Domestic Rebel
1 pkg (8 oz) cream cheese, softened1/2 c sugar
1 c creamy peanut butter
1 t vanilla
1 tub (8 oz) Cool Whip, thawed
12 regular-sized Reese’s PB cups, roughly chopped (I only had 8 so I didn't have enough to decorate the top)
1 chocolate graham cracker crust
In lg bowl, beat cream cheese and sugar til smooth. Blend in peanut butter and vanilla il smooth and creamy. Gently fold in Cool Whip. Fold in chopped pb cups. Spread into prepared chocolate crust. Fridge 4 hours (the longer it chills, the more firm it’ll be) or freeze 2 hours until firm. Before serving, allow pie to sit on counter at room temp 10 min, to take the chill off for easier cutting. Store covered in fridge for about 2-3 days. I doubt it will last that long.
Monday, May 6, 2013
Easy Circle Skirt for Blockette
When my best friend was clearing out her fabric stash she had this fabric with a stamped pattern for a circle skirt. The only thing is that it called for a zipper.
Only I don't do zippers.
Or windows.
Then I realized that the waist opening would be the right size for Blockette without a zipper. So a hem and some elastic were all I needed to do. Awesome!

This was one of those things I made for Blockette without asking her if she'd like it. I took a risk and it paid off.

At first she was a bit leery of the skirt. She'd never had a long skirt like this before. Of course she was sold once she took it for a twirl.
 My favorite part is that it can be worn with nearly every short sleeve shirt she has in her drawer.
Only I don't do zippers.
Or windows.
Then I realized that the waist opening would be the right size for Blockette without a zipper. So a hem and some elastic were all I needed to do. Awesome!

This was one of those things I made for Blockette without asking her if she'd like it. I took a risk and it paid off.

At first she was a bit leery of the skirt. She'd never had a long skirt like this before. Of course she was sold once she took it for a twirl.

Friday, May 3, 2013
Non Choking Hooded Sweatshirt
My mom went to Spain early this spring and bought me this cool hooded sweatshirt. I've been hemming and hawing over what to do. The sweatshirt fits perfectly, except the neck is too tight. Boa Constrictor tight.
You see, I'm one of those people who can't stand anything around their neck. (We'll for some reason scarves are ok. Probably because I wear them over my mouth mostly, or loosly around my neck.) I feel like I'm choking to death. I hate turtlenecks so much that Blockette has never ever worn one. Even seeing one can bring on a panic that I can't breathe.
So, I was faced with a dilemma: I could alter the sweatshirt somehow and possibly risk ruining it, or leave it alone and never wear it. I really like the hoodie, but was so afraid I'd ruin it. So It just sat there. And sat there. Not getting worn. I finally decided that I should just get over it and try to make the sweatshirt into something I could wear.
 Ah.
Ah.
That's so much better.
Yeah yeah yeah. I know. I forgot to take a before picture.
The neckline looked sort of like this:
See, very close and chokey. Look how the hood sits on the neck of the manikin. I'm clawing at my neck just looking at the photo.
Of course my sweatshirt is much better than the ones in the above photo. Mine is turquoise and the logo is way more awesome. It's especially awesomer as I can now wear it without passing out from hyperventilating.
If you have chokey hooded sweatshirts why not hack them up to make them super comfy!
Fear not! If I can do it, so can you.
I followed this video from Khayotikk on you tube.
As you can see, I made the "V" in my hoodie much more shallow that the lady in the video did. I didn't want to cut into the logo on my shirt.
Before watching the video I had no idea how to cut a hoodie like this. It was super helpful, and made me much less scared to take the scissors to the fabric. Hooray for You tube!
You see, I'm one of those people who can't stand anything around their neck. (We'll for some reason scarves are ok. Probably because I wear them over my mouth mostly, or loosly around my neck.) I feel like I'm choking to death. I hate turtlenecks so much that Blockette has never ever worn one. Even seeing one can bring on a panic that I can't breathe.
So, I was faced with a dilemma: I could alter the sweatshirt somehow and possibly risk ruining it, or leave it alone and never wear it. I really like the hoodie, but was so afraid I'd ruin it. So It just sat there. And sat there. Not getting worn. I finally decided that I should just get over it and try to make the sweatshirt into something I could wear.

That's so much better.
Yeah yeah yeah. I know. I forgot to take a before picture.
The neckline looked sort of like this:
 |
| via |
Of course my sweatshirt is much better than the ones in the above photo. Mine is turquoise and the logo is way more awesome. It's especially awesomer as I can now wear it without passing out from hyperventilating.
If you have chokey hooded sweatshirts why not hack them up to make them super comfy!
Fear not! If I can do it, so can you.
I followed this video from Khayotikk on you tube.
As you can see, I made the "V" in my hoodie much more shallow that the lady in the video did. I didn't want to cut into the logo on my shirt.
Before watching the video I had no idea how to cut a hoodie like this. It was super helpful, and made me much less scared to take the scissors to the fabric. Hooray for You tube!
Wednesday, May 1, 2013
April Reads
Sensing a theme here? Book about Vampire Jane Austen and then books about Zombies. Guess I"m in a rut.
Jane Vows Vengeance by Michael Thomas Ford
This is the next book in the series about Jane Austen as a vampire. This book read more like a mystery than a romance/drama like the others. I liked it, but they tied everything up at the end that I think it would ruin things if they made a fourth book.
Walking Dead: Book 1 and Walking Dead: Book 2 and Walking Dead: Book 3 by Robert Kirkman
I started reading these graphic novels to see how different they were from the show by the same name. So far there are some of the same elements, but the story is quite different. I thought that the storyline was almost like reading a soap opera. Lots and lots of drama. I find this highly amusing because I have a friend who won't watch the TV show because he thinks it's too dramatic compared to the graphic novels. Heh. To each their own!
Jane Vows Vengeance by Michael Thomas Ford
This is the next book in the series about Jane Austen as a vampire. This book read more like a mystery than a romance/drama like the others. I liked it, but they tied everything up at the end that I think it would ruin things if they made a fourth book.
 |
| via |
Walking Dead: Book 1 and Walking Dead: Book 2 and Walking Dead: Book 3 by Robert Kirkman
I started reading these graphic novels to see how different they were from the show by the same name. So far there are some of the same elements, but the story is quite different. I thought that the storyline was almost like reading a soap opera. Lots and lots of drama. I find this highly amusing because I have a friend who won't watch the TV show because he thinks it's too dramatic compared to the graphic novels. Heh. To each their own!
Subscribe to:
Posts (Atom)