Blockette has been begging me to share her super secret Orange sauce recipe.
It's the best thing, in her opinion, since sliced bread.
OK Here goes:
First you put Ketchup in a bowl, then you put mustard in the bowl. You mix it with a spoon. Then you test it with a hot dog. If you like it, then eat it all up. The End.
This has been Orange Sauce by Blockette. We now return you to your regularly scheduled blog.

Thursday, June 30, 2011
Wednesday, June 29, 2011
Orangey Whole Wheat Flax Waffles
MMMMM. Waffles. How can you not love them? Most of the time I just cheat and whip up a big batch from a box mix. Sometimes it's nice to switch things up a bit and try a "fancy" from scratch version. I have a list of waffle recipes I'd like to try. I showed the list to Blockette and let her choose. She picked Healthier Whole Wheat Waffles from goodLife{eats}. Apperently, the recipe on goodLife{eats}is one that she made over. The original recipe had a whole cup of sugar, plus the sugar content from 2 cups of apple juice. This revised recipe has 1/3 c brown sugar and the juice from one orange. Loads less sugar, which is a great thing for me, especially now that it is hotter and I have to be careful about my sugar intake.
When I make new waffles for the first time I taste test them plain, without butter or syrup. My first impression was that they were sweet. Not overly sweet, but a good sweet, the kind that I thought didn't need any syrup though. This may be because I used a sweet mineola orange. If I thought the reduced sugar version was sweet, I can only imagine what the original waffles must taste like!
One word of warning, this batter is very thick. I have one of those round waffle makers, not the kind that has 2 or 4 squares. If you have a small waffle iron like this, 1/3 c of batter will be enough for one waffle, but you will need to spread it out quickly over the entire surface of the iron with a spatula.
I'm going to have to make these waffles again in the not too distant future. One, because they were so tasty, and two because Blockette and I ate these for dinner two nights when Mrblocko wasn't home. Mrblocko was none too happy he didn't get a single taste!
Healthier Whole Wheat Waffles from Good Life Eats
1/4 cup (4 tablespoons) butter, melted
1/3 cup brown sugar
2 1/4 cup whole wheat flour
2 tablespoons cold milled flax
1 teaspoon baking powder
1/4 teaspoon salt
1/2 teaspoon cinnamon
1 cup milk
3 eggs, separated
juice of one orange
zest of half an orange
Preheat waffle iron. Sift brown sugar, flour, flax, baking powder, salt and cinnamon together in a bowl. Add egg yolks and milk to dry ingredients and beat together thoroughly. In a separate bowl, beat egg whites until stiff. Stir 1/2 of the egg whites into the waffle batter, and then fold in the remaining egg whites and stir (do not beat) until mixed. Add butter, orange juice and zest, and mix until smooth. Grease the waffle iron, if necessary. Pour scant 1/3 c of batter on the heated waffle mold. Makes about 10-16 waffles, depending on the size of your waffle iron.
Apperently, the recipe on goodLife{eats}is one that she made over. The original recipe had a whole cup of sugar, plus the sugar content from 2 cups of apple juice. This revised recipe has 1/3 c brown sugar and the juice from one orange. Loads less sugar, which is a great thing for me, especially now that it is hotter and I have to be careful about my sugar intake. When I make new waffles for the first time I taste test them plain, without butter or syrup. My first impression was that they were sweet. Not overly sweet, but a good sweet, the kind that I thought didn't need any syrup though. This may be because I used a sweet mineola orange. If I thought the reduced sugar version was sweet, I can only imagine what the original waffles must taste like!
One word of warning, this batter is very thick. I have one of those round waffle makers, not the kind that has 2 or 4 squares. If you have a small waffle iron like this, 1/3 c of batter will be enough for one waffle, but you will need to spread it out quickly over the entire surface of the iron with a spatula.
I'm going to have to make these waffles again in the not too distant future. One, because they were so tasty, and two because Blockette and I ate these for dinner two nights when Mrblocko wasn't home. Mrblocko was none too happy he didn't get a single taste!
Healthier Whole Wheat Waffles from Good Life Eats
1/4 cup (4 tablespoons) butter, melted
1/3 cup brown sugar
2 1/4 cup whole wheat flour
2 tablespoons cold milled flax
1 teaspoon baking powder
1/4 teaspoon salt
1/2 teaspoon cinnamon
1 cup milk
3 eggs, separated
juice of one orange
zest of half an orange
Preheat waffle iron. Sift brown sugar, flour, flax, baking powder, salt and cinnamon together in a bowl. Add egg yolks and milk to dry ingredients and beat together thoroughly. In a separate bowl, beat egg whites until stiff. Stir 1/2 of the egg whites into the waffle batter, and then fold in the remaining egg whites and stir (do not beat) until mixed. Add butter, orange juice and zest, and mix until smooth. Grease the waffle iron, if necessary. Pour scant 1/3 c of batter on the heated waffle mold. Makes about 10-16 waffles, depending on the size of your waffle iron.
Tuesday, June 28, 2011
The Turducken of Cookies
Oh no I just cannot leave well enough alone. A while ago I wrote about Brownie Covered Oreos, a recipe I saw on Picky Palate. Well, Jenny at Picky Palate also wrote about brownie stuffed cookies. I thought about that for 2 seconds and said, why not stuff a Brownie covered Oreo into a chocolate chip cookie. I give you the turducken of cookies!
 These cookies were yummy, but the Brownie got sort of lost in the baking process. I didn't think they tasted too much different from the plain Oreo stuffed Chocolate chip cookies. I think next time I will just make the Ultimate chocolate chip cookie n' Oreo Fudge brownie Bar from Kevin and Amanda. The recipe seems easier with only one bake time. Also, the layers of cookie and brownie look pronounced, which I assume would result in more of an equal brownie and cookie flavor combination.
These cookies were yummy, but the Brownie got sort of lost in the baking process. I didn't think they tasted too much different from the plain Oreo stuffed Chocolate chip cookies. I think next time I will just make the Ultimate chocolate chip cookie n' Oreo Fudge brownie Bar from Kevin and Amanda. The recipe seems easier with only one bake time. Also, the layers of cookie and brownie look pronounced, which I assume would result in more of an equal brownie and cookie flavor combination.Monday, June 27, 2011
'11 Happy Dance #11 Finally...The Fish Bag
I got this pattern for a Big Mouth Fish Bag by Katie Lane Quilts, exactly 12 million years ago. OK, so it was more like 5 years ago, but it feels like 12 million years. I think originally I had intended it to be a book bag of some sort. Little did I know that Blockette would turn out to be a voracious reader. A mac truck would be more suitable for her book transportation needs.
This little fishy does make a perfect overnight bag. We took it with us this weekend when we did Relay for Life. It fit all her "stuff" perfectly. This bag is also great because, unlike her school backpack, it is too small to be able to hold more than she can carry on her back comfortably.
The pattern for this bag was very intimidating. There were plenty of times where I took the pattern out, looked at it and just scratched my head in confusion. Over the past 5 years I've made several stuffed animals and that helped me understand what I needed to do in order to stitch up this bag. Really, this bag is just like a stuffed animal without the stuffing. There were still a few of those "huh?" moments, but after reading the directions and playing with the cut pattern pieces, I was able to figure it out.

Blockette helped me pick out what fabrics she wanted in her bag. The stipulation was that she had to pick from the fabrics I already had. At first she wanted an all pink bag, but I didn't have enough contrasting pink fabrics. I told her that if the fabrics looked too much alike, the scales weren't going to show up. I put all the pink fabrics she liked next to each other and told her to look at them from across the room. She reluctantly agreed the pink fabrics wouldn't be good for the bag.
I suggested a rainbow fish bag and she thought that was almost as good as a pink one. She was a little upset that the green is out of color order, but I told her I just didn't have enough purple fabric to make the tail. Personally, I think the green on the tail and side fin makes a better contrast than purple would. Then again, what do I know about these things. I'm just the mom.

The pattern includes directions for a shoelace closure, but I didn't think that would be a very comfortable way for Blockette to carry the bag. So, I made the drawstring into back pack straps. I remember having a bag that had a closure like that in Jr High, so I replicated it from my memory of that bag. Jr high was a long time ago, so I'm not entirely certain that I made it exactly the same way the bag I had was constructed. I can get so particular sometimes that I had to tell myself it didn't matter, and that the bag was fine, maybe even better, the way it is.
I also thought it would be fun for the bag to have some pockets in it. I wasn't exactly sure how I wanted to make the pockets. Then I found an old pair of Mrblocko's jeans with the holes in the knees. Mrblocko won't wear hole-y jeans or cut offs, so when this happens they become free game for my crafting purposes. Why make a pocket when you've got one already made for you?!
 Originally, I was going to rip out the seam and remove the pocket from the butt of the jeans. Then, I realized that the grommets at the corners of the pockets would make this impossible. Plus, that was a lot of work, ripping out a double seam. Then I thought, why not cut around the pocket and sew that to the inside of the bag? It's easier AND it creates two pockets instead of one. The larger pocket isn't the neatest looking thing, but it's on the inside of the bag so big whoop.
I'm so happy to finally have completed this project. Blockette loves it, and I feel like I accomplished something big by finishing it. There are several mistakes, but even I have to look really hard to find them, so I'm not going to beat myself up over it. Now I just have to figure out what project I'm going to start next!
This little fishy does make a perfect overnight bag. We took it with us this weekend when we did Relay for Life. It fit all her "stuff" perfectly. This bag is also great because, unlike her school backpack, it is too small to be able to hold more than she can carry on her back comfortably.
The pattern for this bag was very intimidating. There were plenty of times where I took the pattern out, looked at it and just scratched my head in confusion. Over the past 5 years I've made several stuffed animals and that helped me understand what I needed to do in order to stitch up this bag. Really, this bag is just like a stuffed animal without the stuffing. There were still a few of those "huh?" moments, but after reading the directions and playing with the cut pattern pieces, I was able to figure it out.

Blockette helped me pick out what fabrics she wanted in her bag. The stipulation was that she had to pick from the fabrics I already had. At first she wanted an all pink bag, but I didn't have enough contrasting pink fabrics. I told her that if the fabrics looked too much alike, the scales weren't going to show up. I put all the pink fabrics she liked next to each other and told her to look at them from across the room. She reluctantly agreed the pink fabrics wouldn't be good for the bag.
I suggested a rainbow fish bag and she thought that was almost as good as a pink one. She was a little upset that the green is out of color order, but I told her I just didn't have enough purple fabric to make the tail. Personally, I think the green on the tail and side fin makes a better contrast than purple would. Then again, what do I know about these things. I'm just the mom.

The pattern includes directions for a shoelace closure, but I didn't think that would be a very comfortable way for Blockette to carry the bag. So, I made the drawstring into back pack straps. I remember having a bag that had a closure like that in Jr High, so I replicated it from my memory of that bag. Jr high was a long time ago, so I'm not entirely certain that I made it exactly the same way the bag I had was constructed. I can get so particular sometimes that I had to tell myself it didn't matter, and that the bag was fine, maybe even better, the way it is.
I also thought it would be fun for the bag to have some pockets in it. I wasn't exactly sure how I wanted to make the pockets. Then I found an old pair of Mrblocko's jeans with the holes in the knees. Mrblocko won't wear hole-y jeans or cut offs, so when this happens they become free game for my crafting purposes. Why make a pocket when you've got one already made for you?!

I'm so happy to finally have completed this project. Blockette loves it, and I feel like I accomplished something big by finishing it. There are several mistakes, but even I have to look really hard to find them, so I'm not going to beat myself up over it. Now I just have to figure out what project I'm going to start next!
Crockpot Coconut Beef
We don't eat a lot of beef in this house. When we do, 99% of the time it is ground beef. Oh sure, once in a blue moon I will break down and humor Mrblocko and let him have a nice steak. So I'm sure that you can imagine his surprise when I told him I was making A Year of Slow Cooking's coconut beef in the crockpot. I mean it wasn't even his birthday, and we were having beef? Granted it was stew beef, but still...BEEF! This is what the stuff looks like when you first plop all the ingredients into the crock pot. Ew right?
Then, the cumin colors the coconut milk a nice orangy color. OK, it's not so nice looking, but it tastes good and that's the point. I liked mine served over a bed of rice with some sweetened shredded coconut on top. YUM!
 This recipe was almost a HUGE disaster though. I misread the recipe and I almost put in 1-2 tsp of red pepper flakes instead of chili powder. Luckily, I caught my mistake right before I put the spices in the crockpot. If I had added the red pepper flakes instead of the chili powder, Blockette and I would have looked Homer Simpson at the chili cook off!
  Mrblocko would have been fine though. He added loads of red pepper flakes to his portion.
 This is what the stuff looks like when you first plop all the ingredients into the crock pot. Ew right?
Then, the cumin colors the coconut milk a nice orangy color. OK, it's not so nice looking, but it tastes good and that's the point. I liked mine served over a bed of rice with some sweetened shredded coconut on top. YUM!
 This recipe was almost a HUGE disaster though. I misread the recipe and I almost put in 1-2 tsp of red pepper flakes instead of chili powder. Luckily, I caught my mistake right before I put the spices in the crockpot. If I had added the red pepper flakes instead of the chili powder, Blockette and I would have looked Homer Simpson at the chili cook off!
  Mrblocko would have been fine though. He added loads of red pepper flakes to his portion.
This recipe makes a lot. So much so that we got sick of eating the leftovers. I froze about 4 cups of the meat and sauce. Four cups! Keep in mind, this was after eating it for at least 3 meals! After several months of just pushing it around and not wanting to use up the leftovers I had a rather brilliant idea. Why not make a sort of shepherd's pie out of those leftovers? I added corn, carrots, peas and green beans to the meat mix, topped it with mashed potatoes (which I also had a ton of in the freezer) and a bit of cheddar cheese. This made enough for 2 round casserole dishes. Each dish fed the three of us for 2 meals.

I actually preferred the leftovers in shepherd's pie form to the original main dish. Not only did I like the flavor combinations of the meat, potatoes and veggies, but it was a one dish meal. If I don't have to prepare any side dishes that always makes me a happy camper.
Crockpot coconut Beef from a Year of Slow Cooking
1-2 lbs stew meat
1 yellow onion, cut in chunks
1 can coconut milk
1 juice from one lime
2 T of butter (optional. I used it, but don't think it needs it next time)
2 cloves chopped garlic
2 tsp brown sugar
1 tsp curry powder
1/2 tsp ground coriander
1 tsp cumin
1 1/2 T chili paste (or 1-2 tsp red chili flakes)
1 inch piece of ginger, peeled and grated
I used a 6qt Smart-Pot for this dish. Anything 4qt and up will work. If using, put butter into crockpot, and turn it on to begin to melt. Add meat, lime juice, and coconut milk. Follow with the onion and garlic. Add the brown sugar and all the spices. Grate the ginger. Toss meat a bit in the liquid and spices to coat. Cover and cook on high for 4 hours, or on low for 8. The coconut milk will be yellow from the curry, and will separate a bit. A quick stir will turn it all creamy again. Serve over white or brown rice.
Friday, June 24, 2011
Moroccan Tuna Casserole
Summer is salad weather in our house. Well, it is also grilling weather. It's actually, Mrsblocko doesn't want to use the oven and heat up the house weather, but they are all essentially the same thing. So when I came across Moroccan pasta salad over at Food.com I thought it might be something interesting to try.
As I was assembling the recipe, I found that it needed to be tweaked quite a bit. The original recipe says to use an 8 oz can of corn and 2-3 Tablespoons of olives. I used an entire 15 oz can of corn and one of those short stumpy cans of sliced black olives. This made the salad seem much more substantial. As you can tell from the photo above, I used regular corkscrew noodles instead of the tri-colored. I had oodles of noodles in my pantry and couldn't justify buying another box just to be fancy. I also served this salad over a bed of lettuce. Mrblocko and I agreed that this made the salad seem more like a complete meal. I served it with some fruit on the side and viola, a one dish meal.
Finally, I used tuna in vegetable oil, not olive oil. This was my error at the grocery store. I simply grabbed the wrong can off the shelf. I didn't think it made any difference. I did drain off some of the oil in the can. There just seemed like a lot in there and while dressing on a salad is nice, oily salad is not. I also did not add any extra olive oil. If I was trying to eliminate oil, why would I add more oil?
As I was assembling the recipe, I found that it needed to be tweaked quite a bit. The original recipe says to use an 8 oz can of corn and 2-3 Tablespoons of olives. I used an entire 15 oz can of corn and one of those short stumpy cans of sliced black olives. This made the salad seem much more substantial.
As you can tell from the photo above, I used regular corkscrew noodles instead of the tri-colored. I had oodles of noodles in my pantry and couldn't justify buying another box just to be fancy. I also served this salad over a bed of lettuce. Mrblocko and I agreed that this made the salad seem more like a complete meal. I served it with some fruit on the side and viola, a one dish meal.Finally, I used tuna in vegetable oil, not olive oil. This was my error at the grocery store. I simply grabbed the wrong can off the shelf. I didn't think it made any difference. I did drain off some of the oil in the can. There just seemed like a lot in there and while dressing on a salad is nice, oily salad is not. I also did not add any extra olive oil. If I was trying to eliminate oil, why would I add more oil?
The salad was simple to prepare and everything, but it didn't knock my socks off. The tuna wasn't overly fishy tasting, but it was lacking something. Maybe it needed more spices? I don't know. Everyone ate the salad without complaint, but we were all glad when the leftovers were gone.
Moroccan Pasta Salad with Tuna from Food.com
2 tablespoons mayonnaise
1 tablespoon olive oil
1/2-1 teaspoon cumin
1/4-1/2 teaspoon salt
1/4 teaspoon onion powder
8 ounces tri-colored rotini pasta, cooked
1 (3 ounce) can tuna in olive oil, flaked apart
1 (8 ounce) can corn, drained
2 -3 tablespoons sliced black olives
Mix olive oil, mayo, and spices together in a small bowl. Mix other ingredients in a large bowl. Then stir mayo mix in with pasta. Serve cold.
Thursday, June 23, 2011
Thankful Thursday 24.11
1. No rain for the parade.
2. No sun/heatstroke from the parade.
3.watching Harry Potter movies with Blockette.
4. I didn't scream when the spider landed on my shoulder while I was brushing my teeth last night.
5. Blockette had fun at her best friend's party.
6. Blockette wasn't too scared to climb the rock wall like the rest of the kids.
7. Blockette went right back to sleep after the tornado warning expired.
8. I kept a level head when the sirens went off.
9. I had watch and warning confused.
10. There was no actual tornado close to our house.
Wednesday, June 22, 2011
Black Bean Bip AKA The "Chocolate" Dip
More bean dip. YAY! This is for when you and your family gets tired of the Pesto Bean dip I wrote about earlier. I mean I love the stuff and it gets me to eat veggies, but sometimes you just need a bit of variety. I found the recipe for Black bean dip from Tidy Mom, and altered it slightly to fit the ingredients I had on hand. Below is the recipe with my changes:
1 can black beans, drained and rinsed
1 small onion
1/2 T balsamic vinegar
3/4 t kosher salt
1/2t smoked paprika
heaping 1/2 t dried parsley
4cloves garlic, minced
saute the onions until translucent in some olive oil. puree everything in a food processor. stream in olive oil to get dip to your desired consistency.
------------
As a final note: Mrblocko made the mistake of telling Blockette that this dip was made from black beans. Upon hearing this, Blockette immediately refused to eat any more. I kicked Mrblocko under the table and told her "Daddy was just joking. The dip is really made from chocolate. That's what gives it that dark color." Since my white lie, she asked for the dip every day at lunch, until it was gone. Chocolate makes everything better, even if there isn't any in the dish at all.
 I found the recipe for Black bean dip from Tidy Mom, and altered it slightly to fit the ingredients I had on hand. Below is the recipe with my changes:
1 can black beans, drained and rinsed
1 small onion
1/2 T balsamic vinegar
3/4 t kosher salt
1/2t smoked paprika
heaping 1/2 t dried parsley
4cloves garlic, minced
saute the onions until translucent in some olive oil. puree everything in a food processor. stream in olive oil to get dip to your desired consistency.
------------
As a final note: Mrblocko made the mistake of telling Blockette that this dip was made from black beans. Upon hearing this, Blockette immediately refused to eat any more. I kicked Mrblocko under the table and told her "Daddy was just joking. The dip is really made from chocolate. That's what gives it that dark color." Since my white lie, she asked for the dip every day at lunch, until it was gone. Chocolate makes everything better, even if there isn't any in the dish at all.
Tuesday, June 21, 2011
Cooking Cream Pasta Bake
Have you seen that Philly Cooking Creme at the grocery store? I've been eyeing it and pondering whether or not to purchase a tub of it. Then one week, low and behold it was on sale, plus a coupon made it less than a dollar. Sold! There are a few different flavors, and after hemming and hawing for a while I settled on the Savory Garlic.
Of course then I wondered what in the world I was going to make with it. The recipes on the tub didn't strike my fancy. Neither did anything on the Philly cream cheese website. So I just winged it.

Here is what I threw together:
1 box tube pasta
6 c pasta sauce with meat and veggies already added(this was leftovers from the freezer)
half container of garlic cooking creme
2 c shredded mozzarella
Boil your pasta, per the package instructions. Stir together the pasta, sauce and cooking cream. Spread into a 9x13 pan. Top with cheese and cover with foil. Bake at 350 for 20 min, uncover and bake for another 15 min til cheese is browned and melty.
---------------------
The results? Well, they were tasty, but not any better or worse than any other baked pasta dish I've made or eaten in the past. It was good, but I see no reason to go out of my way to buy another tub of the stuff. I wasn't able to think of another use for the other half of the cooking creme before it went bad and I had to pitch it. I give the cooking creme a hearty meh.
Has anyone else tried the stuff? What was your experience with the cooking creme?
Monday, June 20, 2011
Breakfast Oatmeal Bar Fail
I present to you the breakfast oatmeal bar from Anja's food 4 thought. I have no idea what I was expecting from this recipe, but this was not it. I was not pleased with the results. I made them because I thought it might be a great low sugar snack as the only sugar from these bars is the sugars in the dried fruit.
I think part of my problem with these bars was that I really like sugar. It's not like I need a snack that is heavy with sugar. I just want something with a little bit of sweet. With these bars, I couldn't taste any sugar at all. They were really quite bland.
Also, I think I was anticipating them to be a crispy oatmeal bar. They were chewy instead. Very Very Chewy. I would even go so far as to say that the middle was soggy. This was not from my lack of trying. I cooked the bars for 90 minutes before I gave up. After an hour in the oven, I cut them into bars, smashed them onto a parchment lined cookie sheet and baked them for the last 30 minutes. (As you can see in the photo above.) I still didn't like them.
For some reason Blockette did. In fact, she loved them so much gobbled them all up. So maybe the bars just weren't suited to my palate. I'd say, try these bars at your own risk. They weren't for me, but maybe you will like them as much as my daughter did.
BREAKFAST OATMEAL BARS from Anja's Food 4 Thought
1 1/4 cups rolled oats
1/2 cup chopped nuts (e.g. almonds, walnuts, pistachios, pecans, peanuts)
3/4 cup dried fruit (e.g. dates, apricots, raisins, prunes, cranberries)
1 teaspoon cinnamon
1/2 teaspoon salt
1 1/4 cups milk
1 teaspoon vanilla extract
Preheat oven to 375F. Line 25x25cm baking sheet with parchment paper. Mix all dry ingredients in a bowl and set aside. Mix wet ingredients. Pour wet into dry ingredients and stir to combine. Let the mixture soak for 10 minutes. Then pour into prepared dish and press down evenly. Bake for 35-40 minutes. Cut into squares while still hot. Let cool completely before storing in airtight container.
I have no idea what I was expecting from this recipe, but this was not it. I was not pleased with the results. I made them because I thought it might be a great low sugar snack as the only sugar from these bars is the sugars in the dried fruit.I think part of my problem with these bars was that I really like sugar. It's not like I need a snack that is heavy with sugar. I just want something with a little bit of sweet. With these bars, I couldn't taste any sugar at all. They were really quite bland.
Also, I think I was anticipating them to be a crispy oatmeal bar. They were chewy instead. Very Very Chewy. I would even go so far as to say that the middle was soggy. This was not from my lack of trying. I cooked the bars for 90 minutes before I gave up. After an hour in the oven, I cut them into bars, smashed them onto a parchment lined cookie sheet and baked them for the last 30 minutes. (As you can see in the photo above.) I still didn't like them.
For some reason Blockette did. In fact, she loved them so much gobbled them all up. So maybe the bars just weren't suited to my palate. I'd say, try these bars at your own risk. They weren't for me, but maybe you will like them as much as my daughter did.
BREAKFAST OATMEAL BARS from Anja's Food 4 Thought
1 1/4 cups rolled oats
1/2 cup chopped nuts (e.g. almonds, walnuts, pistachios, pecans, peanuts)
3/4 cup dried fruit (e.g. dates, apricots, raisins, prunes, cranberries)
1 teaspoon cinnamon
1/2 teaspoon salt
1 1/4 cups milk
1 teaspoon vanilla extract
Preheat oven to 375F. Line 25x25cm baking sheet with parchment paper. Mix all dry ingredients in a bowl and set aside. Mix wet ingredients. Pour wet into dry ingredients and stir to combine. Let the mixture soak for 10 minutes. Then pour into prepared dish and press down evenly. Bake for 35-40 minutes. Cut into squares while still hot. Let cool completely before storing in airtight container.
Friday, June 17, 2011
Yay or nay?
I'm a little tired with the old layout on the blog. I thought I'd try something new. Too much change? Not enough? The fonts and/or the colors are annoying? Please let me know what you think!
Brownie Covered Oreos
What do you do when an OREO just isn't enough of a desert for you? Oh sure you've made OREO Stuffed Chocolate Chip Cookies before, but that is old hat, it's just not gonna cut it anymore. Why not bake the Oreo in a brownie. In individual cookie shaped portions no less.  I discovered the genius of brownie covered Oreos over at Picky Palate. What makes these treats truly brilliant is that they are baked in a muffin tin! That's how they keep their cookie-esque shape.
After a bit of trial and error, I discovered that there is no need to super coat the OREOS with brownie batter. I just give them a quick little dip because the brownie batter does poof up when baked.
One of the best things about this cookie-brownie hybrid is that they are pre portioned. I am one of those people who cuts a tiny slice off the brownies. Then I come back 5 min later because, well I only had a tiny slice. I will do that 3 or 4 times and then finish off a row. Then I will have to cut a long skinny piece from the entire row because I cut the row crooked. Lather, rinse, repeat until I've eaten half the pan of brownies. That is no good cause it makes me sick and I am too thickheaded to just STOP EATING THEM ALREADY! I never learn. So yes. Portioned brownies are a very good thing in this house.
I liked the cookies best when they were warm. I loved how the Oreo was soft inside. I probably could have recreated this by nuking the cooled cookie for a few seconds in the microwave, but to be honest, it didn't occur to me until just now to do that. I'll have to remember that for next time.
Also, I think I will try using some of the different flavored OREOS for the next batch. I'm thinking the peanut butter or the mint ones would be tasty.
P.S. That really is my hand in the picture. Yes it is that enormous. I have freakishly large hands and feet for a short girl. I blame that for my excessive clumsiness.
P.P.S No actual OREOS were harmed in the making of this treat. I used the generic store brand "Double O's" and no one was the wiser. At least until now. EEEP! My cover is blown. Guess I'll have to go into hiding.
Brownie Covered Oreos from Picky Palate
1 Brownie mix (or use your own brownie recipe)
1 package Oreos, I used the Holiday ones
White chocolate, melted for drizzle, or Wilton White frosting pen works great
White nonpariels Sprinkles
Preheat oven to 350 F. Prepare brownie batter according to package directions. Leave in mixing bowl. Dip Oreos in brownie batter then place in bottom of cupcake tins that have been generously sprayed with cooking spray. Bake for 12-15 min, til brownies are cooked through (doesn’t take long). As soon as you remove, take a plastic knife and run along edges, this is VERY important so you get the cookie out with brownies not stuck to pan. Let cool 5 min, remove and drizzle with melted white chocolate or the Wilton White icing pen, sprinkle with nonpariels. Makes entire package of Oreos
I discovered the genius of brownie covered Oreos over at Picky Palate. What makes these treats truly brilliant is that they are baked in a muffin tin! That's how they keep their cookie-esque shape.After a bit of trial and error, I discovered that there is no need to super coat the OREOS with brownie batter. I just give them a quick little dip because the brownie batter does poof up when baked.
One of the best things about this cookie-brownie hybrid is that they are pre portioned. I am one of those people who cuts a tiny slice off the brownies. Then I come back 5 min later because, well I only had a tiny slice. I will do that 3 or 4 times and then finish off a row. Then I will have to cut a long skinny piece from the entire row because I cut the row crooked. Lather, rinse, repeat until I've eaten half the pan of brownies. That is no good cause it makes me sick and I am too thickheaded to just STOP EATING THEM ALREADY! I never learn. So yes. Portioned brownies are a very good thing in this house.
I liked the cookies best when they were warm. I loved how the Oreo was soft inside. I probably could have recreated this by nuking the cooled cookie for a few seconds in the microwave, but to be honest, it didn't occur to me until just now to do that. I'll have to remember that for next time.
Also, I think I will try using some of the different flavored OREOS for the next batch. I'm thinking the peanut butter or the mint ones would be tasty.
P.S. That really is my hand in the picture. Yes it is that enormous. I have freakishly large hands and feet for a short girl. I blame that for my excessive clumsiness.
P.P.S No actual OREOS were harmed in the making of this treat. I used the generic store brand "Double O's" and no one was the wiser. At least until now. EEEP! My cover is blown. Guess I'll have to go into hiding.
Brownie Covered Oreos from Picky Palate
1 Brownie mix (or use your own brownie recipe)
1 package Oreos, I used the Holiday ones
White chocolate, melted for drizzle, or Wilton White frosting pen works great
White nonpariels Sprinkles
Preheat oven to 350 F. Prepare brownie batter according to package directions. Leave in mixing bowl. Dip Oreos in brownie batter then place in bottom of cupcake tins that have been generously sprayed with cooking spray. Bake for 12-15 min, til brownies are cooked through (doesn’t take long). As soon as you remove, take a plastic knife and run along edges, this is VERY important so you get the cookie out with brownies not stuck to pan. Let cool 5 min, remove and drizzle with melted white chocolate or the Wilton White icing pen, sprinkle with nonpariels. Makes entire package of Oreos
Thursday, June 16, 2011
Thankful Thursday 23.11
1. A good day after a really rotten day with Blockette.
2. Getting the gumption to walk to the library with Blockette.
3. Realizing that I can't do that again anytime soon. (It's not the distance, it's caring all the books.)
4. Applying the things Blockette is learning in her workbooks and seeing the light click on in her head.
5. Getting my computer back after several months in the shop.
6. The earwigs are out much later this year.
7. Being able to fix my computer when it got several Trojans the same day I got it back from the shop.
8. Finally wiggling out that loose tooth in Blockette's mouth.
9. Cool weather.
10. Not completely forgetting to pass on the phone message to Mrblocko.
Wednesday, June 15, 2011
Mandarin Orange Cake
This cake also goes by the name of Pig pickin' cake. I have no idea why. The name just makes me giggle. If you are like me, you can count this cake as a serving of fruit. Not only is there decorative Mandarin oranges adorning the top of the cake, but there is crushed mandarins inside the cake, and crushed pineapple in the frosting. How does that not count as a serving of fruit?
I made this cake to take over to my Mother-in-laws for lunch. Well, not for lunch. For dessert after lunch. So you can only imagine my horror when I was baking the cake and the top got dark. VERY dark. There were tears and screams people. Tears and screams.
While the cake cooled I went through my recipe binder and searched for a back up dessert. I think I found a few, but I was not a happy camper. Once the cake had cooled I took my trusty purple serrated bread knife and cut the dark top off the cake. Oh! it looked nice and wonderful inside. Mrblocko, Blockette and I even tested the "dark" part I cut off. It was good, even though it was over cooked!
I breathed a huge sigh of relief. That is, until I realized that I was going to transport this cake for over an hour unrefrigerated and the frosting was cool whip based. Uh oh. So, I crossed my fingers and put the cake in the freezer overnight and didn't take it out until right as we were going to leave. I also put ice packs around the cake in the cake carrier.
I stuck the cake into my Mother-in-law's fridge as soon as we walked in the door. And guess what? The cake did not slide, shift or melt. It was perfectly defrosted by the time we cut into it as well. Another huge sigh of relief!
Everyone liked the cake. (Or at least they were polite and said they did.) The cake is very sweet, so be aware of that if you are not big on super sweet desserts. Even with the cake being so rich, and someone else bringing a pie for dessert as well, there was only a single slice left of the cake. I'd say that was a success.
Head over to Mommy's Kitchen to see the full recipe for Mandarin orange cake.
1 - 18.25 oz butter recipe cake mix
1/2 - cup vegetable oil
1 - can (15 oz ) mandarin oranges, undrained & separated
3 - eggs
Add cake mix, oil, eggs and mandarin oranges with liquid to a large mixing bowl. Separate a few of the mandarin oranges aside for garnish. (6-8 segments). Mix cake ingredients using an electric mixer. Pour into two greased and floured round cake pans.
Bake at 350F for 30 min til golden brown and cake springs back. Remove from oven and let cool in pans 10 min. Remove from pans and cool completely on a baking rack. Frost when cakes are completely cooled.
Frosting:
1 - can (8 oz) crushed pineapple, undrained
1- 3.4 oz box vanilla or french vanilla instant pudding mix
13 - ounces cool whip (thawed) whipped topping
Prepare frosting by adding dry pudding mix and un drained pineapple together and mix with a spoon. Fold in cool whip until well blended. Frost both layers and sides of cake. Garnish with remaining mandarin orange segments. Keep refrigerated before serving.
If you are like me, you can count this cake as a serving of fruit. Not only is there decorative Mandarin oranges adorning the top of the cake, but there is crushed mandarins inside the cake, and crushed pineapple in the frosting. How does that not count as a serving of fruit?I made this cake to take over to my Mother-in-laws for lunch. Well, not for lunch. For dessert after lunch. So you can only imagine my horror when I was baking the cake and the top got dark. VERY dark. There were tears and screams people. Tears and screams.
While the cake cooled I went through my recipe binder and searched for a back up dessert. I think I found a few, but I was not a happy camper. Once the cake had cooled I took my trusty purple serrated bread knife and cut the dark top off the cake. Oh! it looked nice and wonderful inside. Mrblocko, Blockette and I even tested the "dark" part I cut off. It was good, even though it was over cooked!
I breathed a huge sigh of relief. That is, until I realized that I was going to transport this cake for over an hour unrefrigerated and the frosting was cool whip based. Uh oh. So, I crossed my fingers and put the cake in the freezer overnight and didn't take it out until right as we were going to leave. I also put ice packs around the cake in the cake carrier.
I stuck the cake into my Mother-in-law's fridge as soon as we walked in the door. And guess what? The cake did not slide, shift or melt. It was perfectly defrosted by the time we cut into it as well. Another huge sigh of relief!
Everyone liked the cake. (Or at least they were polite and said they did.) The cake is very sweet, so be aware of that if you are not big on super sweet desserts. Even with the cake being so rich, and someone else bringing a pie for dessert as well, there was only a single slice left of the cake. I'd say that was a success.
Head over to Mommy's Kitchen to see the full recipe for Mandarin orange cake.
1 - 18.25 oz butter recipe cake mix
1/2 - cup vegetable oil
1 - can (15 oz ) mandarin oranges, undrained & separated
3 - eggs
Add cake mix, oil, eggs and mandarin oranges with liquid to a large mixing bowl. Separate a few of the mandarin oranges aside for garnish. (6-8 segments). Mix cake ingredients using an electric mixer. Pour into two greased and floured round cake pans.
Bake at 350F for 30 min til golden brown and cake springs back. Remove from oven and let cool in pans 10 min. Remove from pans and cool completely on a baking rack. Frost when cakes are completely cooled.
Frosting:
1 - can (8 oz) crushed pineapple, undrained
1- 3.4 oz box vanilla or french vanilla instant pudding mix
13 - ounces cool whip (thawed) whipped topping
Prepare frosting by adding dry pudding mix and un drained pineapple together and mix with a spoon. Fold in cool whip until well blended. Frost both layers and sides of cake. Garnish with remaining mandarin orange segments. Keep refrigerated before serving.
Tuesday, June 14, 2011
English Muffin Bread
We are huge fans of English muffins in this house. Blockette particularly fond of having them in an egg and cheese sandwich. I made them from scratch once and they turned out fairly decent. I came across a recipe for English muffin bread from the blog Waiting for Gateau and wondered if an English muffin in bread form would taste anything like a true English muffin.
First off, before I delve into the realm of English muffin bread, I feel the need to state that I love the name of the blog, Waiting for Gateau. It's a play on words based off of the play (Heh, I made another pun. Yay me!) "Waiting for Godot" by Samuel Beckett, and gateau, a French word for a rich iced cake.
I had to read the play in high school for a modern literature class. Don't ask me what the play was about because I remember hating how weird and abstract the book was. If you are curious check it out over on Wiki. So why do I love the name of the blog if I hated the play? I love it cause it's pun-y. That's how I roll.
Now onto the bread. You've heard the phrase, a watched pot never boils. Well, a watched bread never rises either. This is sometimes true even if you don't watch it. This bread did NOT want to rise. The dough was supposed to rise over the top of the pan. After sitting for 5 hours the dough was just below the rim of the pan. I gave up and just stuck the loaf in the oven. I figured if it hadn't risen after sitting in a nice warm place for 5 hours, it was never going to rise. The bread was a bit dense, but tasty. It did taste quite similar to a normal English muffin. I found myself missing the craggy landscape that is classically associated with the English muffin. Those nooks and crannies are the best part. Doncha just love when they all get filled overflowing with butter or ooey gooey peanut butter? You don't get that with the bread loaf version.
I went over the recipe again in an attempt to decipher where I could have gone astray. Ugh, then I realized problem. I had used the wrong type of yeast. I used they type of yeast I always keep on hand, dry active yeast. The recipe called for the instant variety. The two types of yeast are interchangeable in recipes, they just need to be proofed differently. Oh well. Lesson learned.
English muffin bread from Waiting for Gateau
cornmeal for dusting
2 1/4 teaspoons (one packet) instant, rapid-rise yeast
2 3/4 cups all-purpose flour
1 1/2 teaspoons sugar
1 teaspoon salt
1/2 teaspoon baking soda
1 cup whole milk
1/3 cup water
Spray a 9x5" loaf pan with nonstick cooking spray and dust bottom and sides with cornmeal. Whisk yeast, flour, sugar, salt, and baking soda in a large bowl. Combine milk and water and microwave on high 30 sec; til just warmed. Add milk mix to flour mix and stir to form a stiff batter. Spoon dough into prepared pan and sprinkle top with cornmeal. Cover dough loosely with plastic wrap and let rise for 50-60 min til dough is 1" above side of pan. Meanwhile, preheat oven to 400° F. Remove plastic wrap from loaf and bake 25 min. (loaf will still be pale, but is okay.) Remove loaf from the pan immediately and cool completely on a wire rack.
First off, before I delve into the realm of English muffin bread, I feel the need to state that I love the name of the blog, Waiting for Gateau. It's a play on words based off of the play (Heh, I made another pun. Yay me!) "Waiting for Godot" by Samuel Beckett, and gateau, a French word for a rich iced cake.
I had to read the play in high school for a modern literature class. Don't ask me what the play was about because I remember hating how weird and abstract the book was. If you are curious check it out over on Wiki. So why do I love the name of the blog if I hated the play? I love it cause it's pun-y. That's how I roll.
Now onto the bread. You've heard the phrase, a watched pot never boils. Well, a watched bread never rises either. This is sometimes true even if you don't watch it. This bread did NOT want to rise. The dough was supposed to rise over the top of the pan. After sitting for 5 hours the dough was just below the rim of the pan. I gave up and just stuck the loaf in the oven. I figured if it hadn't risen after sitting in a nice warm place for 5 hours, it was never going to rise.
The bread was a bit dense, but tasty. It did taste quite similar to a normal English muffin. I found myself missing the craggy landscape that is classically associated with the English muffin. Those nooks and crannies are the best part. Doncha just love when they all get filled overflowing with butter or ooey gooey peanut butter? You don't get that with the bread loaf version.I went over the recipe again in an attempt to decipher where I could have gone astray. Ugh, then I realized problem. I had used the wrong type of yeast. I used they type of yeast I always keep on hand, dry active yeast. The recipe called for the instant variety. The two types of yeast are interchangeable in recipes, they just need to be proofed differently. Oh well. Lesson learned.
English muffin bread from Waiting for Gateau
cornmeal for dusting
2 1/4 teaspoons (one packet) instant, rapid-rise yeast
2 3/4 cups all-purpose flour
1 1/2 teaspoons sugar
1 teaspoon salt
1/2 teaspoon baking soda
1 cup whole milk
1/3 cup water
Spray a 9x5" loaf pan with nonstick cooking spray and dust bottom and sides with cornmeal. Whisk yeast, flour, sugar, salt, and baking soda in a large bowl. Combine milk and water and microwave on high 30 sec; til just warmed. Add milk mix to flour mix and stir to form a stiff batter. Spoon dough into prepared pan and sprinkle top with cornmeal. Cover dough loosely with plastic wrap and let rise for 50-60 min til dough is 1" above side of pan. Meanwhile, preheat oven to 400° F. Remove plastic wrap from loaf and bake 25 min. (loaf will still be pale, but is okay.) Remove loaf from the pan immediately and cool completely on a wire rack.
Monday, June 13, 2011

Rockin Pesto Bean Dip
Mommy, what smells so good?
It's a new veggie dip. Wanna try some?
Sure! This is really good mom. What's in it?
White beans.
Beans?
Yup.
Not black beans?
Nope. White beans.
Oh. Good. Cause I don't like black beans and this is really good. I think this has to be the easiest dip I've ever made. Not only is it easy, it is down right tasty. Even Mrblocko and Blockette love it as much as I do. This is awesome cause any way to increase our veggie intake is a good thing.
Here is what you do:
1. Drain and rinse one can of white beans and place it into the bowl of a food processor. (I used Great Northerns.)
2. add about 3 T of pesto. (I used Classico Basil Pesto. This is a really garlic-y pesto which imparts a ton of flavor to the dip. If you have a more mild pesto, you will need to add more.)
3. Add 2-3 teaspoons of lemon juice, about the juice from 1 lemon. (I've forgotten this before and the dip still tastes wonderful.)
4. Turn on the food processor and stream in some olive oil until the dip is your preferred consistency. (The amount of olive oil I use is different every time I've made this. It's going to depend on the humidity, your beans and how much pesto you use. If I had to guess I'd say somewhere around 1/4 c oil.)
5. Add salt and pepper to taste.
6. If you have time, this dip tastes even better if left to sit in the fridge for a few hours so the flavors can marry.
I found the basic recipe for white bean and pesto dip over at epicurious first, but I've seen versions of this same recipe all over the web.
It's a new veggie dip. Wanna try some?
Sure! This is really good mom. What's in it?
White beans.
Beans?
Yup.
Not black beans?
Nope. White beans.
Oh. Good. Cause I don't like black beans and this is really good.
I think this has to be the easiest dip I've ever made. Not only is it easy, it is down right tasty. Even Mrblocko and Blockette love it as much as I do. This is awesome cause any way to increase our veggie intake is a good thing.Here is what you do:
1. Drain and rinse one can of white beans and place it into the bowl of a food processor. (I used Great Northerns.)
2. add about 3 T of pesto. (I used Classico Basil Pesto. This is a really garlic-y pesto which imparts a ton of flavor to the dip. If you have a more mild pesto, you will need to add more.)
3. Add 2-3 teaspoons of lemon juice, about the juice from 1 lemon. (I've forgotten this before and the dip still tastes wonderful.)
4. Turn on the food processor and stream in some olive oil until the dip is your preferred consistency. (The amount of olive oil I use is different every time I've made this. It's going to depend on the humidity, your beans and how much pesto you use. If I had to guess I'd say somewhere around 1/4 c oil.)
5. Add salt and pepper to taste.
6. If you have time, this dip tastes even better if left to sit in the fridge for a few hours so the flavors can marry.
I found the basic recipe for white bean and pesto dip over at epicurious first, but I've seen versions of this same recipe all over the web.
Iced Coffee
This post is for my best friend. She loves iced coffee, but her husband doesn't like the smell of the coffee brewing. I saw a recipe over at The Pioneer Woman that has a recipe for Cold Brewed Iced Coffee and thought it was a good match for her. So here you go girly. Let me know if you decide to try it.
Perfect Iced Coffee from Pioneer Woman
1 pound Ground Coffee (good, Rich Roast)
8 quarts Cold Water
Half-and-half (healthy Splash Per Serving)
Sweetened Condensed Milk (2-3 Tablespoons Per Serving)
Note: Can Use Skim Milk, 2% Milk, Whole Milk, Sugar, Artificial Sweeteners, Syrups.
In a large container, mix ground coffee with water. Cover and allow to sit at room temperature eight hours or overnight. Line a fine mesh strainer with cheesecloth and set over a pitcher or other container. Pour coffee/water mixture through the strainer, allowing all liquid to run through. Discard grounds. Place coffee liquid in the fridge and allow to cool. Use as needed.
To make iced coffee, pack a glass full of ice cubes. Fill glass 2/3 full with coffee liquid. Add healthy splash of half-and-half. Add 2-3 tablespoons sweetened condensed milk (can use plain sugar instead) and stir to combine. Taste and adjust half-and-half and/or sweetened condensed milk as needed.
Sunday, June 12, 2011
Rare Cat Pics
If you hate cats well that is too bad cause I'm posting some pics of my kitties. For some reason it is extremely hard to snap a good photo of them. They are always moving or the flash makes them look like undead creepy creatures.
Magically, I caught Basil sleeping. Usually he wakes up as the flash goes off and the photo op is ruined. Now that he is older, he is becoming a much more sound sleeper, especially when it gets really hot like it has been.
 I just love his little pink toes peekin out. I just want to rip them off and eat them. Om NOM mom!
Boo would be jealous if I gave all the attention to Basil so here is a shot of him. Whenever I'm in the kitchen he thinks I'm in there to give him more food, even if I just filled up his food dish 2 minutes ago. "That food is old. It has been exposed to the elements for 2 whole minutes. You expect me to eat that contaminated food? "
I like this picture of Boo because it is one of the few photos that show off how ripply his fur is. That and he doesn't have glowing green eyes. That's so spooky. Then again, he is my Halloween kitty.
Magically, I caught Basil sleeping. Usually he wakes up as the flash goes off and the photo op is ruined. Now that he is older, he is becoming a much more sound sleeper, especially when it gets really hot like it has been.
 I just love his little pink toes peekin out. I just want to rip them off and eat them. Om NOM mom!
Boo would be jealous if I gave all the attention to Basil so here is a shot of him. Whenever I'm in the kitchen he thinks I'm in there to give him more food, even if I just filled up his food dish 2 minutes ago. "That food is old. It has been exposed to the elements for 2 whole minutes. You expect me to eat that contaminated food? "

I like this picture of Boo because it is one of the few photos that show off how ripply his fur is. That and he doesn't have glowing green eyes. That's so spooky. Then again, he is my Halloween kitty.
Saturday, June 11, 2011
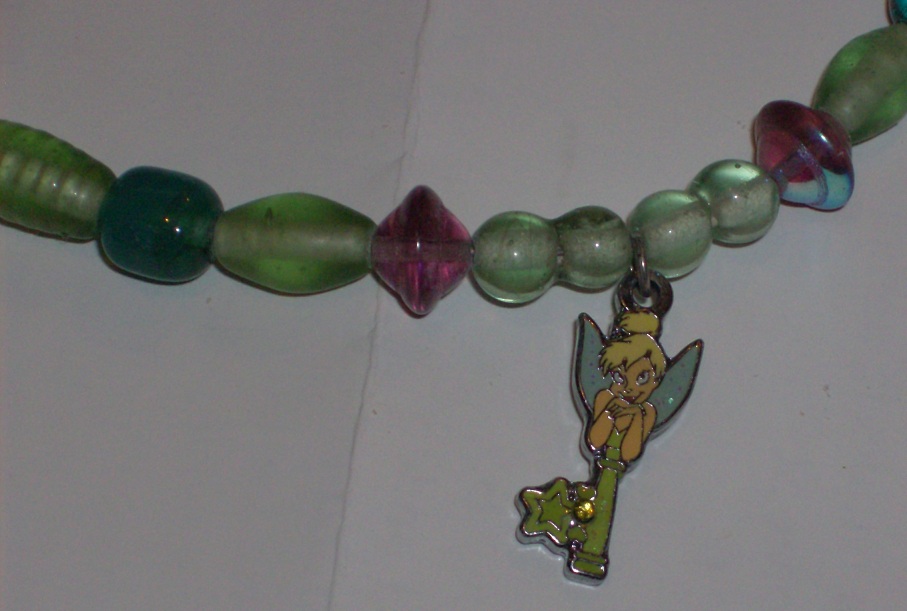
'11 Happy Dance #9 and 10: Necklaces
Blockette has been lamenting her extreme lack of accessories. I thought I'd make her a few fun little necklaces so she could find something else to complain about.
This crazy monkey necklace reminds me of the circus. It's something about the bright primary colors and the bumpy lampwork beads I guess. The monkey dangle charms are actually jingle bells. I know she is going to want to wear this to school in the fall, but the bells ARE rather loud. We'll see how much I end up liking her first grade teacher. Yeah. I'm only sorta kidding about that. Sorta.
We got the next necklace charm when we went on vacation this spring. I promised I'd make her a neato necklace out of it. Blockette has been rather patient for me to get around to making it. Quite out of character for the little munchkin.
The charm just makes me giggle. Here's a close up. To me it almost looks like Tinkerbell is looking cross-eyed. At the very least she certainly has a goofy expression on her face. Blockette claims not to see it. I think she is in denial though. How could perfect Tinkerbell make a weird face?

Out of the two necklaces, the Tinkerbell one is clearly her favorite. She walks around the house saying that her Tinkerbell Key can open any lock in the house. When she wears the necklace, anytime she comes to a door, locked, unlocked, doesn't matter if it is only the pantry door and it doesn't even have a door that can be locked, she will pretend to open the lock with her magic key necklace.
Blockette has also been obsessed as of late with gems. She thought maybe the small green "gem" on the star part of the key was real. I reluctantly told her it wasn't. She was sad for half a second before she said, "Well, at least it looks real." Whew. Dodged a bullet with that one!
This crazy monkey necklace reminds me of the circus. It's something about the bright primary colors and the bumpy lampwork beads I guess. The monkey dangle charms are actually jingle bells.
 I know she is going to want to wear this to school in the fall, but the bells ARE rather loud. We'll see how much I end up liking her first grade teacher. Yeah. I'm only sorta kidding about that. Sorta.
We got the next necklace charm when we went on vacation this spring. I promised I'd make her a neato necklace out of it. Blockette has been rather patient for me to get around to making it. Quite out of character for the little munchkin.

The charm just makes me giggle. Here's a close up. To me it almost looks like Tinkerbell is looking cross-eyed. At the very least she certainly has a goofy expression on her face. Blockette claims not to see it. I think she is in denial though. How could perfect Tinkerbell make a weird face?
Out of the two necklaces, the Tinkerbell one is clearly her favorite. She walks around the house saying that her Tinkerbell Key can open any lock in the house. When she wears the necklace, anytime she comes to a door, locked, unlocked, doesn't matter if it is only the pantry door and it doesn't even have a door that can be locked, she will pretend to open the lock with her magic key necklace.
Blockette has also been obsessed as of late with gems. She thought maybe the small green "gem" on the star part of the key was real. I reluctantly told her it wasn't. She was sad for half a second before she said, "Well, at least it looks real." Whew. Dodged a bullet with that one!
Friday, June 10, 2011
'11 Happy Dance #8 Earring Mend
I spent a whopping 50 cents on these earrings. I had one of those fancy schmancy "buy $10 worth of stuff, get $10 off of that stuff you bought" coupons from Kohls. These guys below, combined with another pair of gold hoopie earrings came to a grand total of $11. Slap on that coupon and bam. Two earrings for a buck. Yeah. I'll take that deal.
The thing about these earrings, if you look very closely you will see the earring on the left has a bead missing from the second loop from the left, and the one on the right is missing the bead in the middle. My bestest friend has quite an extensive bead stash. Seriously she could open up a bead store with all the beads she has on hand. And I'm pretty sure she has a super secret squirrel stash out there that she is hiding from me too! So yeah. Lots of beads.
I was fairly certain that she had some brown and amber beads roughly the same size as the ones on the earrings. I knew I had seen them the last time I visited with her beads. My memory served me correctly. A few bends of wire here and there and Viola! Fixed earrings. Yay!
Now some of you particularly nitpicky people might say, oh that bead in the middle doesn't exactly match the other bead in the middle. For some reason the flash on my camera lights up the new bead differently than the old one. Trust me, in regular non-flash induced light, they are nearly identical. Besides when I'm gonna wear them they are going to be on either side of my head, not side by side like they are now. And if anyone is looking at me THAT closely to care about that, well let's say they have some serious problems.
The thing about these earrings, if you look very closely you will see the earring on the left has a bead missing from the second loop from the left, and the one on the right is missing the bead in the middle.
 My bestest friend has quite an extensive bead stash. Seriously she could open up a bead store with all the beads she has on hand. And I'm pretty sure she has a super secret squirrel stash out there that she is hiding from me too! So yeah. Lots of beads.
I was fairly certain that she had some brown and amber beads roughly the same size as the ones on the earrings. I knew I had seen them the last time I visited with her beads.
 My memory served me correctly. A few bends of wire here and there and Viola! Fixed earrings. Yay!
Now some of you particularly nitpicky people might say, oh that bead in the middle doesn't exactly match the other bead in the middle. For some reason the flash on my camera lights up the new bead differently than the old one. Trust me, in regular non-flash induced light, they are nearly identical. Besides when I'm gonna wear them they are going to be on either side of my head, not side by side like they are now. And if anyone is looking at me THAT closely to care about that, well let's say they have some serious problems.
Thursday, June 9, 2011
Thankful Thursday 22.11
1. Collecting shells at the river with Blockette.
2. Blockette singing a song she made up about how God made the mantle and inner and outer core.
3. Blockette entertaining herself for hours by writing a story on the computer.
4. My new Keyboard. (Ok so I said this one last week, but I'm extra thankful because of number 3 above.)
5. Blockette playing with the neighbor boy in the tent we borrowed.
6. Mrblocko put up the tent without my help.
7. The hummingbird briefly in the garden.
8. Blockette singing her heart out in church.
9. Emails from my mom.
10. Blockette reading the word Hobgoblin as Hobble-goblin.
11. Hand-me-downs.
12. An unexpected day to myself.
13. Blockette was insanely well behaved at the church meeting I had to drag her to.
14. Blockette stopped herself, unprompted before she did something that would have gotten her into big trouble.
Wednesday, June 8, 2011
Caramel Banofee Pie
I am not a big fan of bananas. Ever since I was pregnant with Blockette the smell and texture just does not agree with me. However, if you freeze the banana and smother it in something gooey and delicious...count me in.
Caramel Banoffee Pie from a Blogable Life most definitely fits into that category. Dulce de leche makes EVERYTHING better. Even bananas. I used up my last jar of dulce de leche to make this happy little fella. Oh was it ever worth it. The caramel is sooooo good, I didn't even care about the bananas.
The recipe says to make your own whipped cream. I didn't feel like doing that so I just used cool whip. I happen to like cool whip. Let me say it again. I LIKE COOL WHIP. I'm trashy that way. Go ahead and revoke my foodie card. It's not the first time, and it won't be the last.
This dish could be really labor intensive or a quick super cheater extravaganza. Yes, you could make your own crust, whipped cream, dulce de leche, and crush up your own heath bars and feel proud at your make it from scratchy-ness. OR, you could buy a premade graham cracker crust, a can of dulce de leche, cool whip and a bag of heath bits. I think I fell somewhere in the middle on this one, making my own crust, and ddl, but using cool whip and heath bits.
This pie got a double thumbs up from the whole family. I made this the last time my mom came to visit. I think she enjoyed it too. At least she was nice enough to eat a piece at every meal until the pie was gone. Oh the sacrifices a mother endures for her daughter!
Luscious Caramel Banana {Banoffee} Pie from a Blogable Life
1 (approximately 5 ounce) packet graham crackers, crushed (about 1 & 2/3 cups in total)
1/4 granulated sugar
1/4 cup plus 2 tablespoons unsalted butter, melted
1 (14 ounce) can sweetened condensed milk
3 ripe bananas
1 cup heavy whipping cream
1/4 cup sifted powdered sugar
2/3 cup Heath English Milk Chocolate Toffee Bits (more or less to taste)
to make the 9-inch graham cracker crust: Preheat oven to 350 degrees F. Combine crushed graham crackers, granulated sugar and melted butter; mix well. Firmly press crumb mixture evenly over the bottom and sides of a 9-inch pieplate. Bake crust at 350 degrees F for 7-9 minutes. Remove pieplate from oven and allow crust to cool.
to make the caramel filling: Preheat oven to 425 F. Pour sweetened condensed milk into another 9-inch pieplate. Cover entire pieplate tightly with aluminum foil. Using a jelly roll pan, fill pan with about 1/4-inch of water, then set foil-wrapped pieplate in center of pan (to create a water bath) and place in a preheated 425 degree F oven. Bake for approximately 1 hour and 20-30 minutes, or until condensed milk is thick and caramel colored (adding hot water to pan as needed). When done, remove pan from oven, remove foil from pieplate, and set aside to cool slightly.
to make the pie: Thinly slice 3 bananas (into about 1/8" slices) caramelized milk over bananas. Cool at least 30 minutes, up to 1 hour. Using an electric mixer, beat heavy whipping cream until foamy; gradually add powdered sugar, beating until soft peaks form. Spread whipped cream over caramel layer. Top with a generous sprinkling of Heath English Milk Chocolate Toffee Bits. Carefully wrap the pie with plastic wrap (so as not to smash the pie) and place in the refrigerator to chill at least 3 hours before serving.
Caramel Banoffee Pie from a Blogable Life most definitely fits into that category. Dulce de leche makes EVERYTHING better. Even bananas.
I used up my last jar of dulce de leche to make this happy little fella. Oh was it ever worth it. The caramel is sooooo good, I didn't even care about the bananas.The recipe says to make your own whipped cream. I didn't feel like doing that so I just used cool whip. I happen to like cool whip. Let me say it again. I LIKE COOL WHIP. I'm trashy that way. Go ahead and revoke my foodie card. It's not the first time, and it won't be the last.
This dish could be really labor intensive or a quick super cheater extravaganza. Yes, you could make your own crust, whipped cream, dulce de leche, and crush up your own heath bars and feel proud at your make it from scratchy-ness. OR, you could buy a premade graham cracker crust, a can of dulce de leche, cool whip and a bag of heath bits. I think I fell somewhere in the middle on this one, making my own crust, and ddl, but using cool whip and heath bits.
This pie got a double thumbs up from the whole family. I made this the last time my mom came to visit. I think she enjoyed it too. At least she was nice enough to eat a piece at every meal until the pie was gone. Oh the sacrifices a mother endures for her daughter!
Luscious Caramel Banana {Banoffee} Pie from a Blogable Life
1 (approximately 5 ounce) packet graham crackers, crushed (about 1 & 2/3 cups in total)
1/4 granulated sugar
1/4 cup plus 2 tablespoons unsalted butter, melted
1 (14 ounce) can sweetened condensed milk
3 ripe bananas
1 cup heavy whipping cream
1/4 cup sifted powdered sugar
2/3 cup Heath English Milk Chocolate Toffee Bits (more or less to taste)
to make the 9-inch graham cracker crust: Preheat oven to 350 degrees F. Combine crushed graham crackers, granulated sugar and melted butter; mix well. Firmly press crumb mixture evenly over the bottom and sides of a 9-inch pieplate. Bake crust at 350 degrees F for 7-9 minutes. Remove pieplate from oven and allow crust to cool.
to make the caramel filling: Preheat oven to 425 F. Pour sweetened condensed milk into another 9-inch pieplate. Cover entire pieplate tightly with aluminum foil. Using a jelly roll pan, fill pan with about 1/4-inch of water, then set foil-wrapped pieplate in center of pan (to create a water bath) and place in a preheated 425 degree F oven. Bake for approximately 1 hour and 20-30 minutes, or until condensed milk is thick and caramel colored (adding hot water to pan as needed). When done, remove pan from oven, remove foil from pieplate, and set aside to cool slightly.
to make the pie: Thinly slice 3 bananas (into about 1/8" slices) caramelized milk over bananas. Cool at least 30 minutes, up to 1 hour. Using an electric mixer, beat heavy whipping cream until foamy; gradually add powdered sugar, beating until soft peaks form. Spread whipped cream over caramel layer. Top with a generous sprinkling of Heath English Milk Chocolate Toffee Bits. Carefully wrap the pie with plastic wrap (so as not to smash the pie) and place in the refrigerator to chill at least 3 hours before serving.
Tuesday, June 7, 2011
Peanut Butter Quick Bread
Look at my delicate flower of a child. Look at how she is attempting to cram an entire slice of peanut butter bread into her wee little mouth.  Well, I can't really blame her. The bread was just THAT good. This creation from Eat, Live, Run really does taste like a slightly less sweet peanut butter cookie in bread form. I didn't even know that was possible! It's like a quick bread miracle!
 I was very happy at how nicely the bread rose. The loaf came out of the oven with a beautifully rounded top. This rarely happens with any type of bread for me, especially not with quick bread.
The inside of the bread very soft and quite crumbly. This is both good and bad. The crumbly nature of the bread is similar to the crumbly nature of my favorite kind of peanut butter cookie. This is a very good thing. Sadly, this bread is so crumbly, it makes it quite hard to spread Nutella on. And that my friends, is a very very bad thing. I guess I'll just have to eat my Nutella off the spoon!
Peanut Butter Sandwich Bread from Eat, Live, Run makes 1 loaf
3/4 cup chunky peanut butter
1/2 cup sugar
1 1/2 cups milk
2 cups flour
1 tsp cinnamon
1 tsp salt
1 T baking powder
Preheat oven to 350 degrees and grease a loaf pan well. Cream together the peanut butter and sugar until well combined. In another bowl, combine the flour, baking powder, salt and cinnamon. Set aside.
With the mixer running on low, slowly alternate between adding the milk and the dry ingredients. Mix until smooth. Pour batter into greased loaf pan and bake for one hour. Let cool in pan for 10 minutes before turning out on a wire rack and cooling completely.
Well, I can't really blame her. The bread was just THAT good. This creation from Eat, Live, Run really does taste like a slightly less sweet peanut butter cookie in bread form. I didn't even know that was possible! It's like a quick bread miracle!I was very happy at how nicely the bread rose. The loaf came out of the oven with a beautifully rounded top. This rarely happens with any type of bread for me, especially not with quick bread.The inside of the bread very soft and quite crumbly. This is both good and bad. The crumbly nature of the bread is similar to the crumbly nature of my favorite kind of peanut butter cookie. This is a very good thing. Sadly, this bread is so crumbly, it makes it quite hard to spread Nutella on. And that my friends, is a very very bad thing. I guess I'll just have to eat my Nutella off the spoon!
Peanut Butter Sandwich Bread from Eat, Live, Run makes 1 loaf
3/4 cup chunky peanut butter
1/2 cup sugar
1 1/2 cups milk
2 cups flour
1 tsp cinnamon
1 tsp salt
1 T baking powder
Preheat oven to 350 degrees and grease a loaf pan well. Cream together the peanut butter and sugar until well combined. In another bowl, combine the flour, baking powder, salt and cinnamon. Set aside.
With the mixer running on low, slowly alternate between adding the milk and the dry ingredients. Mix until smooth. Pour batter into greased loaf pan and bake for one hour. Let cool in pan for 10 minutes before turning out on a wire rack and cooling completely.
Monday, June 6, 2011
'11 Happy Dance #7: Cat Carrier
No, it's NOT a mailbox. It sorta looks like one though. It's a cat carrier for Blockette's little stuffed cat named Harley. (And any other cat toy that she can jam in there.) Although, it's a bit of a tight squeeze for him/her, (Harley changes gender according to Blockette's whim,) so I'm not entirely sure how many more creatures could fit inside there.
  I found the idea for the toy kitty carrier at Pink and Green Mama. Although, the one she made looks a bit more structurally stable. Pink and Green Mama's little girl has much smaller kitty plushies, so the carrier she made was quite a bit smaller than the one I made for Blockette.
Originally, I had wanted to make the carrier bigger, but the plastic mesh needlepoint canvas just wouldn't retain it's shape the way I wanted it to. Even at the size it is now, sometimes the thing gets mangled into a weird shape if you don't set it down right and occasionally the door sits peculiarly. I'm OK with the carrier's wonkiness, because Blockette seems to really enjoy it flaws and all.
 It's a cat carrier for Blockette's little stuffed cat named Harley. (And any other cat toy that she can jam in there.) Although, it's a bit of a tight squeeze for him/her, (Harley changes gender according to Blockette's whim,) so I'm not entirely sure how many more creatures could fit inside there.
  I found the idea for the toy kitty carrier at Pink and Green Mama. Although, the one she made looks a bit more structurally stable. Pink and Green Mama's little girl has much smaller kitty plushies, so the carrier she made was quite a bit smaller than the one I made for Blockette.
Originally, I had wanted to make the carrier bigger, but the plastic mesh needlepoint canvas just wouldn't retain it's shape the way I wanted it to. Even at the size it is now, sometimes the thing gets mangled into a weird shape if you don't set it down right and occasionally the door sits peculiarly.
 I'm OK with the carrier's wonkiness, because Blockette seems to really enjoy it flaws and all.
Saturday, June 4, 2011
Failed Resurrection Rolls
Hey everyone, I'm already up to Easter in my horrendously backlogged list of things I made and need to blog about. Yay! Really it's OK because Easter came late this year. You buying that? No? Fine then. Be that way!
Around and leading up to Easter I kept seeing blog entries about these "Resurrection rolls." The concept is that you wrap crescent roll around a large marshmellow. In the cooking process the marshmellow melts, leaving an empty interior to your crescent roll.
Blockette and I made these together and talked about how the Marshmellow was like Jesus and the crescent roll was like his shroud. I explained that the little rolls were like Jesus inside his tomb and something magical was going to happen once they had cooked.
This is what my rolls looked like before they went into the oven. Pretty neat eh
Here is what they looked like when they came out of the oven. Um yeah.
Not so miraculous. I told Blockette what was supposed to have happened, that the marshmellows were supposed to melt and the crescent rolls were supposed to be empty like the Jesus' grave at Easter. We talked about the whole thing some more and came to the conclusion that our Resurrection rolls still "worked" for Easter because the "tombs" couldn't hold Jesus so they split open. Yeah it's a stretch but hey, let's roll with the punches shall we?
So why didn't this work? I blame it on all the chemicals in the marshmellows. The preservatives just don't let the marshmellow melt. Period. If they don't melt in hot chocolate, then they aren't going to melt in the oven. I may give this another try the next time I make marshmellows from scratch. I have a feeling they would melt quite nicely.
If you'd like see if you have more success making Resurrection rolls, I used the recipe over at The Family Kitchen. Please let me know if you have better luck than I did!
Resurrection Rolls from Family Kitchen
1 can of refrigerated crescent rolls
8 large marshmallows
2-3 tablespoons unsalted butter – melted
1/4 cup cinnamon sugar
Preheat oven to 350 F. Unroll crescent roll triangles and place them on a rimmed cookie sheet that has been lined with a silpat {or other silicone mat}. Dip marshmallow into melted butter and then roll all sides in cinnamon sugar. Place covered marshmallow on the widest end of crescent roll. Roll crescent roll over marshmallow, making sure that it’s sealed on all sides{otherwise the marshmallow will leak}. Place on baking sheet. Continue until all are complete. Bake for approximately 10-12 minutes OR until golden. Allow rolls to cool for 1-2 minutes before serving.
Around and leading up to Easter I kept seeing blog entries about these "Resurrection rolls." The concept is that you wrap crescent roll around a large marshmellow. In the cooking process the marshmellow melts, leaving an empty interior to your crescent roll.
Blockette and I made these together and talked about how the Marshmellow was like Jesus and the crescent roll was like his shroud. I explained that the little rolls were like Jesus inside his tomb and something magical was going to happen once they had cooked.
This is what my rolls looked like before they went into the oven. Pretty neat eh
Here is what they looked like when they came out of the oven.
Um yeah.Not so miraculous. I told Blockette what was supposed to have happened, that the marshmellows were supposed to melt and the crescent rolls were supposed to be empty like the Jesus' grave at Easter. We talked about the whole thing some more and came to the conclusion that our Resurrection rolls still "worked" for Easter because the "tombs" couldn't hold Jesus so they split open. Yeah it's a stretch but hey, let's roll with the punches shall we?
So why didn't this work? I blame it on all the chemicals in the marshmellows. The preservatives just don't let the marshmellow melt. Period. If they don't melt in hot chocolate, then they aren't going to melt in the oven. I may give this another try the next time I make marshmellows from scratch. I have a feeling they would melt quite nicely.
If you'd like see if you have more success making Resurrection rolls, I used the recipe over at The Family Kitchen. Please let me know if you have better luck than I did!
Resurrection Rolls from Family Kitchen
1 can of refrigerated crescent rolls
8 large marshmallows
2-3 tablespoons unsalted butter – melted
1/4 cup cinnamon sugar
Preheat oven to 350 F. Unroll crescent roll triangles and place them on a rimmed cookie sheet that has been lined with a silpat {or other silicone mat}. Dip marshmallow into melted butter and then roll all sides in cinnamon sugar. Place covered marshmallow on the widest end of crescent roll. Roll crescent roll over marshmallow, making sure that it’s sealed on all sides{otherwise the marshmallow will leak}. Place on baking sheet. Continue until all are complete. Bake for approximately 10-12 minutes OR until golden. Allow rolls to cool for 1-2 minutes before serving.
Friday, June 3, 2011
Dino-tastic
 We bought this for my husband's best friend's son's 5th birthday. I thought it was the perfect gift coming from us. I still giggle every time I see the box.
Thursday, June 2, 2011
Thankful Thursday 21.11
1. Blockette having fun playing in the muddy mud.
2. Getting the mud out of her pants in the wash.
3. Winging it in the kitchen. (Look ma' no recipes!)
4. Figuring out exactly what the teacher told Blockette. (Amazing how things get distorted through kids.)
5. Walking Blockette to school.
6. Finding some time to craft.
7. Mrblocko cleaned the maple seeds out of the gutters.
8. Fresh herbs from the garden.
9. The cilantro I thought I killed when I brought it home from the store is thriving in the spot I planted it.
10. My swanky new keyboard that actually has letters on it.
11. That loud woodpecker, cause he is eating bugs when he makes all that noise.
Wednesday, June 1, 2011
May Reads
1. Theodosia and the Last Pharaoh by R.L. LaFevers. This is the fourth book in the Theodosia series. This is such a fun children's series. The main character is a girl (now 12) who lives in Victorian England with her archaeologist parents. Theodosia has a peculiar gift of being able to detect Egyptian curses. In this book she travels to Egypt with her mother to fight dark forces, unbeknownst to her mother. One of the things I love about this series, aside from how well it's written, is how Theodosia is so accurately portrayed as a young girl. She gets appropriately, scared, homesick, frustrated with adults, and frequently is trusting of the wrong people. It just makes the main character very likeable and real.
2. Daughters of Rome by Kate Quinn. This is the prequel to Mistress of Rome. There is some minor overlap of characters between the two books, but they could each be stand alone books. You wouldn't need to read either one to have the other make sense. The characters in Mistress of Rome seemed to be better developed than the sequel. Overall, the book was an enjoyable read though especially if you like historical fiction about ancient Rome.
3. Allison Hewitt is Trapped: A Zombie Novel by Madeleine Roux. Zombies. In. A. Book store. Awesome! Plus the story is told though Allison's postings on her Blog. It's like this book was written specifically for me. The only thing that could have made this book better was if Harry Potter himself came flying in on a magic rainbow farting unicorn to save the day.
4. The Thirteenth Child by Patricia C. Wrede. I thought this book was a refreshing change of pace from the normal fantasy books I read. It takes place in an alternate reality where magic exists, and is set in post civil war America. Most of the locations in the book have alternate titles which I thought it was fun to try to figure out the corresponding name in this reality. I'm geeky that way. When this book first came out the author got a lot of flack for not including Native Americans in her world. She stated that she didn't include them because she was afraid she was going to pigeon hole them into negative stereotypes. This only caused people to be outraged because they felt if she couldn't write about them other than their stereotypes then the author must place some merit in the stereotypes. I think she was damned either way. People would have complained about how she portrayed Native Americans had they been included in the story. As for the story itself, it reminds me a lot of the Little House on the Prairie. A lot of story telling about everyday life and the people that live it. This is different from most fantasy writing as there is no huge quest to defeat a villain. I enjoyed this, but hard core Fantasy readers might find the story dull since it doesn't contain the action packed adventures that often draw them to this particular genre.
5. The Neddiad: How Neddie Took the Train, Went to Hollywood, and Saved Civilization by Daniel Pinkwater. I read the very weird Adventures of a Cat Whiskered Girl a while ago. The Neddiad is the first book in that trilogy. (Cat Whiskered Girl being book 3) Reading this book didn't help me make any more sense of Cat Whiskered Girl. That book was just straight up weirdness. This book is slightly less weird. It is set in post World War II Hollywood. The main character, young Neddie comes to obtain this magic sacred turtle and winds up having to save the world with it. The book is written as a journal of his adventures. The title of the book is a play on The Illiad, which just adds to its silly peculiarity.
6. The Yggyssey: How Iggy Wondered What Happened to All the Ghosts, Found Out Where They Went, and Went There by Daniel Pinkwater. This is book 2, the sequel to The Neddiad. Neddie's friend, Yggdrasil, or Yggy, um "wonders what happened to all the ghosts, finds out where they went and goes there herself." So yeah, the title is pretty self explanatory. Oh and no body remembers what happened in the first book! Even the journal that Neddie wrote is mysteriously missing. Another strange ride of a story, but still, not as crazy as Cat Whiskered Girl.
7. Night of the Living Trekkies by Kevin David Anderson. OK, so I thought there couldn't be a better Zombie book for me than one about a Girl in a Bookstore who blogs about her escapades. Then I found this gem. Zombies at a Star Trek convention. Awesomesauce! Each chapter is named after a Trek episode. There are all sorts of nods to all the different "Trek"s, including the short lived cartoon. There are also a lot of Star Wars references and a brief little joke about South Park. (It's at the end so wait for it.)
8. The Candy Shop Wars by Brandon Mull. I think at one time or another every kid wishes they had magical candy. The main characters come across a candy store owner who gives them this seemingly wonderful gift. The candy comes with strings attached though. Our heroes (and heroine) have to make the choice whether or not the powerful treats are worth the price. This is a fun read especially for kids around the 5th grade, or those with the mentality of a 5th grader!
9. Secret History of Elizabeth Tudor, Vampire Slayer by Lucy Weston. Queen Elizabeth, Gloria Regina herself, is descended from Morgaine le Fay of the Arthurian legends. QE discovers that through this familial line, she herself is a Vampire Slayer, and the head vampire is none other than Arthur's son Mordred. Oh, and did I mention that this is written in the style of a journal recovered from a fire by Lucy Weston. Lucy Weston, more commonly known as Lucy Westenra, Mina's best friend who is turned into a werewolf in Bram Stroker's Dracula. Lucy's even got her own facebook page. With all that going on, how could I not love the story? It was a little slow going at first, but it picks up speed quickly. The ending leaves ample room for a sequel, which I will be anxiously awaiting.
10. The Unicorn's Tale by R. L. Lafevers. This is the 4th book in the Beastologist series. This time Nate must help a unicorn that has become mysteriously ill. There is a slight ray of hope that his parents may still be alive, which I will ruin by telling you that it is all but shattered at the end. I love this children's series a lot. Mrblocko has started reading it with Blockette and they are thoroughly enjoying it. My favorite character by far is Greasle. She's a little gremlin. (Think WWI messer-upper of airplane engines, not the bizarre things from the 80's movie.) Greasle is cute and spunky and never fails to crack me up.
Subscribe to:
Posts (Atom)