Monday, May 31, 2010

Orange Glazed Cedar Plank Salmon

Slowly but surely, I'm starting to find fish not so disgusting. I would go so far as to say the grilled salmon my husband made was even delicious. He got some cedar grill planks for Christmas and this was the first time the planks got used.

I forgot to take a picture of the salmon off the grill. The recipe was from the packaging on the Fire and Flavor grill planks. There was even a picture of the salmon on the front of the packaging, so I took a picture of the packaging to give you an idea of what the finished fish dish looked like.

There was hardly any fishy taste to this at all. The cedar plank does a good job of covering that up. We'll definitely be making this again over the summer.

Fire and Flavor's Orange glazed salmon
3 T Dijon mustard
3 T maple syrup (the real stuff, or it won't caramelize properly)
1 T balsamic vinegar
2 tsp orange zest
4 6oz salmon fillets
1 cedar plank soaked for 1 hour

Preheat grill to medium-low heat, about 350F. Combine mustard, syrup, vinegar and zest in a small bowl. Season salmon with salt and pepper. Brush fish with glaze. Place soaked plank on grill. Close lid and heat for 3 min. Flip plank with tongs and place salmon on heated side of plank. Close lid and grill for 12-15 minutes until fish is cooked to your liking. Remove plank from grill and serve.

Thursday, May 27, 2010

Thankful Thursday 12

1. Blockette finally understanding the concept of stearing her bike.
2. Air conditioning.
3. The cats' clean bill of health from the vet.
4. Homemade popcicles.
5. Blockette's latest meltdown wasn't half as bad as her previous one.
6. Mother's Day Do-overs.
7. Unexpectedly making leftovers into an additional meal.
8. Watching Blockette splash in puddles after a rainstorm.

Wednesday, May 26, 2010

Fresh Broccoli Salad, Part 2: Electric Bugaloo

I wrote about Alton Brown's Fresh Broccoli Salad in August of last year. I'm just only now getting around to making it again. Who knows why. We really liked it the first time. I guess I must have just forgotten about it. Now that the weather is getting nicer, we've moved from soups to salads as a big part of our dinners.

This time I used toasted hazelnuts instead of pecans. I liked the hazelnuts better than the pecans. Of course that is probably because aside from my husband and daughter, hazelnuts are my favorite nut!

I still thought the dressing was overly acidic, even though I used a heaping Tablespoon of Dijon mustard instead of 2 teaspoons. Maybe I need to use a different vinegar, balsamic or red wine perhaps? I may also try honey mustard instead of Dijon mustard. It could be that the dressing needs more sweetness to balance the acid from the vinegar and lemon.

While eating the leftovers, I got to thinking about the sweetness of this dish. I wondered if adding craisins would do the trick. I still think the dressing needs to be sweeter because the acidity seemed to increase the tartness of the dried cranberries. While craisins are tart, they are mostly sweet, but in this dish I could barely taste their sweetness.

Don't get me wrong, the salad is good, delicious in fact, but it still needs a slight tweaking in my opinion. I must add that my mom and husband both thought this dish was fine as is. That was most likely due to the fact that they actually ate the tomatoes in the dish. The grape/cherry tomatoes do their job in providing the necessary sweetness. Since I'd rather not eat raw tomatoes, I need to find something else to balance the flavor of the salad.

Tuesday, May 25, 2010

Ditalini and Fennel Ragu

I'm having trouble remembering what I've made and written about on here. I thought I had written about todays post already, so I went through my previous posts searching for this recipe. I guess I'm imagining things, because I haven't written about Picky Palate's Ditalini Pasta in Beef and Fennel Ragu.Yeah, it is another one of those ugly but delicious red sauce dishes. It also makes a metric ton so unless you like to eat leftovers forever/have a large family of big eaters, be prepared to half the recipe or freeze it. I made a full batch and froze half, cause that's how I roll.

The first time I made this dish and froze the leftovers I was a bit leery. I thought the noodles might get gummy or chewy after defrosting. They didn't, and the defrosted leftovers were just fine. Even Blockette likes the leftovers.

Among the strange healthy foods Blockette likes to eat, Fennel is one of them. Until I made this ragu, I'd only ever had the seeds and fronds of the fennel. I'd never had the bulb-y white part. I have to admit I was a bit reluctant to test it out. Yay! Add another veggie to the list of those that everyone in the family will eat

This time around I added finely chopped button mushrooms. Normally, I'd quarter them, but Blockette doesn't like mushrooms. I thought I'd try to be sly and sneak them in. She noticed them, but only after she had eaten almost her entire bowl of dinner. She tried to be disgusted and refuse to eat the rest of her meal.

I asked her if she thought her dinner was tasty. She stopped and thought for a minute and agreed that she indeed had enjoyed the food that she had just eaten. I then reminded her that she had been eating mushrooms the whole time. She thought again and said, "Well, maybe I DO like mushrooms." Mark one down for sneaky moms!

Ditalini Pasta In Beef and Fennel Ragu from Picky Palate
8 oz Ditalini Pasta
2 Tablespoons extra virgin olive oil
1 medium onion, finely chopped
1 bulb of fennel, thinly sliced
Pinch of salt
1 lb lean ground beef
Pinch of salt, pepper, garlic seasoning
26 oz favorite homemade or store bought pasta sauce
8 fresh basil leaves, chopped into chiffonade, thin ribbons

Prepare pasta according to package directions. Drain and set aside. Heat the oil in a large sauté pan over medium heat. Saute onion, fennel and salt for 3-5 minutes or until softened. Stir in beef, salt, pepper and garlic seasoning; cook until browned. Stir in pasta sauce, basil leaves and cooked pasta. Season to taste. Simmer on low until ready to serve.

8 servings

Monday, May 24, 2010

Lava Flow in the Congo

When I saw this recipe for congo bars on Bakerella I knew I just had to make it. Originally, I had thought I was going to make it for my uncle in exchange for plants, but he forgot to give them to my mom when she came up to visit. Well plbbbt I say! Actually, it was a good thing that I wasn't planning on giving these bars to him. They turned out...well...not how I intended.

I baked the bars for 35 minutes, 5 minutes more than the recipe stated. The recipe also said to be sure not to over cook the bars. I thought that the center didn't look 100% set, but I figured it would firm up as it cooled.

After letting the bars cool for nearly 2 hours, I began to cut portions to my family. Excuse me, did I say cut? I meant scoop. The middle was a ooey gooey mess. A delicious ooey gooey mess. It was very much like a chocolate chip version of lava cake. We all happily consumed what was placed in front of us.

Had these been baked in individual ramekins there would not have been any issue. However, I baked mine in a 9x13 dish. The row of "bars" that I removed from the pan caused the rest of the gooey middle to ooze into the now unoccupied section of the pan. How was I going to store the leftovers? Not in our bellies! These bars were sweet and a second helping would have made us sick. So, back into the oven the bars went. For ANOTHER 35 minutes.

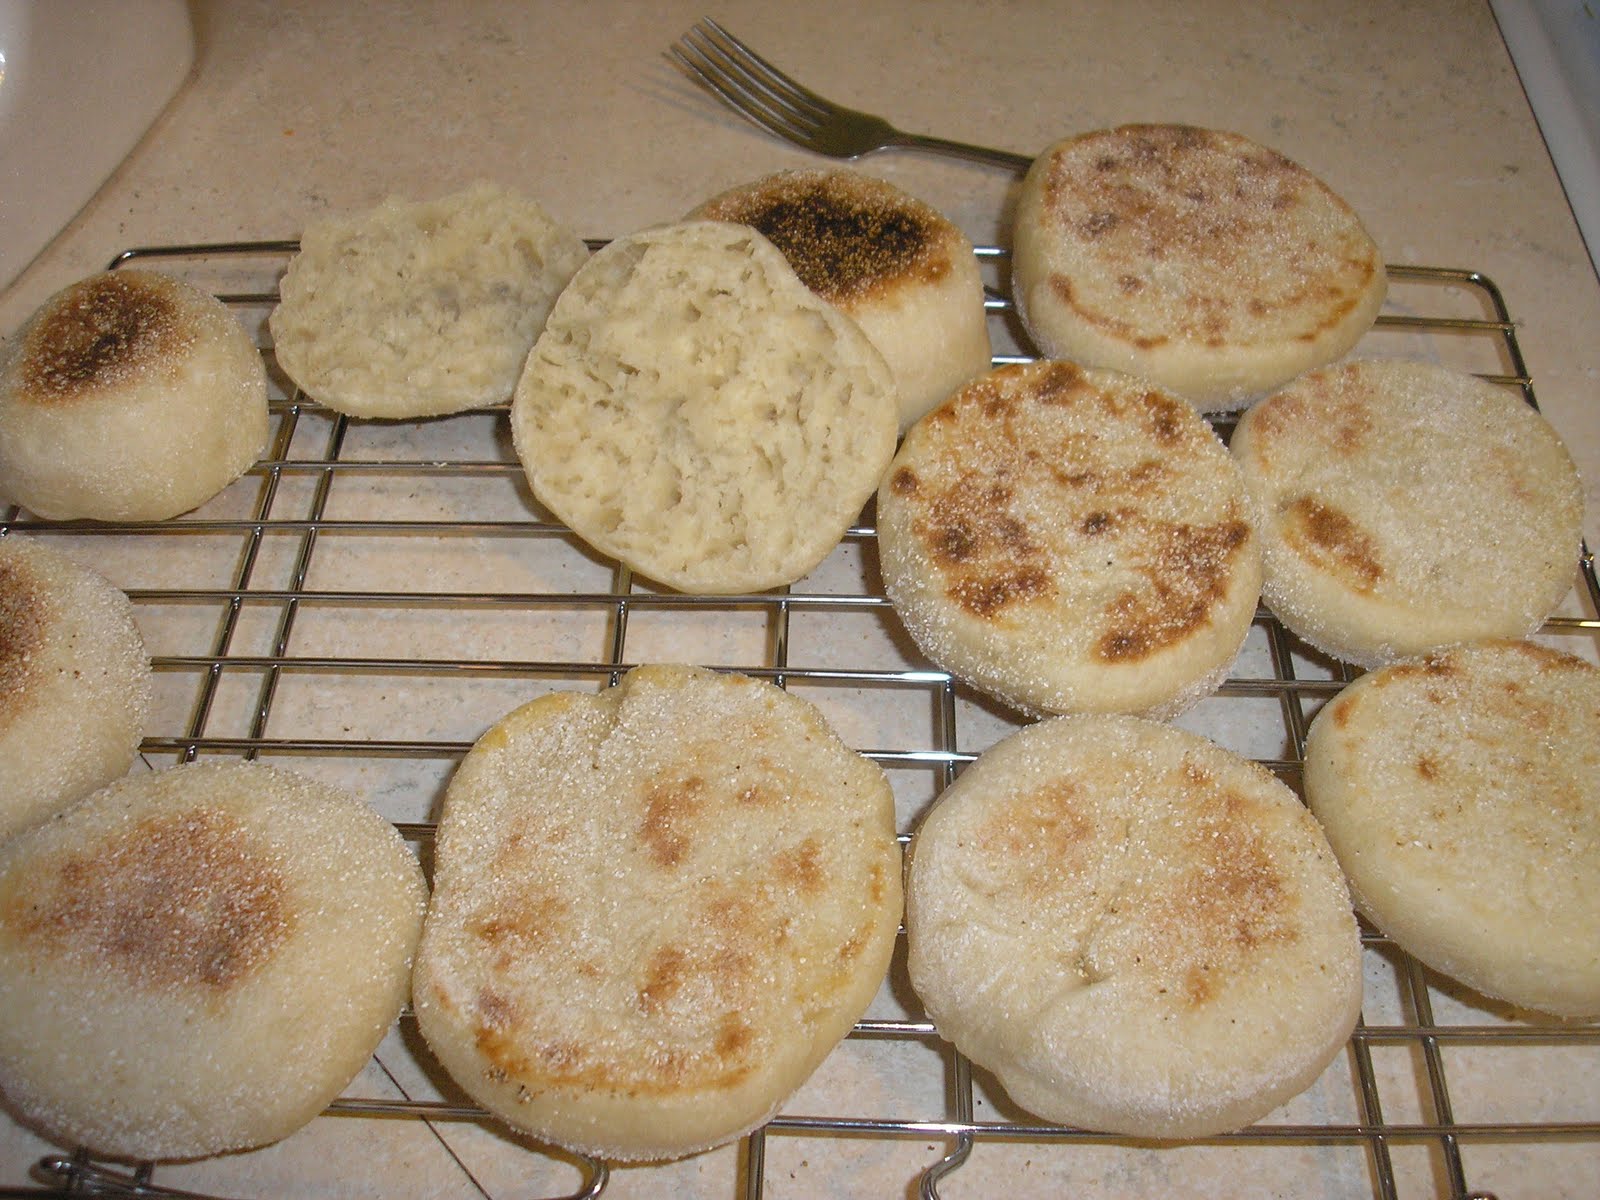
Here is what the bars looked like after they came out of the oven the second time:
You can hardly tell where the missing row was. The edges and the oozy overflow were considerably more crunchy than the middle, but not so hard that you'd break a tooth attempting to chomp on it. The middle was the best part, but I didn't hear anyone complaining about eating an edge piece once all the middle pieces were gone.

My mom did say that she thought they were the best that first day in there lava state. I told her that I would eat her portion if she didn't think the bars were good. She protectively pulled her plate closer to her and made a wall with her hands to hide her dessert from me. I'm not sure if she said anything cause she was so busy shoving bar into her gob.
So what went wrong?

The original recipe said that you need a pound of brown sugar. A. Pound. Of Brown Sugar. Ok, so I don't have a scale and I buy my brown sugar in the 4 lb bag. Someone commented on Bakerella's site that she uses 2 1/4 c of brown sugar when she makes her congo bars. I went with that.

Mrblocko thought maybe there was too much brown sugar. I did some research and found out that a pound of brown sugar is the equivalent to 2 1/3 c packed brown sugar. I highly doubt that less brown sugar would have made it more viscous.

Could it be the amount of chips used? I had a bunch of partial bags of chips in the pantry that I wanted to use up. I wound up using 3 cups of a combination of: toffee, semi sweet, butterscotch and caramel chips. The recipe says to use 2 cups of chips and a cup of nuts. But chips stay fairly solid while baking and don't become a part of the batter. The chips may melt but they stay where they are for the most part.

Was it my oven? I don't think so. Everything else I've baked recently has been cooked in the specified time listed in the recipe.

The only other thing I can think of was that the bars were baked in a glass pan. In the past I've had to increase baking times because I used a glass pan, but I've never had to double the baking time before. I read all the comments on Bakerella's site and it seems like I'm not the only one who had a problem getting the bars to solidify.

At first, I vowed that I would never make this dessert again. Now that the bars are all gone, I must be in withdrawal. Even though it's a million degrees out with 400% humidity, I have this strange desire to make another batch in a metal pan. I'm quite curious to see if the glass pan was the culprit.

Congo Bars from Bakerella
2 3/4 cup all purpose flour
2 1/2 teaspoons baking powder
1/2 teaspoon salt
2/3 cup butter, softened
1 lb. light brown sugar (Oh my and thank you!)
3 eggs
1 teaspoon vanilla
11.5 ounce package milk chocolate chips
1 cup chopped pecans (optional)

By mixer:
Sift flour, baking powder and salt in a large bowl. Set aside. Combine butter and sugar using a mixer until blended. Add eggs, one at a time to sugar mixture, mixing on low in between each addition. Add vanilla and mix. Add flour and mix until combined. Stir in chips and then pecans.

By hand:
Sift flour, baking powder and salt into a large bowl. Set aside.Stir brown sugar into softened (not melted) butter in another large bowl until butter disappears. You can use the back of your spoon to help incorporate the two together. Add eggs one at a time to butter mixture and stir well after each egg. Add vanilla, chocolate chips and nuts. Mix well. Add dry flour mixture and stir until well combined.

Coat a 13 X 9 pan with non-stick spray and spread batter evenly into dish.
Bake at 350 degrees for 30 minutes or until top is golden brown. Make sure you don’t over bake.

Thursday, May 20, 2010

Thankful Thursday 11

How did it get to be Thursday already??? I really dropped the ball this week and forgot to be mindful of the everyday things I was thankful for. This is the 11th week I've been doing Thankful Thursday so I suppose one slip up in almost 3 months isn't too bad.

Oh, I've just thought of one thing as I'm writting this: The big black ants are only ants, not scorpions, wasps or tarantulas.

Wednesday, May 19, 2010

Grilled Pinata Rolls

How is this for fusion food? Chicken empanadas wrapped in an egg roll. Yeah. I don't even know what you call that. Span-sian? Asia-ish? Does it even matter? Nope. At least not to us Blockos. I found this recipe for Chicken empanadas with olives and raisins about two years ago over at the Gourmet Girl's blog. The original recipe isn't for a traditional empanada, but for an empanada styled appetizer using wonton/gyoza skins. In the past, that's how I've always made them.

This time, I saw egg roll wrappers sitting next to the wonton wrappers at the grocery store. That lazy girl in me said, "You'd fit more filling inside an egg roll. That means less wrapping, frying and fuss in the kitchen." That lazy girl would have did a little dance of joy, but well, that's a lot of work and she IS lazy.

Then, when I was assembling the rolls Mrblocko said, "I bet I could cook those on the grill, and that would save time and be a little bit more healthy too." How awesome is that? I was a bit skeptical. I had visions of our dinner in a blackened charred lump. Luckily, my paranoia was unfounded. The egg rolls came off the grill with a crispy bubbly exterior. They even had nice neato looking grill stripes.

Blockette liked these a lot. Even though they had evil olives. I think she's starting to come around.

Try as she might, Blockette could not pronounce the word Empanada. Every time she tried it came out pinata. So that is their new fancy name.

Grilled Pinata Rolls
1-2 cooked chicken breast, diced into 1" cubes (you could use raw diced chicken and cook it with the onion if you wanted to save time. We had some chicken that was already grilled, so we used that.)
1-2 T olive oil
1 medium onion, chopped
3 cloves of garlic, chopped
1 heaping T tomato paste
2 tsp cumin
2 T chopped fresh cilantro
2 T chopped fresh parsley
1/3 c chopped pimento stuffed olives
1/3 c raisins ( we used half golden and half regular)
1/2 c white wine, white grape juice, or chicken stock
salt and pepper to taste
1 package of egg roll wrappers
olive oil to coat egg rolls

In a medium skillet cook onion until caramelized. Add garlic, cumin, chicken and tomato paste. Stir to combine. Add cilantro, parsley, olives and raisins. Saute til warm, about 3 min. Add wine/juice/stock to deglaze pan. Stir occasionally until all liquid is absorbed. Season with salt and pepper to taste. Set aside to cool. Once filling is cooled, add about 2 T of filling to egg roll skins. Fold and seal per package instructions. At this point you can pop these in the fridge until you are ready to grill. Once you are ready to grill, liberally brush each egg roll with olive oil to coat. Cook for five minutes on each side, on a low heat(about 325F), watching carefully so they don't burn. Serve with salsa, sour cream or guacamole for dipping.

One final note: The next time we make this we'll be adding a chopped up hard boiled egg to the mix and a bit of shredded cheese. There are so many other things you could add to these empanada egg rolls like cubed cooked potatoes, black beans, oregano, paprika, jalapenos, roasted peppers, rice, ground beef, mushrooms, cinnamon, nutmeg, cloves, peas, carrots, fish, or whatever strikes your fancy! There are so many different versions of empanadas, the possibilities are endless.

Tuesday, May 18, 2010

Why I hate May...

First, May is when the Cottonwood trees release their noxious white poison and I spend the month in allergy agony.

Second, it heralds the end of the school year. The end of the school year means a major change in the household schedule. If any of you know me well, you know my fondness for change. It makes me crabby and irritable. Oh that consistency could be my constant companion.

Third, May is also when my body decides to act like I have low blood sugar. I don't. Sometimes I think it would be easier if I did. Then at least I would know why I'm feeling the way I do. The doctors don't have a clue. My sugar levels are fine. My thyroid is fine. My iron levels are fine. My everything is fine. If everything is fine why do I feel like poop on a stick? And why does this mystery ailment rear its ugly head mid spring??? Why I ask you? Why?!!!

If I'm very careful and watch what I eat and drink. Things aren't so bad. That's the kicker...remembering that I gotta do that. I can't eat a big breakfast and expect to not feel awful by lunch. I have to eat a small breakfast and a larger snack and a small lunch and possibly a snack before dinner.

So I sat down with Mrblocko and thought of some new meal ideas. One of them was peanut butter on toast for a snack. Then the other day I thought, I bet that would be even more tasty on an English muffin.
Yes, I made those rounds of deliciousness myself. I found this particular recipe for English Muffins at Tasty Kitchen. They turned out pretty awesome for my first attempt.

I made only a few minor mistakes. When I separated the dough for the second rise I left the dough in balls. I should have flattened them out into disks. The muffins were a bit on the small side because I didn't understand that part of the recipe.

You can see 2 muffins at the top of the photo that are a bit darker than the others. I screwed up and overcooked the first batch on the griddle. That was a easily remedied situation. The next batch I watched them carefully and made sure not to space out at the stove!

These muffins even survived the freezer test. I stuck two in the freezer to see how they would taste defrosted, and they were just as nummy. Even Blockette gave them the thumbs up. She's asking me when I'm going to make some more. Guess I better get on that while the weather is still cold and dreary.

English Muffins from Tasty Kitchen
1 1/2 t dry active yeast
1 c warm water
1 3/4 c flour
1 T butter
1 T sugar
1 T salt
1/4 c cornmeal
oil to coat pan

Place yeast and warm water in bowl of mixer. Stir to dissolve. Let stand til foamy. Add flour, butter, sugar and slat to yeast. Mix ingredients til well blended. Turn dough out on floured surface. Knead 5 min til smooth. Shape dough into ball. Place in lightly greased bowl. Cover with plastic wrap. Let rise in warm place til doubled, 2 hrs. Fold dough gently over on itself in 3-4 places. Turn dough on lightly floured surface. Dived dough in 12 pieces. Shape into rounds. Place on pan dusted with cornmeal. Turn each muffin over to coat both sides with cornmeal. Cover. Let rise til risen slightly. 10 min. Preheat griddle over med. Brush lightly with old/shortening. Cook muffins til light brown, 5 min. Split by pulling apart with fork. Toast just before serving.

Monday, May 17, 2010

Thai Burgers

Hey it's a burger! So what. Big deal. This isn't just any burger, but a burger that incorporates a lot of flavors in Thai food. Num. Num. Gimme some!Ok, so this burger isn't for everyone. Say, like my best friend, who can't stand peanut sauces or cilantro. She would not like this burger. But, if you are among the majority who like peanut butter in any way shape or form, you are gonna love this dish.

Whenever possible, I get Mrblocko to do the burger mixing. I hate the squishy feel of raw meat. I'm not so grossed out that I can't handle raw meat. It's just like killing bugs. If there is someone else around that I can convince to do the job, I'm gonna utilize them.

Mrblocko said he thought the burgers were going to be nasty as he was making the patties. Peanut butter? In a burger? Ew. He was not afraid to admit he was wrong. All the flavors are very complimentary. There is a great balance of sweet from the peanut butter and brown sugar, spice from the ginger and red pepper flakes, and tangy from the lime and soy sauce.

You could omit the cilantro if you are a hater. I happen to love cilantro, and when it is added to all the flavors I mentioned above, it brings out that Thai food vibe. Sadly, my cilantro plant is still too wee to harvest. I had to use dried cilantro which isn't that great in my opinion. Fresh is best. Still, I'm glad I used the dried cilantro, rather than skipping that flavor note all together.

This burger is very moist so keep that in mind if you are grilling it. A gentle touch is needed when flipping. If we had our old grill, the burger would have fallen through the grate and been a nasty burnt mess. If your grill is temperamental, or you don't have one, the burgers could just as easily be cooked in a pan on the stove or under the broiler.

You can find the recipe for Thai-Style Burgers over at Cookie Baker Lynn.
1-1/2 lbs ground chuck
1/2 cup creamy or crunchy peanut butter
2 Tbsp sour cream
2 Tbsp soy sauce
1 Tbsp fresh lime juice
1 Tbsp minced fresh cilantro leaves
2 Tsp peeled and grated fresh ginger
2 tsp light brown sugar
1 tsp crushed red pepper
1/2 tsp fine sea salt
1/2 tsp finely ground black pepper
6 hamburger buns, grilled or toasted
Lettuce, sliced tomatoes, and sliced onions
Barbecue sauce of your choice

Prepare a medium-hot fire in your grill. Combine the beef, peanut butter, sour cream, soy sauce, lime juice, cilantro, ginger, brown sugar, red pepper, salt, and black pepper in a large bowl, blending well with your hands. Shape into six patties 1/2 to 3/4 inch thick. Place the burgers directly over the coals, cover and grill to your desired degree of doneness, 5 to 7 minutes for medium rare. Place the burgers on the buns ad top with lettuce, tomato, onion, and barbecue sauce.
Makes 6 servings.

Thursday, May 13, 2010

Thankful Thursday 10

1. The bad day has an end.
2. The bad day was followed by a better day.
3. The better day was followed by a good day.
4. There is chocolate in the house.
5. Remembering to put a granola bar in my purse.
6. The Dr said Blockette only has a cold.
7. My mom is coming to visit! Whoohoo!

Wednesday, May 12, 2010

Crack-a-chino Bars

I just found the blog Vanilla Sugar a few weeks ago. I was going through her archived posts and came across these espresso bars. I knew they had to be made immediately, and as luck would have it, I was going to visit my mother-in-law and promised to bring along some cookies. Bars are really just square cookies you portion out after baking. Right?

Hot damn these bars are good. I have dubbed them Crack-a-chino bars. They are my Kryptonite. I cannot eat just one. I made myself sick on these more than once. You'd think I'd learn. No. These bars suck out all my willpower. It's a good thing I left most of them with my mother-in-law. If left to my own devices, I'd render myself unconscious in a sugar coma, eating the entire pan in one sitting.

I made one tiny change to the recipe posted on the Vanilla Sugar blog. I used mini chocolate chips instead of regular sized chips. The author made a comment that next time she made the bars she'd use shaved chocolate instead of regular sized chips. Well, since I am lazy, shaving chocolate is too labor intensive. Mini chips seemed like the perfect solution, and they were.

The bars are good warm and cooled. The coffee flavor develops the longer they sit. Because of this, the bars are even better the next day. The trick is getting them to last that long. My mother-in-law thought these bars would be awesome crumbled over ice cream. I'm too much of a purist. I'd rather eat the whole pan all on it's own. Save that ice cream for later when I'm out of delicious bars.

Make these devils if you dare. You'll be sorry if you do and sorry if you don't!


Espresso Bars from Vanilla Sugar
To get really flat bars, I find it works best to smooth them over with an offset spatula, using gentle pressure, just after they come out of the oven and before you apply the glaze.

1 cup (2 sticks) butter, at room temperature
1 cup brown sugar, firmly packed
1 tbsp. instant coffee or espresso powder
1 tsp. vanilla extract
2 1/4 cups flour
1/2 tsp. baking powder
1/2 tsp. salt
1 t cinnamon
1 1/2 cups semisweet chocolate chips

Glaze
2 tbsp. milk
1-3 tbsp. butter
3/4 cup powdered sugar
1/4 tsp. cinnamon

Preheat the oven to 375 F. Line a 10×15" jelly roll pan with baking parchment or grease lightly. Cream butter, brown sugar, instant coffee, and vanilla. Blend in flour, baking powder, and salt. Last, stir in the chocolate chips by hand. The mix will be very crumbly, with barely enough dough to hold together the chocolate chips.

Use fingers, palms, and heels of your hands to press dough evenly into pan. If necessary, cover dough with wax or parchment paper and use a small rolling pin to flatten lumps. Bake 5 min, rotate the pan, and bake 5-10 min more or until the edges are just starting to brown (watch carefully). Cool in the pan 5 minutes before spreading with glaze.

Put all the ingredients for the glaze in a small saucepan on medium heat. Don’t leave this stuff! Find a whisk and stir until smooth and barely bubbly. Drizzle the glaze evenly over the bars and smooth out to the edges and corners with a rubber spatula. Cool until the pan is just warm to the touch and cut into bars with a sharp knife.

Tuesday, May 11, 2010

How I Get My Family to Eat Broccoli

Blockette LOVES broccoli. I cannot get over this. It's one of those things that make me wonder if she's even related to me. I HATED broccoli as a kid. That could be because my mom would serve the frozen stuff. I'm still not a fan of the frozen stuff, unless it's smothered in cheese.

Mrblocko doesn't care for cooked broccoli either. However, when I roast it, he'll tolerate it. The following recipe is what he says is the "best broccoli he ever ate." Of course he says he still doesn't like it, but it's OK enough to choke down. (How's that for a confidence booster in the kitchen?)

I haven't made broccoli any other way for at least four years now. Whatever works right? If you don't care for broccoli, but haven't tried it roasted before, give this recipe a try. You might just find yourself having a change of heart.
Roasted Broccoli
1 bunch of fresh broccoli
2 T olive oil
2-5 cloves of garlic, chopped
1/2 tsp kosher salt
1/4 tsp pepper (or more to taste)
1/3 c panko
1/4 c shredded cheese (You can use whatever cheese you want. Cheddar seems to be our favorite)

Preheat the oven to 425. While the oven is preheating, toast the panko in a metal 13x9 pan until it is golden brown. (I check this after 5 min, and give the pan a shake. Usually the panko is done browning before the oven fully preheats.) Set panko crumbs aside. Cut broccoli in bite size florets. (You can use the stems too if you like. I don't care for the woodiness of broccoli stems so I leave them out.) Toss broccoli in a bowl with olive oil, garlic, salt and pepper. Add panko to the bowl and stir to combine. Place entire mixture back into your metal pan. Cook for about 8-10 minutes until the veggies are al dente. Toss in cheese and serve immediately. If you have leftovers they can be reheated on a skillet over the stove. I like them best the second day because the cheese gets crunchy when it's reheated.

P.S. Mrblocko wanted to add that he likes to eat this dish with shelled pumpkin seeds sprinkled on top. Personally, I think that sounds nasty, but at least it's not stinky hot sauce!

Monday, May 10, 2010

Peanut Butter Ninjas!

Mrblocko would not shut up about these cookies. I made them for a church event and he was pimping them out to everyone. Someone even made a comment to me that Mrblocko must really like my cooking because he was telling everyone to eat these cookies.

Now that I think about it, I'm not sure if that was a backwards compliment. Did that person have one of the cookies and think they were icky? Or were they commenting on how it was nice to see a husband raving over his wife's cooking? It's probably best I don't think about it too much.

I do think I know why Mrblocko was telling everyone to try the cookies. They don't look like anything special. They look a bit like weird gingersnaps. You'd never know that they have a peanut butter middle lurking beneath that dark chocolaty exterior. That's why they're called peanut butter ninjas.

At least that is what Valerie over at Une Gamine dans la Cuisine calls them. Peanut butter ninjas is much cooler name than Peanut butter munchies. Since I got the recipe from her, they will forever more be referred to as PEANUT BUTTER NINJAS.

Boy are they a pain in the buttowski to make. You make the chocolate and peanut butter doughs. Then you roll the chocolate dough into balls, and then you have to roll the peanut butter dough into the exact same number of balls. Next you gotta flatten the chocolate dough and roll it around the peanut butter balls. Finally, you roll the uniball in sugar, smash it down with a glass before baking it.
Mrblocko says to make sure and let everyone know that they are totally worth all the effort, and that they are better the next day. I wouldn't know because he ate all of them before I could test out a day old version. Oink oink!

Peanut Butter Ninjas from Une Gamine dans la Cuisine
1 1/2 cups all-purpose flour
1/2 cup unsweetened cocoa powder
1/2 teaspoon baking soda
1/2 cup butter, softened
1/2 cup granulated sugar
1/2 cup packed brown sugar
1/4 cup peanut butter
1 egg
1 tablespoon milk
1 teaspoon vanilla
3/4 cup sifted powdered sugar
1/2 cup peanut butter
2 tablespoons granulated sugar

Preheat oven to 350F. In medium bowl stir together flour, cocoa powder and baking soda; set aside. In a large bowl beat together butter, 1/2 cup granulated sugar, brown sugar, and the 1/4 cup peanut butter until combined. Add egg, milk, vanilla; beat well. Beat in as much of the flour mixture as you can. Stir in remaining flour mixture. From the chocolate dough into 32 balls about 1 1/4 inches in diameter. Set aside.

For filling: Combine powdered sugar and 1/2 c peanut butter until smooth. Shape mixture into 32 (3/4") balls. On a work surface, slightly flatten a chocolate dough ball. Top with peanut butter ball. For each cookie, shape the chocolate dough over the peanut butter filling, completely covering the filling. Roll dough into a ball.

Place balls 2 inches apart on an ungreased cookie sheet. Lightly flatten with the bottom of a buttered glass dipped in 2 tablespoon granulated sugar. Bake cookies in preheated oven for 8 minutes, or until just set and surface slightly cracks. Let stand 1 minute. Transfer to wire racks, cool. Makes 32.

Thursday, May 6, 2010

Thankful Thursday #9

1. New plants.
2. The little green caterpillar that crawled up Blockette's hand and arm and made her giggle with glee.
3. Checking off yucky cleaning chores from a to do list.
4. Blockette saying "awww" not "eeew" when mrblocko and I give each other a smooch.
5. Mrblocko doesn't expect me to get up with him on days when he has to get up at 6:30 a.m.
6. Seeing the 3 baby robins begging for worms in the nest outside Blockette's window.
7. Blockette's outside playtime.
8. Grilling outside.
9. Not eating burnt grilled food.
10. Waking up from a nightmare and realizing it was only a stupid bad dream and aliens aren't sending mega uber tornados down to earth to eliminate all life forms.

Wednesday, May 5, 2010

Mother's Day Plants Take Over the World!

A few weeks ago Mrblocko asked what I wanted for Mother's Day. I decided that last years gift of plants would be a good gift this year as well. Since Mrblocko is even more clueless than I am when it comes to plants, I went to a few greenhouses and picked out some stuff that I wanted.

Last year I bought marigolds, strawberries and violas. This year I opted for herbs. The sage, oregano, thyme, chives, lavender and strawberries all came back this year. My parsley, cilantro and basil did not. So I picked up some flat leaf parsley, cilantro, and sweet Italian Basil. I also bought 2 cherry tomato plants, peppermint, and rosemary. Then at the last nursery I went to I saw this guy:
It's purple curly leaf basil. I never heard of such a thing! It may be just a shorty short pants guy now, but it is going to get to be hugemongous. Aaaaand it's going to get pink flowers in the summer. When I told Blockette that they were going to get pink flowers and we could eat the leaves, she said "Oh Mommy, you gotta get that one."

Then in the same aisle, there was this little cutie: Aw, don't you want to just eat it up? Well you can, cause it is ginger mint. Yes. Mint with an under note of ginger. I never heard of that either. I love the stripy yellow and green of the leaves. In addition too all that great stuff, it's going to spread and be great ground cover.

Speaking of ground cover, I bought one non herb-y plant. It called to me from across the nursery. Seriously. I saw the orange five or six aisles away from where the herbs were. I had to check it out. It's a Houttuynia cordata, or a chameleon plant. Please don't bite my head off if you are a gardener. I know this plant likes to spread and spread and spread. I guess it's illegal to plant in Australia and New Zealand, as it is such a pest there. The climate here is nothing like there, so I "think" I'll be fine. I also planted it in partial shade, so hopefully that will help keep it in check. If not, you can say "I told you so" and I will acquiesce.

Seriously, I must have a thing for invasive plants. One of my favorite plants at our old house was the vinca, or periwinkles. Those babies wanted to go everywhere. There were lots of them that we had all over the front, side and back of the house as ground cover. The chameleon plant is just one solitary lonely little fella. It won't get as crazy as the periwinkles. Famous last words right?

Tuesday, May 4, 2010

Waffle of Insane Greatness: Worthy of it's Name?

With a name like waffle of insane greatness, could you pass up the opportunity to test out the recipe? I couldn't. When I saw the recipe featured on Inn Cuisine, I just had to see if the waffles would live up to their name. They were good, but I don't know if I would file them under insanely great.

These waffles were light, but not as light as the overnight waffles I made last month. I think they did achieve optimum waffle density, and they had a nice crispy exterior too. Where these waffles fell short for me was that they did not reheat as well as other waffles.

Part of the appeal of making waffles is having leftovers and freezing them. I even made a double batch since this recipe had a relatively small yield. This would probably be my new go to waffle recipe if they tasted better the second time around. Next time, I'll just make a single batch of these waffles, at least until I find my Holy Grail of Waffle Recipes.

Waffle of Insane Greatness from Inn Cuisine
1 cup all-purpose flour
1/3 cup cornstarch
3/4 teaspoon baking powder
1/4 teaspoon baking soda
1/2 teaspoon salt
1/2 cup milk
1/2 cup heavy cream
1/3 cup vegetable oil
1 large egg
2 teaspoons sugar
1 teaspoon pure vanilla extract

Stir first 5 ingredients together in mixing bowl until thoroughly combined. Add milk, cream, oil, egg, sugar & vanilla to dry ingredients and stir by hand until mixture is smooth. Let batter rest for 30 minutes. Preheat waffle iron; pour batter into preheated waffle iron and cook as indicated by manufacturer or refer to waffle iron’s indicator light. There is no need to pre-spray the waffle iron with non-stick cooking spray as the oil in the batter will allow the waffles to release with ease. Serve warm.

Cook’s choice: You may substitute 1 cup whole milk, 1 cup half & half or 1 cup buttermilk for the 1/2 cup milk & 1/2 cup heavy cream as suggested in the recipe above, using 1 cup (diary product of preference) in total.

Monday, May 3, 2010

EW!

Blockette is a nail bitter. I'm not sure where or why she picked this up, especially since she is biting her fingernails AND her toenails. Gack! It makes me sick to think about it. Bleck. At least it isn't warm enough out for her to be wearing sandals so her feet are relatively clean. But still...ish ka bibble.

For some reason she hates it when I cut her fingernails. She says it hurts when I do it. I'm not cutting them any differently than I have since birth, so who knows what is up with that.

We talked about how her hands and feet have germs all over them. And it's the germs that make her feet stinky. And when she puts them in her mouth the germs get in her body and make her sick. And she doesn't want to get sick does she? Mrblocko even told her that her fingernails in her tummy could cut up her insides and make her insides all ouchy and bleed. Then we told her about a friend who bites her fingernails and how it got infected. The fingernail got such a bad boo boo on it that the fingernail fell off and it was very VERY ouchy.

Well, all that worked for about a minute. The next day I heard the tell tale sound of a little girl snip snip sniping at her fingernails with her teeth. AAAAH!

So I told her if she likes to put yucky things in her mouth then we were only going to feed her things that she thought were yucky. If she kept biting her fingers she was getting a bowl of black beans, olives, and mushrooms with hot sauce for breakfast, lunch and dinner. Her initial response was, "Then I just won't eat." Mrblocko countered with, "Then you will be a very hungry girl." Her eyes got big and she said, "I don't want to eat those yucky things. I promise. I don't want to bite my fingernails anymore."

I guess time will tell if this tactic is going to work. So far I haven't seen (or heard) her bite her nails since we had the yucky food discussion a few days ago. Keep your fingers crossed that this works!