I made this Wild Rice Flatbread from Pinch of Yum because I had all this leftover wild rice. The pictures on the website also looked so appetizing. Unfortunately, my flatbread did not turn out at all like the pictures.
Pinch of Yum's flat bread was a lovely golden brown. Mine was dark blackish brown. And before you ask if I burnt it, let me say, "NO! I did NOT!" It was that color after I pureed it.
The darn thing also did not want to cook. After 15 minutes I tried to flip it using the towel technique mentioned in the recipe and the whole thing fell apart completely. It had not set at all. I was able to mash it back together in the pan and form a patty again.
Long story short, it took an hour in the oven before the rice flat bread had set up. This was not the quick lunch I was hoping for!
The crispy edges were OK, but the center was still quite mushy. I'm sure I could have continued to cook it for another 30-45 minutes, but I didn't feel like spending that much time on something that just turned out OK.
So what went wrong? I'm thinking because of the texture of the rice the original recipe resulted in a lighter bread, they used a wild rice blend. Mine was 100% wild rice. I think the starch from the regular rice may have help bind everything together. Also, I think that I just don't care for wild rice plain. Another reason for using a wild rice blend, it gives a bit of texture and flavor variety.
I wanted this recipe to work so badly, but I guess it just wasn't in the cards. Please let me know if you try it and how it works out for you!
Wild Rice Flatbread from Pinch of Yum
2 c cooked wild rice (or “instant” wild rice, wild rice blend, etc I suggest the wild rice blend)
1/2 c water
2 egg whites
1 clove of garlic
1 tbs. flaxseed meal
a sprinkle of red pepper flakes
1/2 tbs. olive oil
salt
pepper
Preheat to 425F. Grease a heavy skillet with oil. Spread it out so bottom and sides are well covered.
Place all ingredients in a food processor and blend until batter-like (about 30 seconds). Pour into pan. Bake for 15 min and remove from oven. Using a spatula, flip flatbread over and bake for another 15 min. Check doneness and bake for 5 min if needed. You’ll know when it’s done because it starts to pull away from the sides of the pan. (Mine never did this) Remove from oven, cool, cut, and serve with hummus or other dips.
Wednesday, July 3, 2013
Tuesday, July 2, 2013
PBJ Mug Cake
Are you ready for another microwave mug cake? This one is for you peanut butter and jelly lovers out there!
We used strawberry jelly in our mug cakes. I wished that there was more than a heaping tablespoon of jelly in mine. Although, I'm not sure I'd feel the same way if it was grape jelly. I prefer strawberry over grape. Blockette is the opposite. Use the jelly flavor and amounts you like best!
Peanut Butter and Jelly Mug Cake from Kirbie Cravings
1/4c flour
1/4 t baking powder
1/4c milk (I've used skim and sugar free almond milk with great success)
3 T peanut butter
4 t granulated sugar
1-2 heaping T jelly or jam
Mix everything except jelly in LARGE, micro-safe mug til batter's smooth. Using a large ice cream scoop, scoop out half the batter. Drop jelly into middle of batter that is still in the mug. Plop the remaining batter back into the mug, covering the jam. Nuke for 45-60 sec. I've found that 45 seconds works best for my microwave. Then let it sit for 5 min. It will continue to cook as it sits. If you are going to wolf the cake down immediately, then go ahead and nuke it for a minute. If you let it sit at all it will over cook and become rubbery.
We used strawberry jelly in our mug cakes. I wished that there was more than a heaping tablespoon of jelly in mine. Although, I'm not sure I'd feel the same way if it was grape jelly. I prefer strawberry over grape. Blockette is the opposite. Use the jelly flavor and amounts you like best!
Peanut Butter and Jelly Mug Cake from Kirbie Cravings
1/4c flour
1/4 t baking powder
1/4c milk (I've used skim and sugar free almond milk with great success)
3 T peanut butter
4 t granulated sugar
1-2 heaping T jelly or jam
Mix everything except jelly in LARGE, micro-safe mug til batter's smooth. Using a large ice cream scoop, scoop out half the batter. Drop jelly into middle of batter that is still in the mug. Plop the remaining batter back into the mug, covering the jam. Nuke for 45-60 sec. I've found that 45 seconds works best for my microwave. Then let it sit for 5 min. It will continue to cook as it sits. If you are going to wolf the cake down immediately, then go ahead and nuke it for a minute. If you let it sit at all it will over cook and become rubbery.
Friday, June 28, 2013
Peanut Butter Pudding Pops
Who doesn't love a good pudding pop? Why buy them when they are so easy to make! Besides these pudding pops are peanut butter and chocolate, plus they were made with almond milk instead of moo juice. Try finding that in the store!
This recipe for Peanut Butter Pudding pops from Craft, Bake, Sew, Create yielded 6 star pops with about half a cup leftover. I just froze that in a small container and ate it like ice cream.
What I like about pudding pops versus popcicles (or even most homemade non dairy, egg free ice creams) is how they stay relatively soft after being frozen. Sometimes homemade popcicles and ice cream get rock hard after 24 hrs in the freezer.
This is not the case with the peanut butter pudding pops. They are chompable straight out of the mold. This is particularly awesome because it takes Blockette FOREVER to eat frozen confections on a stick. She is willing to chomp on these pudding pops unlike even a store bought Popsicle.
As with all things using cocoa powder, I suggest you use a high quality cocoa powder. The better the cocoa, the better your pudding pops are going to taste. I do NOT like Hershey Cocoa powder. That's because I'm spoiled. Once you use a high quality cocoa powder you won't be able to go back to using the cheap stuff. It will taste like dirt. Consider yourself warned. Personally, I LOVE chocolate, so it's one of the few things I'm willing to splurge on.
For those of you with a peanut allergy, I'm sure these pops could be made with other "butters" other than peanut. Nutella and Biscoff come to mind as tasty alternatives!
Chocolate & Peanut Butter Fudgsicles from Craft, Bake, Sew, Create
2/3 cups granulated sugar
1/4 cup cocoa powder (use the good stuff, I love Penzeys)
1/4 tsp. salt
3 T. cornstarch
2 1/4 cups milk (I used unsweetened almond milk)
1 tsp. vanilla
2 T. butter or margarine
1/2 cup creamy peanut butter
In med pan, whisk sugar, cocoa, cornstarch, and salt. Gradually whisk in milk. Cook over med heat, stirring constantly, until mixture starts to boil. Boil for 1 min. Remove from stove and stir in butter, vanilla and peanut butter. Pour into popsicle molds. Freeze overnight. (While you're waiting for the pops to freeze, go ahead and lick the pan you cooked the pudding in. I won't tell!)
This recipe for Peanut Butter Pudding pops from Craft, Bake, Sew, Create yielded 6 star pops with about half a cup leftover. I just froze that in a small container and ate it like ice cream.
What I like about pudding pops versus popcicles (or even most homemade non dairy, egg free ice creams) is how they stay relatively soft after being frozen. Sometimes homemade popcicles and ice cream get rock hard after 24 hrs in the freezer.
This is not the case with the peanut butter pudding pops. They are chompable straight out of the mold. This is particularly awesome because it takes Blockette FOREVER to eat frozen confections on a stick. She is willing to chomp on these pudding pops unlike even a store bought Popsicle.
As with all things using cocoa powder, I suggest you use a high quality cocoa powder. The better the cocoa, the better your pudding pops are going to taste. I do NOT like Hershey Cocoa powder. That's because I'm spoiled. Once you use a high quality cocoa powder you won't be able to go back to using the cheap stuff. It will taste like dirt. Consider yourself warned. Personally, I LOVE chocolate, so it's one of the few things I'm willing to splurge on.
For those of you with a peanut allergy, I'm sure these pops could be made with other "butters" other than peanut. Nutella and Biscoff come to mind as tasty alternatives!
Chocolate & Peanut Butter Fudgsicles from Craft, Bake, Sew, Create
2/3 cups granulated sugar
1/4 cup cocoa powder (use the good stuff, I love Penzeys)
1/4 tsp. salt
3 T. cornstarch
2 1/4 cups milk (I used unsweetened almond milk)
1 tsp. vanilla
2 T. butter or margarine
1/2 cup creamy peanut butter
In med pan, whisk sugar, cocoa, cornstarch, and salt. Gradually whisk in milk. Cook over med heat, stirring constantly, until mixture starts to boil. Boil for 1 min. Remove from stove and stir in butter, vanilla and peanut butter. Pour into popsicle molds. Freeze overnight. (While you're waiting for the pops to freeze, go ahead and lick the pan you cooked the pudding in. I won't tell!)
Wednesday, June 26, 2013
Garden Monkey bread
In the past I have not had the best luck making monkey bread. The center dough always winds up under cooked. I know some people like undercooked biscuit dough from a can. In fact, my best friend has been known to eat it raw. Then again, she doesn't like cilantro so clearly she is broken. Canned biscuit dough should be cooked into a nice fluffy bread. Any other way is just wrong. Just ask me!
It had been quite some time since I had attempted the whole monkey bread thing, so I figured it was time to give it another whirl. I saw this savory version for monkey bread over at Goodness Gracious and thought it sounded fun.
Instead of bacon I used 2 cups of leftover chopped ham. I also increased the amount of onions from 1/4 c to 3 small onions. Then I caramelized them. I left out the green pepper, and just used a red pepper that I had roasted and peeled the skin off of.
This recipe is so versatile that you could really add whatever you wanted. Basically, if you like it in an omelet, you'd like it in this monkey bread version.
The recipe says to cook the bread for 30-35 minutes. NOT!!! Maybe you only cook it for that long if you are a weirdo that likes the raw dough. After 30 minutes the center of the bread was still raw. I wound up cooking the monkey bread for a full hour.
As you can see, after an hour in the oven, the bread is not burnt in the slightest. Neither is the cheese on top.
And when I unmolded the bread from the bundt pan, the sides are not even dark brown.
Yeah. That unmolding process didn't work out so well for me.
Even though I sprayed the pan twice with PAM the bread still stuck to the pan. I even went around all the edges with a plastic butter knife in attempts to loosen it from the pan. Maybe I should have used PAM with flour instead.
Even though the bread stuck to the pan, it tasted marvelous. The bread was all buttery and the ham on the edges got a little bit crispy and caramelized like bacon. Good stuff people!
I was worried about the leftovers, but I heated them up in a 350F oven for 15 min to take the chill off and they were almost as good as they were right out of the oven the first time.
Garden Monkey Bread adapted from Goodness Gracious
4 Pack of Biscuits (7.5 oz)- Cut into thirds
1/4 Cup Melted Butted
1 roasted red pepper, seeded, peeled and chopped
2 c chopped ham
3 small onions, diced and sauteed
1/2 Cup Shredded Cheddar Cheese
Combine all ingredients in a bowl. Pour into greased bundt pan. Bake at 350 F til golden brown, anywhere from 30-60 min.
It had been quite some time since I had attempted the whole monkey bread thing, so I figured it was time to give it another whirl. I saw this savory version for monkey bread over at Goodness Gracious and thought it sounded fun.
Instead of bacon I used 2 cups of leftover chopped ham. I also increased the amount of onions from 1/4 c to 3 small onions. Then I caramelized them. I left out the green pepper, and just used a red pepper that I had roasted and peeled the skin off of.
This recipe is so versatile that you could really add whatever you wanted. Basically, if you like it in an omelet, you'd like it in this monkey bread version.
The recipe says to cook the bread for 30-35 minutes. NOT!!! Maybe you only cook it for that long if you are a weirdo that likes the raw dough. After 30 minutes the center of the bread was still raw. I wound up cooking the monkey bread for a full hour.
As you can see, after an hour in the oven, the bread is not burnt in the slightest. Neither is the cheese on top.
And when I unmolded the bread from the bundt pan, the sides are not even dark brown.
Yeah. That unmolding process didn't work out so well for me.
Even though I sprayed the pan twice with PAM the bread still stuck to the pan. I even went around all the edges with a plastic butter knife in attempts to loosen it from the pan. Maybe I should have used PAM with flour instead.
Even though the bread stuck to the pan, it tasted marvelous. The bread was all buttery and the ham on the edges got a little bit crispy and caramelized like bacon. Good stuff people!
I was worried about the leftovers, but I heated them up in a 350F oven for 15 min to take the chill off and they were almost as good as they were right out of the oven the first time.
Garden Monkey Bread adapted from Goodness Gracious
4 Pack of Biscuits (7.5 oz)- Cut into thirds
1/4 Cup Melted Butted
1 roasted red pepper, seeded, peeled and chopped
2 c chopped ham
3 small onions, diced and sauteed
1/2 Cup Shredded Cheddar Cheese
Combine all ingredients in a bowl. Pour into greased bundt pan. Bake at 350 F til golden brown, anywhere from 30-60 min.
Tuesday, June 25, 2013
More Artwork from Blockette
Earlier this month my family and I participated in Relay for Life. Our team had some kid's games at the event as a fundraiser. One of the games was a fishing game. Blockette designed the screen for the kids to fish over.
She was a bit overwhelmed with the huge scale she needed to draw in, so I told her that she should just draw it on regular sized paper and I would enlarge it. If there's any art that I'm good at, it's putting something on a grid and enlarging it...original ideas...not so much. That's Blockette's department!
I wound up having to paint the cardboard because the paint was quite uncooperative. No matter how hard I tried, the paint only wanted to stick on in a single coat. Every time I attempted a second layer, I only managed to remove the paint in the first layer. I am not ashamed to say that I yelled at that cardboard on more than one occasion.
It all turned out in the end.
I think it's adorable...especially the expression on the mermaid who sees the fishing pole with bait! Not in a million years would I have thought to do that. That's why we pay the big bucks for Blockette to do these sort of creative endeavors.
She was a bit overwhelmed with the huge scale she needed to draw in, so I told her that she should just draw it on regular sized paper and I would enlarge it. If there's any art that I'm good at, it's putting something on a grid and enlarging it...original ideas...not so much. That's Blockette's department!
I wound up having to paint the cardboard because the paint was quite uncooperative. No matter how hard I tried, the paint only wanted to stick on in a single coat. Every time I attempted a second layer, I only managed to remove the paint in the first layer. I am not ashamed to say that I yelled at that cardboard on more than one occasion.
It all turned out in the end.
I think it's adorable...especially the expression on the mermaid who sees the fishing pole with bait! Not in a million years would I have thought to do that. That's why we pay the big bucks for Blockette to do these sort of creative endeavors.
Monday, June 24, 2013
June 2013 Garden Update
Here's what my garden looks like!
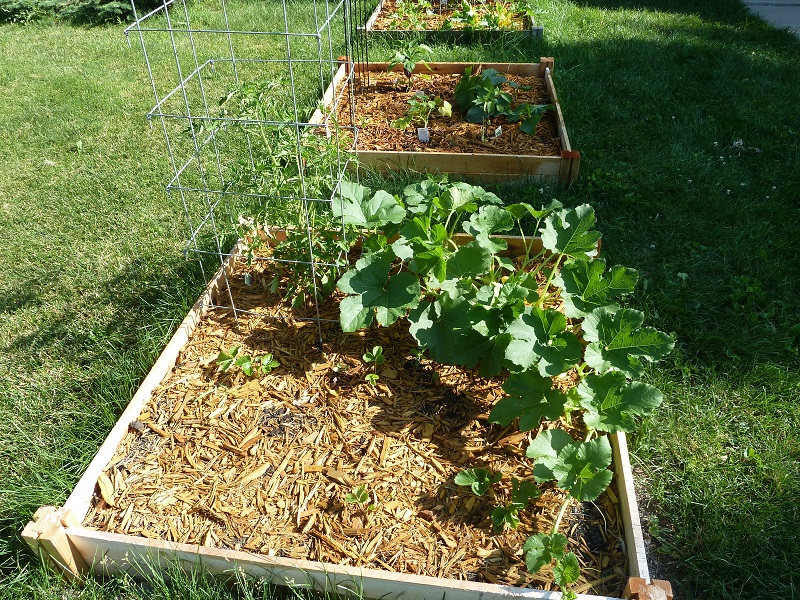
Below is the garden with the strawberries, heirloom tomato and spaghetti squash.
The rabbits ate several of the strawberry plants down the the ground so I've pretty much given up on them. The heirloom tomato is the tallest out of the 3 tomato plants I'm growing this year. And well, as you can see the spaghetti squash is taking over the world. I had to "prune" it back so it didn't choke out the tomato plant. So far I have one large marble sized squash from this plant.
Below is my saddest garden.
The rabbits ate my peas and beans down to the root. The green house had a sale on veggies, 50% off so I had to check out that sale. Sadly they did not have any more peas or beans so I got another summer squash and pepper plant. The squash had three inch and a half squashes and the pepper plant had 3 purple peppers. Hopefully they won't get transplant shock. The large monster of a plant in front is a cucumber plant. There are several 2"long skinny cucumbers growing as well. The pepper plant to the left of the cucumber has not even had a blossom on it yet. Maybe it's just a late bloomer.
This garden is just doing "ok." Nothing spectacular here.
Last year was a lot warmer and sunnier so the tomatoes were much taller this time last year. The tomato plant on the left has one tiny marble sized tomato on it, so that seems like a good thing. The pepper plant to the left of the tomato cages have a few blossoms on it, but it seems like it should be taller as well.
The 2 squash plants in the front are doing ok. The squash on the left is yellow summer squash. The hailstorm we got last week knocked off all the blossoms. I have every confidence that it will bounce back. The squash on the right has several large blossoms, but only one of them has a baby zucchini at the base.
All things considered, I think the garden is doing pretty well for a brown thumber like me! Hopefully we'll be overwhelmed with all the veggies by the end of summer!
Below is the garden with the strawberries, heirloom tomato and spaghetti squash.
The rabbits ate several of the strawberry plants down the the ground so I've pretty much given up on them. The heirloom tomato is the tallest out of the 3 tomato plants I'm growing this year. And well, as you can see the spaghetti squash is taking over the world. I had to "prune" it back so it didn't choke out the tomato plant. So far I have one large marble sized squash from this plant.
Below is my saddest garden.
The rabbits ate my peas and beans down to the root. The green house had a sale on veggies, 50% off so I had to check out that sale. Sadly they did not have any more peas or beans so I got another summer squash and pepper plant. The squash had three inch and a half squashes and the pepper plant had 3 purple peppers. Hopefully they won't get transplant shock. The large monster of a plant in front is a cucumber plant. There are several 2"long skinny cucumbers growing as well. The pepper plant to the left of the cucumber has not even had a blossom on it yet. Maybe it's just a late bloomer.
This garden is just doing "ok." Nothing spectacular here.
Last year was a lot warmer and sunnier so the tomatoes were much taller this time last year. The tomato plant on the left has one tiny marble sized tomato on it, so that seems like a good thing. The pepper plant to the left of the tomato cages have a few blossoms on it, but it seems like it should be taller as well.
The 2 squash plants in the front are doing ok. The squash on the left is yellow summer squash. The hailstorm we got last week knocked off all the blossoms. I have every confidence that it will bounce back. The squash on the right has several large blossoms, but only one of them has a baby zucchini at the base.
All things considered, I think the garden is doing pretty well for a brown thumber like me! Hopefully we'll be overwhelmed with all the veggies by the end of summer!
Friday, June 21, 2013
Before and After: House
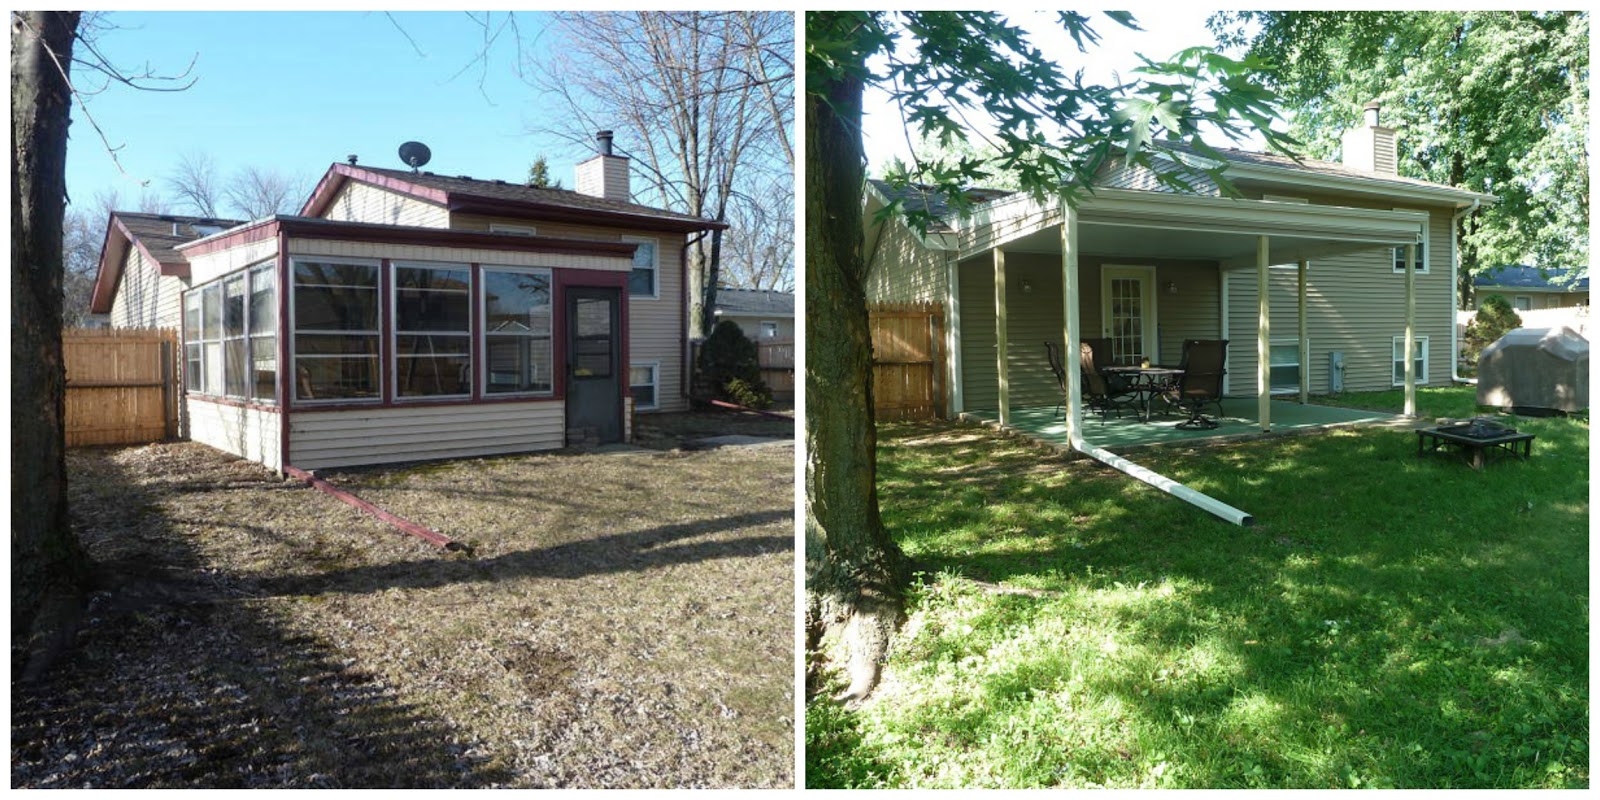
So we just got our siding replaced. Here is a before and after picture.
Silly me took the before picture with the garage door open so you can't get the full effect of the maroon-i-ness. For some reason the garage now looks more brown than red. And the new siding has an almost gray look to it in the front. It is more of a sand color. I wonder if the red from the door is making the siding look a different color.
We still have to do something about the front door. We'll probably just get a new storm door. I can't see painting the front door. It's wood and has these stylized pineapple carvings that I think would look weird painted. Although the color of the door seems out of place. I guess it does sort of match the color of our fence though, so there is that.
My issue is that I can't decide if we should paint the garage door or not. If so, what color?
The most drastic change from redoing the siding is in the back. We tore down the walls of the 3 season room. The windows had been hung up side down so whenever it rained the weep holes allowed rain to drain into the room. I could never be in this room because of the must and mold. So far the new patio has gotten more use than the 3 season room ever did in the 7 years we've lived here.
Turns out we had some freeloaders living in our 3 season room...A Whole Colony of carpenter ants!!!! I was not sad to see them go. Apparently they were eating away the wet wood in the walls. Who knows how long the walls would have stayed up before they ate them away to the point of being structurally unsound. The new wood posts are made from treated wood, which apparently is unappetizing to carpenter ants. YAY!
The back yard seems huge now that the patio is open. I'm so happy with it. I actually want to spend time in the backyard. Now I suppose we have to work on getting the grass to look semi decent. I know you can't tell in the photo, but it's very patchy and weedy. I think that is a project for the fall though.
Silly me took the before picture with the garage door open so you can't get the full effect of the maroon-i-ness. For some reason the garage now looks more brown than red. And the new siding has an almost gray look to it in the front. It is more of a sand color. I wonder if the red from the door is making the siding look a different color.
We still have to do something about the front door. We'll probably just get a new storm door. I can't see painting the front door. It's wood and has these stylized pineapple carvings that I think would look weird painted. Although the color of the door seems out of place. I guess it does sort of match the color of our fence though, so there is that.
My issue is that I can't decide if we should paint the garage door or not. If so, what color?
The most drastic change from redoing the siding is in the back. We tore down the walls of the 3 season room. The windows had been hung up side down so whenever it rained the weep holes allowed rain to drain into the room. I could never be in this room because of the must and mold. So far the new patio has gotten more use than the 3 season room ever did in the 7 years we've lived here.
Turns out we had some freeloaders living in our 3 season room...A Whole Colony of carpenter ants!!!! I was not sad to see them go. Apparently they were eating away the wet wood in the walls. Who knows how long the walls would have stayed up before they ate them away to the point of being structurally unsound. The new wood posts are made from treated wood, which apparently is unappetizing to carpenter ants. YAY!
The back yard seems huge now that the patio is open. I'm so happy with it. I actually want to spend time in the backyard. Now I suppose we have to work on getting the grass to look semi decent. I know you can't tell in the photo, but it's very patchy and weedy. I think that is a project for the fall though.
Subscribe to:
Posts (Atom)