Sunday, October 31, 2010

Spooky Dinner

First of all, let me say Happy Halloween! Mrblocko and Blockette are out panhandling for sweeties while I am at home playing on the computer waiting to pass out candy to all the kids that never show up. So far they've been gone for a half hour and I've only eaten one piece of candy. I deserve some sort of medal for that...or another piece of candy.

Anyhow, all week I told Blockette that we were having spiders for dinner on Saturday while it was just us girls. Heh, she was pretty worried for a while. Sometimes she can't tell when I'm pulling her leg. I like to keep her on her toes. It's only fair. She keeps me on mine!!!

So yesterday I asked her if she would help me prepare our spooky dinner. She was pleased to find out our spiders were really hot dogs and spaghetti. I got the idea for the spiders from The Family Kitchen. I think the coolest part about making them is when they are fully cooked, the spiders dance around in the pot.Spiders weren't the only thing we had for dinner. We also had spider eggs (acini de pepe noodles), worms (more spaghetti noodles), Ogre skin with rolly polly bugs and witches' finger nails (salad with craisins and sunflower seeds) and brains. Well, Blockette had brains. They were too disgusting for me.

The brains were actually Blockette's idea. She thought scrambled eggs would make good brains. Don't ask me how she came up with that. I don't have a clue. It was my brilliant idea to add purple food coloring to the eggs before I cooked them. If you've ever tried to make purple frosting you know that purple food coloring makes everything elephant gray. Bleck. They made for some realistic looking brains. The photo does not do them justice in all their gory glory. In case you were wondering how to eat a spider, the best way is to shove the whole thing in your mouth at once. Then you can feel them squirming around. Oh, and you gotta dip them in blood(ketchup) too. Or if you want to live dangerously, you can do like I did and consume them with dragon's blood (Sweet Baby Ray's Honey Chipotle BBQ Sauce.)

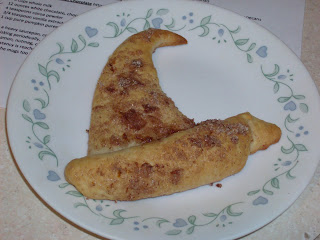
After all that gory stuff, you gotta cleanse your palette with something sweet...witch hats! I totally stole the idea from Little Nummies. I made ours with cinnamon sugar that had been infused with orange zest. Who would have thought crescent rolls could make something so cute?

Our spooky dinner was a total hit, which means I'm going to have to find something even cooler for next year!

Friday, October 29, 2010

Halloween Parade!

Please click on the pictures to enlarge so you can see Blockette's facial expressions. In case you can't tell, she is Rosetta from Tinkerbell. The striped pants were her idea.

"Hmm Where is she???"
"I don't see her. Mommy said she'd be here."
"Heh. I know mommy's over there but I'm going to actually look at her. Why don't I make goofy faces for my adoring fans? They've all come to see me, right? I should give them a good show."

Thursday, October 28, 2010

Thankful Thursday 34

1. Being able to help a friend.
2. A nice enough day to walk Blockette to school.
3. sleeping in bed the whole night.
4. Blockette was not at home to hear me scream bloody murder when I saw the rodent scurrying past me in the garage.
5. There was no malicious intent when Blockette said, "Mommy, I'm drawing a picture of you and I'm going to put some gray hair in it because you are getting old."
6. Blockette did not spit out the nasty tasting medicine like her Dr. said she might.
7. My cats who keep me so warm at night that I still only need to sleep under a light blanket even though it was freezing in our room.
8. Having enough money to go out and buy lots of mouse traps and poison for our new tenant in the garage.
9. Coming to a compromise with Mrblocko when I was fairly certain we wouldn't.
10. Getting to sleep in an extra 10-20 minutes this morning.

Wednesday, October 27, 2010

I'd Marry These Mushrooms

Do you like mushrooms? Even a little bit? If you don't, this recipe will change your mind. My best friend's husband is allergic to mushrooms and I joked with her that even he would want to eat these. Sure it would kill him, but he'd die happy.

The only bad thing about these mushrooms, of course, besides their calories, is that it takes 9 hours to make. Yup. NINE hours. They don't need to be stirred or babysat or nuthin fancy like that, but if you are paranoid about leaving your stove top unattended, you'll probably want to wait to make this recipe on a day when you are planning on being home for an extended period of time.

And really, while you are making these mushrooms, why would you want to leave. The house smells heavenly. Even Blockette thought the house smelled fantastic. At one point she said, "Oh the house smells so good I can't even draw!" Which, if you know Blockette and her propensity for drawing, that is saying something.

I forgot to take a picture before I started cooking. The picture below is after about 4 hours of simmering.
This picture is after 8 hours. See how the mushrooms soaked up all that liquid. Amazing! The recipe is actually called Burgundy Mushrooms from the wonderful Pioneer Woman. This recipe is in her cookbook, and she even made them on the Today show.

The original recipe makes a ton. If you aren't feeding a crowd you can make this half recipe below:

Pioneer Woman's Burgundy Mushrooms-half recipe
2lbs Button Mushrooms
1 stick Butter
1 tsp Worcestershire Sauce
1/2 liter Burgundy Wine (I used Merlot)
1/2 tsp Freshly Ground Black Pepper
1 c Boiling Water
2 Chicken Bouillon Cubes
2 Beef Bouillon Cubes
1/2 tsp Dill Seed
3 cloves Garlic, Peeled (I used 5, which is the amt used for a full recipe, but I love garlic)

Wash mushrooms and put them in a large stockpot. Add all remaining ingred and stir. Bring the mixture to a boil over medium-high heat. Reduce heat to low and simmer, covered, for 6 hours.Remove the lid and cook uncovered for 3 hours. The mushrooms will be very dark in color. Simmer until needed. Server straight from the pot or in a serving bowl. Dip crusty bread in the juices. (You gotta do that because that juice is as awesome as the mushrooms.) The leftover mushrooms can be stored in the fridge for several days and even taste good cold!

Tuesday, October 26, 2010

Project #14 Recycled Jumbo Coaster

My husband has this ginormous water mug. It's great because when he is out doing yard work or running he drinks a lot of water. He had a smaller mug but it was teeny and he got tired of constantly filling it up. I found this blue monster as a replacement. The only thing is that the mug is not insulated, so when it's hot out, it sweats.

I had made him a quick coaster out of fleece and denim scraps, but I saw this tutorial for a coaster made out of the seams of jeans over at Polka Dot Pineapple. Of course the idea got lost in my head for a while until Mrblocko decided that it was time to lay a pair of old jeans to rest. These jeans were hole-y beyond what I feel comfortable passing on to Goodwill, so I stuck them on the chair of my craft room for recycling. See I tend to stick a lot of stuff on the back of my craft room chair. Things have a way of getting hidden for months or years that way.

Flash forward to this weekend where I reminded Mrblocko he agreed to caulk around the window in there. See, at this time of year, my craft room becomes the Ladybug Dance at the Ladybug Picnic.


Every time I go in the craft room I have to kill at LEAST 5 ladybugs. Bleck. Hopefully caulking around the window will stop them from coming in.

Anyhow, Mrblocko needed to caulk on the top of the window and he asked if I could move all the junk off the chair. I did and found the lost pair of jeans. So I snipped em up and made this guy!Goodness! Can you see the ruler, the coaster is almost 6 inches in diameter. That's a jumbo coaster!

And here is the coaster under the big blue monster mug. It fits perfectly.

OK, so if you went to the link up top to look at the tutorial, you will see that the directions specifically state to NOT use a hot glue gun. Well I do not have any fabric glue and have lots of glue sticks left over from my wedding. (Yeah from my wedding, NINE years ago!!!!) I figured it would be safe to use the hot glue because I'm using this coaster for cold beverages and not as a trivet for hot things. If it falls apart no big whoop cause I spent all of zero dollars to make it. So far it is holding together. I guess if it does come apart I could always go out and get some fabric glue.

Monday, October 25, 2010

Project #13 Tooth Fairy Pillow

Do a little dance of joy for me because I'm actually working on craft projects again! I'm really trying to force myself to be productive for the few short hours Blockette is at Kindergarten. Sometimes I amaze myself at how much I can get done in an interrupted two hour stretch of time.

When I was little I remember I had this really cool little yellow gingham pillow with a lace ruffle for the tooth fairy. I don't remember if someone made it especially for me, but I do remember thinking it was the coolest thing. Since I enjoyed having a tooth pillow, I figured Blockette should have a special tooth pillow too.

I did make one huge improvement on the one I had as a girl. Mine was just a small pillow you placed under your big pillow. I figured I'd make it a little easier on the tooth fairy and make it so the pillow could hang from the door handle. That poor tooth fairy, it must be difficult to lift all those heavy sleeping kids' heads. She deserves a break.

Here is the front: The cross stitch is a freebie from Brooke's Books Publishing that came out in January of this year. Here is a link to a pdf of the pattern. The design is supposed to be of a wintry type fairy welcoming in the new year. I altered the colors on the chart to make the fairy look more like Tinkerbell.

Yeah, I know Tinkerbell is a pots and pans fairy, not a tooth fairy. Tink's color scheme works much better with the cross stitch fabric than the original. And you never know, the tooth fairy might call on Fairies from Pixie Hollow in a pinch. Stranger things have happened I'm sure.

Here is the back:I found this piece of fairy fabric at the bottom of my scrap fabric bin. I saw it and thought it was really cute. Then it became even more awesome when I realized that it was the exact size I needed. No cutting needed! Whoohooo! Then the awesome increased tenfold when I saw that the word fairy was situated in the perfect spot to allow a pocket for teeth/coins. Isn't it awesome when things come together like that? (Isn't it also awesome when I am too lazy to use a thesaurus to find another word for awesome? AWESOME!)

Just for a frame of reference, the pocket is just slightly bigger than a dollar coin. I'm sure that if the tooth fairy was feeling generous she could stick a dollar bill in there as well.

When Blockette came home from school the other day, I hung this on the door handle to the pantry. She came into the kitchen and noticed it immediately. She ran up to me and gave me the biggest hug known to mankind. Then she said, "Oh mom! You are the best mom ever!!!! This is the coolest!!!" Then she stuck her fingers in her mouth and proceeded to try to wiggle all of her teeth loose simultaneously.

Poor Blockette. If she is anything like me, she's got a long way to go before she looses her first tooth. Most of her friends have lost multiple teeth already. If my memory serves me correct, that first loose tooth sneaks up suddenly. At least now, whenever that tooth decides to come out, we will be prepared for the tooth fairy.

Thursday, October 21, 2010

Thankful Thursday 33

1. The very bad day was followed by a very good day
2. Blockette has only had one bad day so far this month.
3. Blockette can almost blow her massively slimy nose completely by herself
4. Mrblocko found a cheap(er) place to eat while visiting a client in Chicago where he didn't have to pay for parking. (How does that happen?!)
5. I got my bulbs planted.
6. Blockette discovered that my yard stick is a great tool for squooshing Asian death beatles hanging out on the wall way up by the ceiling.
7. Finishing a weird but good book.
8. Blockette's new found interest in helping out in the kitchen.
9. Sleeping in the bed two nights in a row. (If I have a coughing/sneezing fit in the middle of the night I sleep on the couch so as to not wake the whole house.)
10. Bread that actually rose when I thought the yeast might have lost it's mojo.

Wednesday, October 20, 2010

Pickle Roll Up Dip

Raise your hand if you like those appetizers that consist of meat schmeered with cream cheese, wrapped around a pickle, that gets sliced and placed on those mini pieces of rye bread? OOOOH! Gimme gimme.

The last time I was at a party that had these little guys (And I feel really old because I just realized how very long ago that actually was) I ate half the platter. Now I didn't sit there and shove my face...hmmm well, maybe I did. I seem to remember someone asking where I was putting all the food I ate. I guess that is polite way to say, "Gee you really are being a pig. You should save some for the rest of us."

Yes. I love those pickle wrap slicey thing-a-ma-jigs. I never ever make them though. They are just too fussy. The time it takes to eat an entire plateful is so disproportionate to the time it takes to prepare them. Call me selfish, but I don't want spend all this time in the kitchen to discover there is an empty plate before I get to eat a single one. If I don't get any, then nobody gets any. Guess I'm an all or nuthin kinda girl.

It doesn't have to be like that anymore thanks to chopped up dip from Tasty Kitchen. I came across this recipe by accident. I was searching for a recipe to bring to my friends house at the end of September. (I settled on Roasted Artichoke dip.) I filed the recipe away and thought it might be a good way to make the leftover pumpernickel bread a bit more exciting.Well I was sure wrong. This dip is as disgusting as it looks. It is so disgusting that I am hiding it in the back of my fridge so that no one has to be exposed to its gross disgustingness. Yup. Way in the back so Mrblocko can't find it and I have to eat it all myself.

Ok seriously, this dip is awesome. Mrblocko has been using it as a spread for turkey sandwiches. I've just been eating it huge scoopy globs on top of crackers. I like to fool myself that this is actually a healthy lunch. There is meat from the corned beef, dairy from the cream cheese, veggies from the relish and whole grains from the crackers. Just add chocolate for dessert and you've got all the major food groups covered.

I made a half recipe but bumped up the amount of relish because I am from the school of thought where you can never have too many pickles. Here is the recipe I used:

Pickle Roll Up Dip
3 2oz packages of corned beef lunch meat
1 8oz package of cream cheese (softened)
3 T dill pickle relish

Chop up the lunch meat and mix all the ingredients together!

Tuesday, October 19, 2010

Raspbery Oatmeal Squares

Raspberry oatmeal bars from Buns in my oven, oh how I love you. You are so nummy we ate the whole pan before I remembered I needed a picture.

There really are so many things to love about this little bar dessert. First, there are only 7 basic ingredients. 75% of the time I've got these ingredients on hand. I like those odds. Second, they whip up super fast. Third, they remind me of the raspberry bars from Corner Bakery Cafe.

Let me wax nostalgic about Corner Bakery Cafe for a bit. Back in the day when I worked as a glorified secretary for a marketing company, they would frequently have brainstorming meetings where they ordered in for lunch. I was never in one of those meetings, being low on the totem pole, but there were always leftovers. After the meeting was adjourned, a mass email was sent out to the rest of the company so the remnants could be devoured by the vultures. I was one of those said vultures.

The Corner Bakery Cafe must have been one of the VP's favorite lunchy places because they ordered there a lot. Most of the time there were bars. Oh Raspberry bars. Free Raspberry Bars. I am not ashamed to say that I would gorge myself on those suckers. Eating five bars in one sitting is really quite piggish. Oink oink I say! Ah, but my metabolism was much better back then. I could get away with things like that.

I did have slightly better restraint with these oatmeal bars. I only ate 1 bar at a time, but I cut the bars into nice large pieces. The only real difference between these bars and the ones from CBC are the oats. The CBC bars did not have oats. The crust was a bit more shortbread-ish. That's ok though. I like the oaty addition. This way I can say they are healthy because they have soluble fiber and fruit. Jam is a fruit. Yes it is. Jam is a fruit like ice cream is dairy so there. Plbbt.

Raspberry Oatmeal Bars from buns in my oven
1/2 c brown sugar
1 c flour
1/4 tsp baking soda
1/8 tsp salt
1 c oats
1/2 c butter (1 stick)
3/4 c seedless raspberry jam (or any other flavor just make sure it is seedless)

Preheat oven to 350. Line 8×8 dish with foil and spray with Pam. Blend together everything but the jam. Combine until you have a nice crumbly mixture without too many large chunks of butter. Use a pastry cutter, 2 knives, or your hands. I think using your hands works best. Press 2 c of the mixture into the bottom of the pan. Spoon on the jam (if it is cold, nuke it to soften it up a bit) and spread to within 1/4" of the edge. Lightly press the remaining crust mixture over the top of the jam. Bake for 35-40 min til lightly browned. Cool completely before cutting.

Monday, October 18, 2010

Project # 12: Monster Stocking

I came across this monster stocking idea on CraftyRobot ages and ages ago. I thought they were so super cute but I definately do not have $50+ to plunk down on a little thing like a Christmas stocking. I did have plenty of leftover fabric from the Monster pillow I made for Blockette back in February though.

If you can believe it, I started this project back in Feb. I ran into problem after problem. When I craft, and have a difficulty, I set it aside until I can work through in my brain how I can fix it without scrapping the whole project. There was a whole lot of that with this bugger. It's finally finished though. (Can I get a woot woot?)

Did it turn out how I wanted it to? Well, no, but it is, as my mom would say, "Close enough for government work." It's funny, because the other day, when I was complaining that I didn't think the Red Skully Shirt was going to turn out, my best friend said something like, "I've never seen you churn out something that didn't turn out looking great." My reply to that was, "Well I don't ever show anyone the stuff that doesn't turn out."

Along those lines, no one saw when I had to rip the same section out 4 times because I repeatedly sewed it in backwards. Yes. Four times. And I used pins. I pinned the same section wrong 4 times. Maybe I should pin my hand to my forhead so I don't have to make an effort when I want to smack it. Grr. It's finished though and I can do the happy dance of joy.I do have one final dilema with this stocking. How should I label it? I mean Santa's gotta know somehow that this is my stocking. Should I put my first name? Mom? Mommy? Mommy Monster? Crazy Lady? Any suggestions would be appreciated! Leave a comment and let me know what you think.

Thursday, October 14, 2010

Thankful Thursday 32

1. Blockette scoring her first goal at soccer.
2. A nice visit with my mom.
3. Going out to eat with my husband.
4. Good news about someone I'd been praying for.
5. My husband noticing my attempts to be more positive.
6. Being able to help out at Blockette's school.
7. My mom did not get a speeding ticket.
8. Finding time to get some crafting done.
9. Magic Tree House books
10. The weather is finally fall like again.

Wednesday, October 13, 2010

Project #11: Red Skully Shirt

I got this book Sew Clothes Kids Love for my birthday this year. It's got all sorts of cute clothes patterns in it. As soon as I saw it I knew I wanted to make the Imke Shirt for Blockette. I finally got around to finishing it up yesterday. It didn't turn out exactly as I wanted it to because I couldn't remember how to do this one stitch on my serger. So the seams are showing on the shirt hems. I think it works with the design and makes the sleeves look a bit more flared. Blockette absolutely loves it. When I showed it to her she exclaimed, "Everyone in my class is going to be soooo jealous!" I'm going to cling to that appreciation. All too soon she is going to turn her nose up at the homemade stuff. Hopefully I have a few years left! Apparently the kids in her class aren't the only ones who are jealous. Mrblocko saw her in it and said, "That looks cool. I'd wear something like that." I told him the pattern only went to a girls size 12, so he was outta luck. Then he went and cried in his Cheerieos.

Tuesday, October 12, 2010

Grilled Soy Mustard Chicken

I found this recipe for Soy and mustard grilled chicken on Crepes of Wrath. I don't know what happened. Usually, everything I try from this Blog turns out wonderful. The dijon, hoisin and soy sauce just weren't jiving for me.

It could be because Mrblocko flubbed on the cooking time and the meat got dried out. We ended up dipping the chicken in BBQ sauce. That seems like such a waste. We might as well have just put BBQ sauce on them in the first place. I'm just gonna chalk it up to "Ya can't win 'em all."

Don't get me wrong...this wasn't bad, it just wasn't gooood. We ate all of it after all. If it was completely gross we would have whipped out a box of mac n cheese. I think we've had so many good grilled dinners that we've gotten a bit spoiled when something doesn't turn out fantabulous.

Grilled Soy and Dijon Mustard Chicken from Crepes of Wrath
2 chicken breasts, pounded to an even thickness
3 cloves of garlic, minced
2 tablespoons light soy sauce
2 tablespoons dijon mustard
2 tablespoons hoisin sauce
2 teaspoons white granulated sugar
juice of 1 lime

 Combine all of the marinade ingredients in a small bowl. Whisk well to combine. Place chicken in a large bag and pour marinade in. Seal well and shake around a bit to coat  chicken. Place in fridge for as little as 30 min or as long as 12 hours. When ready to eat, take chicken out of bag and discard  marinade. Grill over med-high heat for 5-6 min on each side, til juices run clear and chicken is cooked through.

Monday, October 11, 2010

Flat Bread

Oct 3 was World Communion Sunday. Yeah that's how behind I am at posting things. I do get around to posting everything I make...eventually. Anyhow...so World Communion Sunday. It was my turn to set up communion at church. This involves buying bread and juice, cutting up said bread, and pouring the juice in those tiny little cups. Which, by the way, is kind of fun. There is a special plunger funnel thingie and it takes about 3 seconds to fill up each mini cup. OK so I don't get out much if I think that is fun.

ANYHOW... I'm so off topic today. For World Communion Sunday our church cuts up different types of bread to represent the variety of people that are all participating in Communion at the same time. I was also asked to bring some extra loaves of different colors to decorate the table.

So I had my 3 regular loaves of bread, Pumpernickel, wheat and white, and 3 different colored round loaves. I was feelin' like I had accomplished something. Then it hit me, I had the bread for the congregation to eat, the decorative bread for the table, but I had completely forgotten to get bread for the Pastor to break during the service. Sure he could tear into one of the decorative loaves, but our church has 2 services. Having broken bread on the table sort of defeats the purpose of having it as decoration.

I started thinking about it and wondered if I couldn't just make something. My bread skills are still quite mediocre. I can make quick bread and crusty bread. Neither of these breads would be good for what I needed. The quick bread is very crumbly and would make a huge mess when torn in half. The crusty bread, well, the crust is hard and when broken would also make a big crumbly mess on the floor too.

Then I started thinking about unleavened breads. This was a global theme right? Almost every culture has their own version of flat bread, so why not make that. It seemed like it would be easy enough to make. After all, there was no yeast to have to fight with. I did a search and settled on Rosemary Flat bread from Bread and Beta.

What I didn't realize, until I was in the middle of combining the ingredients, was that this was a crispy flat bread. Doh! So I improvised as best as I could. I made 3 breads instead of 4. Then I rolled the dough out thicker than suggested. I also undercooked them. As soon as they began to turn light brown on the bubbles I took them out of the oven. Then I stored them in a container with a few slices of white bread. All this helped out quite a bit. When the bread was broken, if you were paying close attention, you could hear a slight snap, but there was no crumblage. Whew!I also, as you can see from the above photo, omitted the salt, paprika and rosemary that were supposed to be pressed into the rolled out dough before baking. In the interest of not making a mess, I thought it would be best to leave them out. I could just see salt and rosemary falling all over the place when the Pastor picked up the bread.

Because I'm Presbyterian, it's OK for us to do "whatever" with communion bread left over from the service. I'm sure Catholics are horrified to learn that I ate the bread for lunch for the next few days. It was delicious! I'll definitely make it again, although, not for communion. I'll follow the directions and make it very crispy and thin. Oh, and add the spices to the dough before cooking.

As a side note, I don't think I will ever forget making this bread. I got a nice souvenir in the process.Now in addition to the Harry Potter "scar" birthmark smack dab in the middle of my forehead, I've got a crescent moon shaped scar on my arm. Hey, the baby from the movie Willow had a scar on her arm. Maybe this means I'm destined to over throw an evil magician/wizard/queen? Hmmm... or maybe it just means I'm clumsy.

Paprika-Rosemary Flatbread from Bread and Beta Makes 4
1 3/4 c. flour
1 Tbsp. fresh Rosemary, finely chopped (yields approx. 1 tsp.),
1/4 tsp. Paprika
3/4 tsp. salt
1/2 c. water
1/3 c. olive oil

Preheat oven to 450 F with heavy baking sheet on middle rack. Combine flour, rosemary, paprika and salt in a bowl.3. Form well in center of ingredients and add water and oil. Stir to combine and form dough. Knead on floured surface for a minute. Divide dough into 4 balls. Put 3 aside and cover in saran wrap. On piece of parchment paper, or non stick liner, roll out 1 ball. It should be quite thin, and luckily, the shape does not matter. Roll out the flatbread. Rub additional olive oil over bread. Sprinkle sea salt, fresh rosemary sprigs and paprika over dough. Slide parchment paper and dough onto cookie sheet to bake. Bake 8-10 min til crispy and golden. Cool on wire rack, discarding parchment paper.Repeat steps 7-10 with remaining balls of dough. These can be made ahead of time and stored in an airtight container for several days, if you can keep away from them for that long.

Thursday, October 7, 2010

Thankful Thursday 31

1. Mrblocko passed one of his tests for his job even though he studied for the wrong one.
2. My mom is coming to visit!
3. I made it through a crazy jam packed weekend
4. Fuzzy blankets
5. That insanely low electric bill this month!
6. My best friend's gram passed away peacefully
7. My kitchen experiments turned out ok
8. Sleeping the whole night in bed without a sneezing fit.
9. S'mores
10. The Superman prayer
11. Finding the perfect door stopper to cover the hole in the wall that the door knob made in the bathroom.
12. Fixing the towel rack in the bathroom that fell off the wall every time I used my towel.
13. Remembering I have a craft project in the works that just might be long enough (if I ever finish it) to cover most of the hole in the wall made from replacing the dryer vent.
14. The Poem book Blockette is composing
15. Naps
16. The hawk Blockette and I saw drinking water in a large puddle in the street on a walk one afternoon. (Never seen a hawk that close up before!)
17. Blockette has gone almost a whole month without biting her fingernails
18. 2 paychecks in one month!

Wednesday, October 6, 2010

Eggless Mug-o-brownie

The other evening, after Blockette had gone to bed, I had a taste for something sweet. I didn't want a whole mess of dessert to tempt me throughout the rest of the week though. I went on the quest to find some small, quick tasty treat. The Microwave mug brownie from Tasty Kitchen fit the bill perfectly.

This recipe makes a small amount, uses pantry staple ingredients, and takes less than 5 minutes to put together. If you have a large enough mug, you can even mix your ingredients in the same container you'll bake it in.

"Who ate all my brownie?" or "I'd better take a picture quick before my brownie is all gone".

I used dutch process cocoa because it was the first thing I saw in the pantry. You can use regular cocoa if you aren't a fan of that deep dark chocolatey taste. Mrblocko and I thought this dessert was quite rich. That was most likely due to the dutch processed cocoa. Because of the richness, we thought this recipe made the perfect amount for two people.

Some people commented on the Tasty Kitchen website that they thought the brownie needed more sugar. If you're used to milk chocolate vs. dark chocolate, go ahead and add some more sugar. Or, you could just add a big old scoop of vanilla ice cream. That would be even better. Go ahead and add that scoop of ice cream anyhow. I would have, but we didn't have any in the freezer. Hey, if we had ice cream in the freezer I wouldn't have even gone looking for this recipe. I would have just had a bowl of ice cream, and gone about my life completely oblivious to this scrumptious, speedy dessert.

This recipe yields a very cakey type of brownie. I microwaved mine for 30 seconds and it still was not cooked. I tossed it in for another 30 seconds and I think that may have been for a tad too long. I think this dessert would be best if it was slightly undercooked.

I just had to test that theory out. I nuked the brownie batter for 45 seconds and it was even better. Nice and gooey on the bottom, like a lava cake. NUM!

Another great thing about this recipe is that it contains no eggs, milk or butter. There's nothing to worry about if you wanted to mix the ingredients up in a mug and take that mug with you to work. That concoction could sit on your desk until the chocolatey mood hit you. Plus, if you are wonky about eatting raw eggs (like me) you can lick the bowl all you like.

(To those of you who gotta hate on me with my salmonilla-laden egg fears, all I have to say is at least I don't have hippopotomonstrosesquipedaliophobia. That would be horribly ironic.

Microwave Mug Brownie from Tasty Kitchen
4 Tablespoons Flour
4 Tablespoons Sugar
2 Tablespoons Cocoa
2 Tablespoons Vegetable Oil
3 Tablespoons Water

In a small bowl, whisk together dry ingredients until the cocoa clumps are gone; you can use your hands! Stir in the oil and water. Scrape into a mug with a spatula. Microwave for 1-2 minutes, but check on it once in a while. (Nuke mine for 45 sec.)

Tuesday, October 5, 2010

White Chocolate Gingerbread Bars

I've been bad at taking pictures of the things I've made recently. Then when I do take pictures, the pictures are bad. Which is worse, a blog with no pictures, or a blog with bad pictures? I don't know, neither one is going to increase traffic to your site. I'll never have a bazillion followers like some blogs. I was pretty jazzed when I saw I was up to 10! That's a pretty big deal to me.Anyhow, this picture of White chocolate gingerbread bars from Crepes of Wrath does not do this dessert justice. I brought a pan of these to my husband's family reunion and they seemed like a big hit. With the huge spread of various sweet things, I felt pretty cool that I brought home an empty pan.

There was one part of the recipe directions that I thought was weird. Before sticking the bars in the oven, 2 T, each of flour and sugar get sprinkled on the top. I understood about the sugar, but I couldn't figure out what the flour added to the bars. That 2 T of flour seemed like an aweful lot. No one seemed to have any qualms about the flour on the top. I don't think anyone could even tell. All the white chocolate drizzeled over the top hid any sugar or flour weirdness.

After I made a squiggly white chocolate lattice over the cooked and cooled bars, I had what I thought was a brilliant idea. When you go to cut the bars, don't wait until the white chocolate has set completely. If you wait until the chocolate has fully hardened, the chocolate will flake off of the bars as you cut through it. I waited until the chocolate had just barely begun to set, then I zipped through the whole thing with a pizza cutter. Some of the chocolate got smeared on the pizza cutter wheel, but I just cleaned the wheel off after a few passes through the bars.

I liked these bars, but I don't know if they were my favorite. I asked Mrblocko if he thought I should make them again and he said, "You better." I also asked him if he thought I should omit the flour step. His reply was, "No, don't change anything. They are awesome the way they are." Personally, I think I'll enjoy them more in the winter with a mug of ginger tea.

White Chocolate Gingerbread Bars from Crepes of Wrath
2 cups all-purpose flour (reserve 2 tablespoons)
2 teaspoons ground ginger
1 teaspoon cinnamon
1/4 teaspoon nutmeg
1/4 teaspoon ground cloves
1/2 teaspoon baking soda
1/2 teaspoon salt
1/2 cup + 2 tablespoons (10 tablespoons) unsalted butter, softened
3/4 cup packed brown sugar
1/2 cup granulated sugar (reserve 2 tablespoons)
2 large eggs
1 teaspoon vanilla extract
1/4 cup molasses
1 cup white chocolate chips (optional, but highly recommended)
1/2 cup white chocolate chips, melted (for drizzling)

Preheat oven to 350 degrees. Line a 9×13-inch pan with foil, then spray it with nonstick cooking spray. Set aside. Add the flour in a medium bowl. Reserve 2 TABLESPOONS OF FLOUR and place in separate bowl to reserve for then topping. In the non-reserved flour, add in the ground ginger, ground cinnamon, ground nutmeg, ground cloves, baking soda, and salt, then set aside. In large mixing bowl, cream together the butter, brown sugar, and 6 TABLESPOONS of granulated sugar. Add in the eggs one at a time, beating just to combine after each addition. Mix in the vanilla and molasses (if it looks strange, it’s okay, don’t worry!). Add in the flour and spices mixture and gradually combine. Stir in white chocolate chips by hand, if you’re using them. Press the batter into your prepared pan. I used clean hands because the batter is pretty thick. Sprinkle the top with reserved flour, then sprinkle the remaining 2 tablespoons granulated sugar over that (I used 1 tablespoon of granulated sugar and 1 tablespoon of turbinado sugar). Place into oven and bake until bars are golden brown and a toothpick comes out mostly clean with a few crumbs attached, about 20-25 minutes. Remove and place pan on wire wrack to cool completely before cutting. When the bars are mostly cooled, melt the 1/2 cup of white chocolate chips and drizzle over the bars either with a spoon or a plastic bag with the tip cut off. When the bars have cooled completely, cut into bars

Monday, October 4, 2010

Garlic Pork Fried Rice

Fried rice is one of my favorite dishes to get from a Chinese take out place. I could eat that as a meal on its own. I have done just that on many occasions. Why not? It's got protein, veggies and a starch. Sounds like a meal to me.

So when I saw the recipe for garlic fried rice on Tasty Kitchen you know I went gaga for it. I've tried making my own fried rice before and the results were just meh. This was probably because I used one of those little instant fried rice seasoning packets from the store. This recipe is so much better, and dare I say better than the take out version too.You know I made changes to the recipe, cause that's how I roll. First, I reduced the amount of butter from 1 1/2 T to soak the garlic, and down to 3T of butter to saute the veggies. I still thought the dish was a bit too buttery for our tastes. The next time I make this I'll knock the amounts of butter down to 1 T and 2 T.

After starting this recipe I realized that I had used up the rest of the juice in the little plastic lemon. When did that happen? I had one of those, "now what am I gonna use" moments. I had just made a pitcher of orange-strawberry-banana juice. Well, that's sorta citrus-y so why not use that? The recipe ONLY calls for a teaspoon of juice. You couldn't even taste the juice. I think with the reduction in butter, I'll add a whole Tablespoon of juice next time.

I had two leftover thin pork chops that needed to be used, I cut up both of them. After the pork chops were, well, chopped, they equaled a slightly heaping cup. The recipe calls for 1/2 cup. I think 1/2 cup would be a bit scant on the meat for us. 1 to 1 1/2 cups of meat is more accurate for meat-a-tarians like us.

One cup of veggies seemed a bit scant as well. I used a half cup each of corn, carrots, green beans and peas. I think this dish could handle even more veggies.

I wish that I had green onions to add to the mix. The recipe calls for green onions, but I didn't have any. I used extra white onion to make up for the lack of green onion. Next time I'll make sure I have the green onion. While it was delicious without, fried rice seems weird without green onions in it.

Next time, I would also add some freshly grated ginger and a pinch of red pepper flakes for a bit of zing, spice and heat. Mrblocko agreed these would be tasty additions. I think I'll also add an extra egg as the eggie bits are Blockette's favorite part of the stir fry.

Garlic Fried Rice from Tasty Kitchen
6 Tablespoons Butter, Divided Use
6 cloves Garlic, Minced
1 teaspoon Lemon Juice
1 whole Medium Onion, Finely Chopped
1 cup Frozen Peas And Carrots
½ cups Diced Ham Or Cooked Chicken
3 whole Eggs Beaten
3 cups Cooked Rice, Chilled
2 Tablespoons Soy Sauce Or More To Taste
2 whole Scallions, Chopped
Salt And Pepper, to taste

Melt 2 tablespoons of butter in a small glass dish in the microwave. Add the minced garlic and lemon juice to the melted butter and stir to combine. Set aside to allow the flavors to mingle.

This dish comes together so fast that EVERYTHING needs to be chopped, measured, and ready to add. Chop the onions and scallions, then measure out the peas/carrots, ham, rice, and soy sauce. Finally, you should beat the eggs in a small bowl.

In a large, non-stick skillet, melt the remaining 4 tablespoons of butter over medium heat. Add the onions and sauté until soft, about 4 to 5 minutes. Add the peas and carrots and cook for about 3 minutes. Then add the diced ham or chicken. Cook for 1 minute. Push all of the contents of the skillet to one side to keep them from cooking too much. On the empty side of the skillet, add the beaten eggs. Season with a little salt and pepper and scramble until just set. Integrate the eggs with the veggies and move everything back to the edge of the skillet.

Quickly add the garlic mixture to the pan and use a spatula to break it up. Cook it for about 1 minute or so (longer if you do not want an intense, in-your-face garlic bite). If you are worried about the strong flavor of garlic, you can add the same amount of garlic but add it with the peas and carrots. This will give the garlic ample time to mellow and sweeten by the name everything is cooked.

Add the cold, cooked rice and mix it in with the other ingredients. Add the soy sauce and stir to combine. Stir it every 30 seconds for about 2 minutes. Add the scallions and stir. Taste for seasoning and add salt, pepper, and/or additional soy sauce, if desired. Stir one last time and transfer everything to a serving bowl.